Two Main Reasons Cause the Data Loss?

1. Logical Damage
Logical damage is primarily caused by power outages that prevent file system structures from being completely written to the storage medium, but problems with hardware (especially RAID controllers) and drivers, as well as system crashes, can have the same effect. The result is that the file system is left in an inconsistent state. This can cause a variety of problems, such as strange behavior (e.g., infinitely recursion directories, drives reporting negative amounts of free space), system crashes, or an actual loss of data. Various programs exist to correct these inconsistencies, and most operating systems come with at least a rudimentary repair tool for their native file systems. Third-party utilities are also available, and some can produce superior results by recovering data even when the disk can’t be recognized by the operating system’s repair utility.

Two main techniques are used by these repair programs.
The first, consistency checking, involves scanning the logical structure of the disk and checking to make sure that it is consistent with its specification. For instance, in most file systems, a directory must have at least two entries: a dot (.) entry that points to itself, and a dot-dot (..) entry that points to its parent. A file system repair program can read each directory and make sure that these entries exist and point to the correct directories. If they do not, an error message can be printed and the problem corrected. If the file system is sufficiently damaged, the consistency check can fail completely. In this case, the repair program may crash trying to deal with the mangled input, or it may not recognize the drive as having a valid file system at all.

The second technique for file system repair is to assume very little about the state of the file system to be analyzed and to, using any hints that any undamaged file system structures might provide, rebuild the file system from scratch. This strategy involves scanning the entire drive and making note of all file system structures and possible file boundaries, then trying to match what was located to the specifications of a working file system. However, recover data even when the logical structures are almost completely destroyed. This technique generally does not repair the underlying file system, but merely allows for data to be extracted from it to another storage device.

2. Physical Damage
A wide variety of failures can cause physical damage to storage media. Hard disks may suffer any of several mechanical failures, such as head crashes and failed motors. Physical damage always causes at least some data loss, and in many cases the logical structures of the file system are damaged as well. This causes logical damage that must be dealt with before any files can be recovered.

Most physical damage cannot be repaired by end users. For example, opening a hard disk in a normal environment can cause dust to settle on the surface, causing further damage to the platters. Furthermore, end users generally do not have the hardware or technical expertise required to make these sorts of repairs; therefore, data recovery companies are consulted. These firms use Class 100 clean room facilities to protect the media while repairs are made, and tools such as magnetometers to manually read the bits off failed magnetic media. The extracted raw bits can be used to reconstruct a disk image, which can then be mounted to have its logical damage repaired. Once that is complete, the files can be extracted from the image.

Read More

How does HDD store data?

How does HDD store data?Hard disk drives store data on one or more metal oxide platters. These platters spin at a rate of 3600-10,000 revolutions/minute, hold magnetic charges. A read-write head attached to an actuator arm actually floats on a cushion of air, 1-2 micro-inches (one millionth of an inch) above the surface of the platters. Data flows to and from these heads via electrical connections. Any force alters this process may cause data loss.

Ten years ago hard drives stored 40 Megabytes (MB) of data. Today’s hard drives store data up to 2000 gigabytes (GB) on a smaller surface. Increasing storage capacities amplify the impact of data loss. As more and more data is stored in smaller and denser areas, mechanical precision becomes crucial.

As a part of this advancing technology, the drive tolerance (distance between the read/write head and the platter where data is stored) is steadily decreasing. A slight nudge, an unstable power surge or a dust introduced into the drive may cause the head to touch the platter, resulting in a head crash, PCB burnt, bad sectors, etc. In some situations, the data residing in the area touched by the head may be permanently destroyed.

The current tolerance drives is 1-2 micro-inches (millionths of an inch). Comparatively, a speck of dust is 4-8 micro-inches and human hair 10 micro-inches. These sizes contaminants can cause serious data damage.

Read More

PC-3000 for SCSI

PC-3000 for SCSIPC-3000 for SCSI is a first-to-market professional hardware-software solution for testing, diagnosing the failures and recovering data from Hard Disk Drives with SCSI and SAS interfaces in tandem with Data Extractor SCSI.

  • SAS (Serial Attached SCSI) are supported.
  • SCSI-2, Ultra SCSI, Ultra2 SCSI, Ultra 160 SCSI, Ultra 320 SCSI is supported.
  • Original user-friendly interface similar to that one of PC-3000 for Windows.
  • PC-3000 for SCSI can work with 1 up to 15 Hard Disk Drives simultaneously; make tests and service operations for each of them and independently from all the other drives.
  • New PC-KEY2 (Power supplier) card can control power supply of one HDD.
  • Three external power sources of ATX standard, you can connect several HDDs to each of them. DBMS for resource storage – one of the most safe database of all existing ones.
  • PC-3000 for SCSI hardware-software product can function under these Operating systems: Microsoft Windows 98/ME, Windows 2000, Windows XP. Requirements to your PC hardware are determined by the requirements to the OS. SCSI adapter must be installed.
  • Know-how manuals with different methodologies of data recovery, recommendations on interchangeability of PCBs, succession of making hot-swap.

More about PC-3000 please refer to this post: Hard Drive Repair Tool PC3000 System

Read More

How to Install a SCSI Hard Drive?

How to Install a SCSI Hard Drive?Setting the Jumpers (see drive label for locations)

1. SCSI ID – 0 thru 15 for Wide devices. Each device must have a unique SCSI ID.
2. SE I/O – No jumper so the device can multimode (default).
3. Motor Start – Disable motor start (default).
4. Delay Motor Start – Disable Delay motor start (default).
5. Write Protect – Write Protect Off (default).
6. Parity Check – Enable Parity check (default).
7. Terminator Power – Host adapter or other device provides term power (default).

Set the SCSI ID
Each SCSI device must have a unique SCSI ID. Most SCSI drives come with no jumpers on SCSI ID (SCSI ID = 0). The SCSI host adapter usually uses SCSI ID = 7. If you are installing a drive model ending in LC (uses 80-pin SCA connector), the host normally sets the ID over the I/O interface.

Configure Termination
Only the devices at each physical end of a SCSI bus need to be terminated. The SCSI host adapter normally will provide termination for the controller end, therefore only terminate the last drive on the end of the cable. LVD drives do not have any provision for onboard termination; therefore, termination for LVD drives must come from another device or from an external terminator. Use only active SE or LVD terminators.

Configure Terminator Power
Active terminators must receive power from some source. The default configuration results in the drive not supplying termination power to the bus. Usually, the host adapter provides term power. Check the user’s manual for your host adapter. Drive models ending in LC cannot be configured to provide termination power to the bus.

1. Attach one end of the interface cable to the connector on the host adapter.
2. Attach the interface connector and a power connector to the drive.
3. Secure the drive using four 6-32 UNC mounting screws. DO NOT over-tighten the screws.

Troubleshooting
1. If the drive does not spin up, check that the power connector and the interface cable are securely attached.
2. If the drive spins, but there is no LED on/off activity, check the SCSI ID setting. Set the ID so that each device on the SCSI chain has a unique ID.
3. If the computer does not seem to recognize the drive, verify the drive is enabled by the SCSI host adapter setup utility.
4. If FDISK does not detect the drive, run the FDISK program with FDISK /STATUS to verify the drive is present

Read More

SCSI Hard Drive Failures

SCSI Hard Drive FailuresSCSI stands for Small Computer System Interface. It is the second-most popular hard disk interface used in PCs today. Many companies use SCSI hard drives because the interface allows for much faster data transfer speeds. One of the main differences with a SCSI hard drive and an ATA hard drive is a SCSI disk must have an independent controller for it to communicate with the operating system.

Although SCSI controller has many benefits, it still adds another layer, another chance for failure and data loss. Unlike the IDE counterparts, SCSI disks operate through their own SCSI BIOS. When the computer is powered up, the SCSI BIOS sends a “Start Unit Request” command to the SCSI devices under its control. If the drive fails to start correctly, the SCSI drive will (often) power down and the error “Start Unit Request Failed” is displayed.

Which caused the SCSI drive failure?
Power down / power up
: SCSI drives are often found in machines that “never” switch off. When eventually these machines are powered down, getting the SCSI drives to restart can often be difficult

Electronic Failure: Failure of the electronic circuitry on the hard disk will prevent the drive from starting, fortunately drives with this type of failure are often recoverable

Mechanical Failure: Often characterized by a clucking sound or high pitched whine, SCSI hard disk mechanical failures are often the worst type of failure these drives can suffer. The noises, though not always apparent, are indicative of an internal mechanical failure or head crash.

All the usual failures that can be found on hard disk drives e.g. bad sectors, logical corruption etc.

Read More

Symptoms of HDD PCB Failure & HDD Firmware Corrupted

Most people can’t distinguish the HDD problems cause by HDD PCB failure and HDD firmware corrupted. Now we offer some advice as below, please refer:

HDD PCB Failure Symptoms:

When a hard drive fails due to PCB failure, the drive usually cannot boot up or there may be an inaccurate display in the BIOS of the hard drive’s information. Also power may not get to the hard drive and as a result it will not spin up.

HDD Firmware Corrupted Symptoms:

  • The drive will power up normally (no ticking noises, errors etc) but will not be recognized by the computer.
  • The drive will power up normally and be recognized correctly but will report a size of 0 bytes
  • The drive will power up but report SMART errors on boot

Article by Hard Drive PCB Sales: HDDZone.com

Read More

New Hard Drive not detected by System

Question: If you installed a new disk but the system can’t see it.

Ten steps to solive Hard drive not detected or recognized by system.

Step One
The easiest thing to check: did you attach a data cable to an appropriate port on the motherboard and a power cable to the power supply? The power cable is sometimes forgotten.

Step Two
Just where exactly is the system not seeing it? In the OS, in the BIOS, or “What is BIOS?”

  • If “What is BIOS,” go to step three
  • If “It’s not seen in the BIOS,” go to step four
  • If “It’s seen in BIOS but not in the OS”, go to step five

Step Three
You asked, “What is BIOS?” When you first apply power to the system, or boot, it starts running a tiny little program called BIOS (it’s an acronym, do you really care what for?) that resides on the motherboard. You will start seeing text messages, and one of the earliest will say “Press <someKey> for Setup.” <someKey> may be Esc, Del, F10, or something else; don’t ask me why it wasn’t standardized.

Anyway, press that key. The startup will continue for a while, and then it will send you to a really primitive-looking setup screen that depends on what your motherboard is, so I can’t give you an exact example here. Look in your Motherboard manual. Somewhere in it, you will find a list of hard drives. On my Asus P5P55D Delux, it looks like this:

New Hard Drive not detected by System

If you don’t know which of them is which of your drives, just count them. Are there enough to account for the new drive (if you had one before, do you see two now)?

If “It’s seen in the BIOS,” go to step five. Else, go to step four.

Step Four
“I don’t see it in the BIOS.” Well, that’s nasty. Some, very few, BIOSes require that the drive controller be enabled, or even the particular port be enabled. Look through your BIOS or your manual to see if this is the case. Dell systems are particularly obnoxious this way.

If you can’t get the BIOS to recognize it, exit this checklist and post a question, giving such information as your therboard make and model, disk make and model, and the fact that it is not detected in BIOS. Sorry.

If you do get the BIOS to recognize it, go to step five.

Step Five
“It’s seen in the BIOS.” But your OS does not see it. You do have an already running OS, don’t you? If not, well, I haven’t written that part yet.

Brand-new drives need to be partitioned and the partitions formatted. If you know how to do this, skip to step six. Otherwise, read on.

Log in to your Windows OS (yes, I’m only covering Windows) with an account with Administrator privileges and open the Control Panel. Select Administrative Tools, and from there select Computer Management. In the new window that opens up, navigate down the tree on the left to Disk Management. It should look something like this:

New Hard Drive not detected by System

See how on the bottom panel on the right there is one “stripe” for each of the hard (or solid-state) drives? Well, let’s look for your new one there. If you can’t figure out which is the new one, shut down the machine, take out the new drive, start up the machine, and open Disk Management again. Print out a copy of it. Then put the new drive back in (please, shut down first!) and re-open Disk Management. It’s the stripe that wasn’t there before.

If the new drive is not seen at all, you have a different problem. Please skip to step ten.
What you will probably see is your new drive represented as a single block of unallocated space. If not, it’s time once again to leave me and ask for more specific help. If that is what you see, because it is a brand-new disk it has to be partitioned and formatted, as I mentioned above. Here’s how you create one big partition so that all of the space on the drive shows up in one new drive letter in Windows Explorer.

** If you do these operations on the wrong disk you can erase all of the data on it. Be sure that you either have backups or have the identified the right disk. Or both. **

Right-click anywhere in the big block or Unallocated Space that represents your drive. Choose the action New Partition (or New Simple Volume in Windows 7). You want to create a Primary partition (or Simple Volume) that takes up the full amount of available space. If you are going through the Partition Wizard, at this point you will also choose to format the partition as NTFS, with the Default “Allocation Unit Size” and a Label like “New Big Disk.” Choose Quick Format if that choice is offered.

When it is through working (2 minutes to 2 hours), if you look in Windows Explorer you will now have a nice new drive letter with all of your new space. Enjoy! You are done. Leave this checklist.

Step Six
OK, you could skip all the detailed instructions on partitioning and formatting. One of two things happened. If you succeeded, you are done with this checklist. If, on the other hand, the Disk Manager did not show the new, unpartitioned drive, you have to go to the dreaded Step Ten.

Step Seven
There is no step seven. Or eight or nine, for that matter. I just used ten earlier to make sure that I had enough room.

Step Ten
On some motherboards, there is more than one controller. Some SATA ports are controlled by the Southbridge, and disks attached to them should always show up in Disk Management. There may be more that are controlled by an additional controller chip on the motherboard. As of January of 2011, that includes any SATA 3 ports.

Before the OS can see a drive attached to these ports, you have to load the driver for the controller chip. It was on the CD that came with the motherboard, or you can read your motherboard manual to find out what the controller chip is and download the most current version for whatever OS version you are using. Install that driver and reboot, and the drive will magically appear in the Disk Management pane (once you re-open that pane). You can go back to step five.

Note: This quick guide applies to internal hard drives added to an already bootable system only.

Read More

Useful Solid State Drive Articles

Useful Solid State Drive ArticlesSolid State Drive Buyer’s Guide
Should you consider upgrading to a solid state drive? Weigh all the pros and cons and evaluate the cost and value of doing so by reading this guide.

The Ins And Outs Of Solid State Storage
The benefits introduced by solid state drives are undeniable. However, there are a few pitfalls to consider when switching to this latest storage technology. This article provides a rundown for beginners and decision makers.

17 SSDs Rounded Up
Which SSD should you buy today? Seventeen flash-based drives battle across a benchmark suite that include throughput, I/O performance, consistency, power consumption, efficiency, and the best overall bang for the buck. The time is right to upgrade.

A look at the NAND itself. How an SSD works at the lowest levels:

http://www.lostcircuits.com/mambo/ […] 9&Itemid=1
http://www.ocztechnologyforum.com/ […] hp?t=65372

Write caching, wear levelling and the importance of partition alignment:

http://www.lostcircuits.com/mambo/ […] 2&Itemid=1

A broad overview of everything SSD (including TRIM):

http://www.anandtech.com/storage/showdoc.aspx?i=3531
http://anandtech.com/storage/showdoc.aspx?i=3631 (A follow-up of the previous Anandtech article. Touches on a few more details, but it’s more of a review of OCZ drives than a good overview of SSDs. Worth reading if your SSD has an Indillinx controller.)

More links will be added here when I find them or when somebody else points me to them.

Read More

Hard Drive PCB Parts

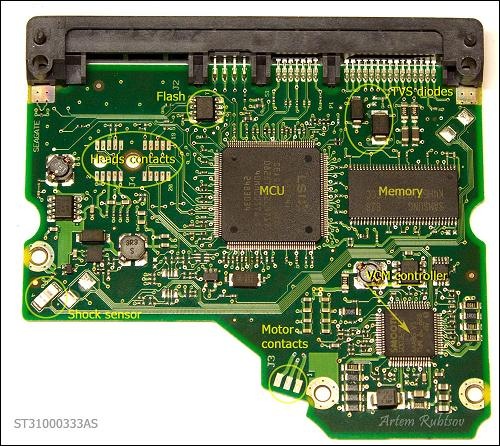
Hard Drive PCB PartsThe goal of this post is to show you how a hard drive Printed Circuit Board(PCB) built. What are its main parts, how do they look and what are these parts names and abbreviations. As an example we are going to disassemble 3.5″ SATA drive.

To make it more fun we going to tear to pieces pretty new 1TB Seagate ST31000333AS hard drive. Let’s take a look on our “Guinea pig”.

Hard Drive PCB Main Parts:

The fancy piece of green woven glass and copper with SATA and power connectors called Printed Circuit Board(PCB). PCB holds on place and wires electronic components of HDD.

Now let’s remove PCB and see electronic components on the other side.

hard-drive-pcb

Hard Drive PCB Parts:

The heart of PCB is the biggest chip in the middle called Micro Controller Unit(MCU). On modern HDDs MCU usually consists of Central Processor Unit or CPU which makes all calculations and Read/Write channel – special unit which converts analog signals from heads into digital information during read process and encodes digital information into analog signals when drive needs to write. MCU also has IO ports to control everything on PCB and transmit data through SATA interface.

The Memory chip is DDR SDRAM memory type chip. Size of the memory defines size of the cache of HDD. This PCB has Samsung 32MB DDR memory chip which theoretically means HDD has 32MB cache (and you can find such information in data sheet on this HDD) but it’s not quite true. Because memory logically divided on buffer or cache memory and firmware memory. CPU eats some memory to store some firmware modules and as far as we know only Hitachi/IBM drives show real cache size in data sheets for the other drives you can just guess how big is the real cache size.

Next chip is Voice Coil Motor controller(VCM controller). This fellow is the most power consumption chip on PCB. It controls spindle motor rotation and heads movements. The core of VCM controller can stand working temperature of 100C/212F.

Flash chip stores part of the drive’s firmware. When you apply power on a drive, MCU chip reads content of the flash chip into the memory and starts the code. Without such code drive wouldn’t even spin up. Sometimes there is no flash chip on PCB that means content of the flash located inside MCU.

Shock sensor can detect excessive shock applied on a drive and send signal to VCM controller. VCM controller immediately parks heads and sometimes spins down the drive. It theoretically should protect the driver from further damage but practically it doesn’t, so don’t drop you drive – it wouldn’t survive. On some drives shock sensors used for detection even light vibrations and signals from such sensors help VCM controller tune up heads movements. Such drives should have at least two shock sensors.

Another protection device called Transient Voltage Suppression diode(TVS diode). It protects PCB from power surges from external power supply. When TVS diode detects power surge it fries itself and creates short circuit between power connector and ground. There are two TVS diodes on this PCB for 5V and 12V protection.

Tips: Hard Drive Failures cased by PCB can be solved by replacing a new one. How to find a matching pcb please refer to: How to find a Matching PCB

Read More

How to break the 2.1TB Barrier With Barracuda XT Hard Drives

How to break the 2.1TB Barrier With Barracuda XT Hard DrivesUntil recently, using a hard drive larger than about 2.1TB has been difficult from a technical perspective. Back in the early 1980s when many of the fundamental hardware and software designs for computers were created, no one could fathom a hard drive approaching even 1TB, so limiting the logical block address (LBA) range to 2.1TB was thought to be more than adequate. As a result, operating systems, BIOS controllers, host interface drivers and device drivers have used the same basic limitation of 2.1TB.

Newer versions of Windows (Windows Vista and Windows 7), when combined with a new BIOS called UEFI and when configured correctly, have the native capability of using hard drives larger than 2.1TB. The problem, however, is that UEFI BIOS systems are less prevalent and more expensive than legacy PC BIOS systems. Also, Windows XP systems still represent a sizable portion of the installed base. So what do you do if you want to use one of the new
high-capacity hard drives coming to market that exceeds this 2.1TB limit?

Solution to break the 2.1TB Barrier With Barracuda XT Hard Drives:

Seagate has broken the 2.1TB barrier by developing a creative solution which allows you to utilize all of your hard drive capacity over two or more partitions when the drive is larger than 2.1TB. The new Seagate® Barracuda® XT 3TB hard drive has been released(See another post: https://www.datarecoveryunion.com/seagate-barracuda-xt-3tb-desktop-hard-drive/), and it includes free access to our updated Seagate DiscWizard™ software. This newest version of the popular hard drive utility from Seagate now includes functionality that allows you to easily configure a virtual device driver to access all of your hard drive capacity.1 It’s simple, fast and free.

Step 1. Locate the Software.
If you purchase a Seagate® retail kit, DiscWizard™ software will be included on the CD that is packaged inside. Otherwise, you are welcome to download DiscWizard software from the Seagate website. You can find it easily starting here: www.seagate.com/beyond-2TB

Step 2. Prepare Your System.
Time to open up the system, mount the drive and attach the SATA cable. It’s really quite simple to do. Tens of thousands of people add new hard drives every day! If you need a few pointers, please review some of the internal drive installation tutorials and flash presentations available online at www.seagate.com/support. Remember to handle your new drive with care.

Step 3. Install DiscWizard™ Software.
Restart your Windows system. After it finishes its normal preliminary startup routine, install the DiscWizard software application. You’ll see a new icon on your Desktop that looks like this:

DiscWizard

Step 4. Think About Your Plan, Start DiscWizard Software and Follow the Prompts.
Not everyone plans to use a drive the same way. You may be adding the new drive as secondary storage, or you may be migrating your old drive (Windows, applications, data, etc.) to your new drive. You may want to split the drive into drive letters. And on and on. DiscWizard software is a very versatile disk management utility—with easy-to-follow menu choices and questions; it will handle anything your system and OS will allow.

Step 5. A Few Words About Drives >2.1TB
As mentioned earlier, there are several capacity limitations that appear at 2.2TB. Any systems built before 2011 and using a drive greater than 2.1TB will need a device driver to access the terabytes above 2.1TB. DiscWizard software will automatically detect and offer to install the appropriate driver for your Windows OS and hardware (Windows 7, Visa or XP, 64- or 32-bit). The driver will mount the remainder capacity above 2.1TB as a new drive letter, usually D:. This new drive is also limited to a maximum of 2.1TB, so this will be repeated as necessary. A future 6.6TB drive will have three drive letters—C: managed by native Windows drivers; D: and E: drives managed by the DiscWizard driver.

The DiscWizard™ Extended Capacity Manager is intuitive and simple to use:

DiscWizard™ Extended Capacity Manager

Step 6. Enjoy Your New Seagate Drive and Keep DiscWizard Software Installed
DiscWizard software provides continuing value during the life of your drive. In addition, you can use the software to make image backups of your computer that may be useful if problems arise with your system or data.

Read More