Compact Flash FAQs

Compact Flash What is Compact Flash?

CompactFlash is the world’s smallest removable mass storage device. First introduced in 1994 by SanDisk Corporation, CF TM cards weigh a half ounce and are the size of a matchbook. They provide complete PCMCIA-ATA functionality and compatibility. Compact Flash is a small, removable mass storage commonly used in digital cameras.

Where will CompactFlash be used?
Several leading consumer electronics companies, including the CFA’s roster of founding members, are designing CF technology into next-generation products being developed for mass markets. The CFA expects CF technology will be widely used in such products as portable and desktop computers, digital cameras, handheld data collection scanners, cellular phones, PCS phones, PDAs, handy terminals, personal communicators, advanced two-way pagers, audio recorders, monitoring devices and set-top boxes. CF technology offers all of these applications new and expanded functionality while enabling smaller and lighter designs.

What is the difference between Type I and Type II?
Type I is 3.3mm thick, while Type II is 5mm thick. A CF Type II device will not fit in a Type I slot.

How do I format my Compact Flash drive?
Formatting a Compact Flash drive can be accomplished several ways. The most common method of formatting a Compact Flash drive is within the device in which the Compact Flash drive will be used. This will ensure a device compatible format and the best overall performance.

How do I interface the CF drive with my PC or Mac?
Compact Flash drives are connected to desktop/laptops computers through flash memory card readers. A typical card reader will contain multiple flash memory slots to accommodate the different types of memory. The card readers are most commonly attached to the computer via a USB or IEEE 1394 (FireWire) interface cable.

Do I need drivers for my OS?
Compact Flash drives do not require drivers. However, when the drive is attached through a card reader, the proper drivers for the card reader must be installed before the drive can be accessed.

Can I use this in my PDA? Does this drive require drivers?
The Compact Flash drive can be used in any PDA that will support Compact Flash Type II drives with high capacity. This is not a supported hardware environment.

While many PDA operating systems do not require drivers, some of the older operating systems, such as Windows CE, will require a driver before the drive can be accessed.

Can I install an OS onto this drive?
Depending on the operating system in use, it may be possible to install an OS onto the Compact Flash drive. Since this is not the intended purpose of the drive, the performance may be less than desired and no support will be provided.

What is the speed of my Compact Flash card?
Solid state CF memory cards are differentiated by a speed number:

Compact Flash Speeds
Speed
Kbytes/s
Mbytes/s
1
150
0.15
4
600
0.6
12
1800
1.8
24
3600
3.6
40
6000
6
60
9000
9
80
12000
12

What is the difference between FAT16 and FAT32, why do cards greater than 2GB require FAT32?
File Allocation Tables (FAT) are like a table of contents to your data. Prior to Windows 98, 16-bit FATs limited partitions to 2.1 Gbytes. The newer 32-bit FAT is capable of huge partitions up to two Tbytes (terabytes). Many digital cameras only support 16-bit FAT (FAT), newer cameras and high-end professional cameras usually support 32-bit FAT (FAT32). Check your camera’s manual or support information to determine if your camera supports FAT32 (memory larger than 2.1Gbytes).

Read More

Cables for Ultra ATA/66 to Ultra ATA/133 Hard Drives

This FAQ applies to all Seagate, Maxtor, Quantum ATA 66, ATA 100, and ATA 133 drives.

The faster timing requirements of Ultra ATA/66 and above require the use of an 80-conductor cable. This is necessary for proper operation of UDMA modes 3 and greater. The 80-conductor cable is used with the same connector configuration as the standard 40-conductor cable. The 40 additional conductors are used as ground paths and are all connected to the 7 original ground conductors. These additional ground conductors serve to improve the overall signal quality (signal-to-noise ratio) of the ATA cable. 80-conductor Ultra ATA cables are also limited to a maximum cable length of 18 inches.

If the drive was purchased in a retail kit and not as a “bare” drive, the kit includes an Ultra ATA cable as described here. If not Ultra ATA cables can be purchased from your system vendor or reseller and are fully backward compatible for operation on all standard/legacy ATA devices and hosts. However, these cables will typically utilize the cable select (CS) configuration on ATA drives for defining a master or slave device (drive 0 or drive 1). The drive placement convention used on an 80-conductor cable is also different from the previous generation of cable select type cables. The 80-conductor Ultra ATA cables require the master drive (drive 0) to be installed at the end of the cable and the slave drive (drive 1) to be installed on the middle connector.

The connectors on 80-conductor cables are also color-coded to help ensure proper drive placement and attachment to the host (system). Typical color-coding is as follows: blue for attachment to the host (system), black is for device 0 (master), and gray is for device 1 (slave).

Cables for Ultra ATA/66 to Ultra ATA/133 Users

Read More

Special Requirements to use an Ultra DMA Hard Drive

Special Requirements to use an Ultra DMA Hard Drive Are there any special system or software requirements to use an Ultra DMA 33/66/100/133 ATA hard drive? Yes as follows:

  • To utilize the Ultra DMA (UDMA) capability of a hard drive, the system that the drive is being installed into must contain the appropriate hardware chipset and have the necessary software drivers installed. The system’s motherboard must be designed with a core logic chipset that provides the desired UDMA support. Also, it is the motherboard or system manufacturer’s responsibility to provide any additional software drivers that may be necessary to implement UDMA (Ultra ATA) operation.
  • Pentium II and newer motherboards and systems will typically contain some level of hardware support for UDMA operation (this could be UDMA 33, 66, 100, or 133 depending on the age of your system). It will be necessary to consult the system or motherboard manufacturer’s documentation to determine the level of UDMA supported by your particular hardware. For example if you install a new Maxtor hard drive capable of Ultra DMA/100 (UDMA mode 5), but your system is only capable of supporting Ultra DMA/33 (UDMA mode 2), you will only be able to achieve the Ultra DMA/33 performance. In this case you may want to consider upgrading your motherboard or purchasing an add-on PCI adapter, such as Maxtor’s Ultra ATA card, that is capable of supporting the latest Ultra DMA transfers. This is an inexpensive alternative to replacing your entire system or motherboard.

All Maxtor UDMA drives are fully backward compatible to earlier, non-UDMA systems. Just keep in mind that the transfer rate (performance) of your drive will be limited by the system’s capabilities and not necessarily by the hard drive.

  • Windows 95 (all versions), Windows 98 (all versions), and Windows NT 4.0 all have limited “bundled” driver support for UDMA operation. If you are attempting to use a hard drive capable of UDMA/66 or greater with one of these operating systems, you will more than likely need to obtain updated drivers for your system. It is best to always check with your system or motherboard manufacturer for UDMA driver requirements and availability. In some cases updated drivers may be available directly from Microsoft or from Intel if an Intel chipset is being used by your motherboard. Maxtor Corp. does not provide software drivers for UDMA operation since any required drivers are specific to the chipset and not the hard drive.
  • Windows ME, Windows 2000, and Windows XP all have expanded “bundled” driver support for UDMA operation and may already contain the necessary driver support. Updated drivers may or may not be required depending on your motherboard’s chipset. Once again, it is always best to check with the system or motherboard manufacturer for driver requirements. A good resource for Ultra ATA drivers for systems with Intel based chipsets is at the following site: support.intel.com/support/chipsets/storagedrivers/ultraATA.
  • For systems and hard drives which have all of the prerequisites for UDMA mode 3 and greater (UDMA/66 and faster), a special 80 conductor, 40-pin interface Ultra ATA interface cable is required. The 80 conductor cable reduces cross talk and improves signal integrity by providing additional ground lines between the 40-pin ATA signal and ground lines. Due to the higher transfer rates and shorter cycle times of UDMA data transfers, this cable is required for UDMA/66, UDMA/100, and UDMA/133 operation. It is also highly recommended for UDMA/33 operation as well to help prevent any possible noise related issues.

All Maxtor Retail Kits that contain a UDMA/66 or greater hard drive will also include the 80-conductor Ultra ATA interface cable. This Ultra ATA Interface Cable conforms to the ANSI Specifications.

Read More

Seagate FreeAgent GoFlex for Mac Storage System FAQs

1. What is special about GoFlex™ for Mac family?
The FreeAgent® GoFlex™ for Mac storage family delivers an easy-to-use, plug-and-play external hard drive experience while offering the flexibility and upgradability that many people are now demanding due to the evolving nature of how mobile and active people’s lives are becoming. With different options of external drives, cables, desktop adapters, and edge devices, the entire family of GoFlex drives can be customized to fit your lifestyle needs – whether with your PC, on your TV, over your network, or on-the-go. GoFlex interface cables are about providing the speed, performance and connectivity that consumers are demanding today. With the explosive growth of video-on-demand, multimedia streaming and growing personal digital libraries, consumers are now moving multi-GB-sized files at a time. These trends are driving demand for high-capacity, high performance storage. USB 2.0 is still adequate for most people, but as more and more video content is stored and moved around, USB 3.0 will become more attractive for consumers. As the world’s most upgradable external drive, the GoFlex ultra-portable drive can be paired with any GoFlex upgrade cable to enhance the transfer speeds or can be used with a GoFlex device to gain access to your digital life from your TV or over your network.

In addition to offering the option of changing the speed and performance to move and read files more quickly, each GoFlex drive is part of the GoFlex Storage System, which allows it to work with any other product within a broader ecosystem. Products within the GoFlex Storage System include:

  • GoFlex™ ultra-portable drive (14.5mm and 23mm versions)
  • GoFlex™ Pro ultra-portable drive
  • GoFlex™ ultra-portable drive (drive-only version)
  • GoFlex™ Cable – USB 2.0
  • GoFlex™ Upgrade cable – USB 3.0
  • GoFlex™ Upgrade Kit – USB 3.0 kit
  • GoFlex™ Upgrade cable – FireWire® 800
  • GoFlex™ Upgrade cable – Auto Backup
  • GoFlex™ Intelligent dock
  • GoFlex™ TV HD media player
  • GoFlex™ Net media sharing device

2. Why is GoFlex for Mac unique?
Aside from the GoFlex eco system and the ability to take advantage of all the tools available from the Mac OS, the GoFlex for Mac drives can also be used interchangeably with PCs without reformatting the drive. Simply install the HFS+ driver, available for download, on the PC and use the drive on both platforms. There are no file size restrictions or performance hits.

3. Is GoFlex for Mac compatible w/ Time Machine?
Yes, all of the external hard drives in the GoFlex for Mac family are formatted to HFS+ out of the box, which is fully compatible with Time Machine software.

4. What is the difference between GoFlex for Mac and GoFlex Pro for Mac?
The GoFlex Pro for Mac features a faster 7200RPM drive. Since this drive has a faster spin speed, it takes further advantage of the faster FireWire 800 interface.

5. If the activity lights are distracting, can I turn the LEDs on/off?
Yes, via the downloadable program from Seagate’s support website. This program will also allow users to perform drive tests to assure the drive is working properly.

6. How is the GoFlex series of products different from other available external hard drive solutions?
The GoFlex family of drives is different from other standard hard drives available today in that it provides more than just a way to store, backup and protect your digital content. FreeAgent GoFlex drives deliver:

  • Flexibility: You can use one drive in many different ways within the GoFlex family, including on your computer, on your TV, over your network, or on-the-go.
  • Interoperability: Use the same drive on both Mac and PC interchangeably.
  • Upgradable: Use the included plug-and-play FireWire 800 or USB 2.0 interface now and have the option to upgrade to either USB 3.0 or powered eSATA (portables only) later.

7. Is USB 3.0 backward compatible with USB 2.0?
Yes, USB 3.0 is fully backwards compatible with USB 2.0. It is however limited to USB 2.0 speeds.

8. Can I interchange cables and adapters between GoFlex for Mac, GoFlex Pro for Mac and GoFlex Desk for Mac?
It is possible to interchange all cables and adapters between the portable solutions – GoFlex for Mac and GoFlex Pro for Mac – however, you cannot use a portable solution cable with the GoFlex Desk for Mac because the power requirements of the GoFlex Desk for Mac exceed what can be supplied through a USB, eSATA or FireWire port. Therefore it is necessary to use GoFlex Desk for Mac power adapters that are designed to draw power from a standard AC power outlet.

9. Can I plug any bare drive into Seagate’s GoFlex cables? Will they function properly?
While the GoFlex cables are capable of plugging directly into our Seagate Barracuda and Momentus drives and used with a laptop or desktop, we do not recommend or support their use with an exposed drive. The added benefit of the GoFlex solutions is to have a durable enclosure that allows for portability, use with other products in the ecosystem and delivers all the added physical protection you would want to keep your most precious data safe and secure.

10. What does upgradeable mean? Can I increase the capacity of my drive?
While it is not possible to increase the capacity of your GoFlex drive, the unique and seamless GoFlex cable system transforms the GoFlex and GoFlex Pro for Mac ultra-portable drives into truly upgradable solutions in that you can access the content on your drive with any interface you would like, all by simply selecting the cable that matches your interface of choice. Each GF for Mac drive comes standard with FireWire 800 and USB 2.0 adapters and cables for a complete out-of-the-box experience. However, by simply changing the cable, you can upgrade the speed and performance of your interface to faster powered eSATA (portable models only), or USB 3.0.

11. Why is there no power button on GoFlex Desk for Mac?
There is no need for an on/off button on the drive since the option to put the drive to sleep when not in use can be managed through the system preferences of the computer.

12. What are the model numbers of GoFlex accessories?
This table provides the various GoFlex accessory model numbers.

Family
Model Number
GoFlex Upgrade CableUSB 2.0 STAE100
GoFlex Upgrade Cable KitUSB 3.0 STAE101
GoFlex Upgrade CableFireWire 800 STAE102
GoFlex Upgrade CableUSB 3.0 STAE104
GoFlex Desk Desktop AdapterFireWire 800/USB 2.0 STAE105
GoFlex Desk Desktop AdapterUSB 3.0 STAE106
GoFlex Desk Desktop Adapter KitUSB 3.0 STAE107

13. Can the USB 3.0 adapter be used with a Mac computer?
Yes, it will work in USB 2.0 mode. Mac computers do not currently offer USB 3.0 support. However, the USB 3.0 connector will work with a USB 2.0 port.

Note: The optional USB 3.0 PCI Express or PC Express cards will not work with Mac OS since a driver is not available.

14. Can the FreeAgent GoFlex Net be used with Mac OS?
Yes, the GoFlex Net works with 10.5 (Leopard) and 10.6 (Snow Leopard). There was an issue with Mac OS 10.6.3 when using the WFS (Windows File Sharing) feature, but an update to Mac OS 10.6.4 resolves that issue.

Read More

Computer Cables Overview

1. External Drives Cables:
USB, FireWire 400, FireWire 800, eSATA, Powered eSATA

a) USB Cable
USB is the most common connection type for external devices, whether external hard drive, thumb drives, flash drives, printers, cameras, all kinds of other devices.  It is extremely easy to use. Whether the computer is powered on or powered off, simply connect the cable to your device and it should be ready to be used less than 30 seconds later (depending on your computer’s speed).

The USB cable has two ends – one to connect into the drive, and one to connect into the computer. Sometimes these ports are found both on the front and the rear of your computer.

USB Cable

b) FireWire 400 and 800 Cable
FireWire is a similar connection to USB, in that it is plug-and-play.  Simply connect your device to the computer and it will usually be ready to be used within 30 seconds.  FireWire is much more common in Mac computers than in Windows computers.

FireWire comes in two speeds at this time – FireWire 400 and FireWire 800.  FireWire 400 (also known as 1394a) usually gives performance similar to USB.  FireWire 800 (1394b) is significantly faster, giving performance similar to an internal Serial ATA drive, but is less common than FireWire 400, and is almost exclusively available in Mac computers.

FireWire 400 and 800 Cable

c) eSATA Cable
eSATA (external Serial ATA) is a high-performance interface most commonly found in Windows PCs, but is fairly rare.

The eSATA cable’s connector and the port look similar to that of a normal Serial ATA connector and port, but they are not intercompatible due to small physical differences.

eSATA Cable


d) Powered eSATA Cable
Powered eSATA provides high performance like eSATA, but like USB 2.0 it also provides electrical power to operate a drive without needing to use a separate power cable for the drive. This interface is even more rare than eSATA.

2. Internal Drives Cables:
Serial ATA (SATA), (Parallel) ATA (PATA)

a) Serial ATA (SATA) Cable
Serial ATA is the most common connection for internal drives in modern PCs and Macs (including all G5s).  There can be multiple SATA ports on any one motherboard or controller card.  One cable connects one hard drive to one port on the motherboard (as opposed to Parallel ATA).

SATA drives include a small power adapter that plugs in to the normal power cable inside your PC or Mac so that it will fit the SATA drive.

Serial ATA (SATA) Cable

b) (Parallel) ATA Cable
ATA is a very common connection for internal drives in older PCs and older desktop Macs (before G5), and for devices like CD and DVD drives in modern PCs and Macs.  It is a connector about 2 inches (5 cm) wide and has 40 small gold pins that will fit into the corresponding 40 small holes on its corresponding connector. There can be two or four ATA ports on any one motherboard.  One cable can connect to two devices at the same time.

(Parallel) ATA Cable

Blue connector – always connects to the motherboard.
Grey (middle) connector – is used for slave devices on the cable.
Black connector – is used for master device connection.

Note: An ATA hard drive will also have different jumper settings depending on whether it is connected as slave or master. An ATA hard drive that is connected to the same cable as a CD or DVD drive must be connected to the master position, with the CD or DVD drive in the slave position.

Read More

Western Digital PCB (IDE Full Model)

Buy Western Digital PCB(Printed Circuit Board) on HDDZone.com with low price, fast shipping and top-rated customer service! All kinds of Western Digital PCB for your Data Recovery Needs!

WD IDE full board PCB 2060-001003-001
Board Number: 2060-001003-001
Main Controller IC: WD70C20-SW
HDD Motor Combo IC: L6262 2.6
WD IDE full board PCB 2060-001102-003
Board Number: 2060-001102-003
Main Controller IC: WD70C23-GP
WD IDE full board PCB 2060-001128-005
Board Number: 2060-001128-005
Main Controller IC: WD70C22 GP ST1.3
HDD Motor Combo IC: L6278 1.2(E)
WD IDE full board PCB 2060-001159-006
Board Number: 2060-001159-006
Main Controller IC: WD70C22-GP ST2.0/WD70C22-GP ST1.3 HDD Motor Combo IC: L6278 1.7E
WD IDE full board PCB 2060-001173-004
Board Number: 2060-001173-004
Main Controller IC: WD70C22-GP ST2.0/WD70C22-GP ST1.3 HDD Motor Combo IC: L6282 3.2E
WD IDE full board PCB 2060-001175-000
Board Number: 2060-001175-000
Main Controller IC: WD70C23-GP ST2.3
HDD Motor Combo IC: L6278AC
WD IDE full board PCB 2060-001177-000
Board Number: 2060-001177-000
Main Controller IC: WD70C23-GP ST2.3
HDD Motor Combo IC: L6278AC
WD IDE full board PCB 2060-001189-003
Board Number: 2060-001189-003
Main Controller IC: WD70C22-GP ST2.0/WD70C22-GP ST1.3 HDD Motor Combo IC: L6278 1.7E
WD IDE full board PCB 2060-001265-001
Board Number: 2060-001265-001
Main Controller IC: WD70C26-GP ST2.1
HDD Motor Combo IC: L6283 1.3
WD IDE full board PCB 2060-001266-000
Board Number: 2060-001266-000
Main Controller IC: WD70C26 ST2.1
HDD Motor Combo IC: L6283 1.3

Note: Hard drive failures are NOT always caused by circuit board failure. In most cases, you should exchange the BIOS chip before you swap the PCB. You should have certain technique.

Read More

How to use Disk Management to set up a Hard Drive

How to use Disk Management to set up a Hard Drive To start Disk Management:

  1. Log on as administrator or as a member of the Administrators group.
  2. Click Start -> Run -> type compmgmt.msc -> click OK. Alternatively, right-click on the My Computer icon and select ‘Manage’.
  3. In the console tree, click Disk Management. The Disk Management window appears. Your disks and volumes appear in a graphical view and list view. To customize how you view your disks and volumes in the upper and lower panes of the window, point to Top or Bottom on the View menu, and then click the view that you want to use.

How to create a new partition or a new logical drive:

To create a new partition or logical drive on a basic disk:

  1. In the Disk Management window, complete one of the following procedures, and then continue to step 2:
    1. To create a new partition, right-click on the Unallocated space on the Basic disk where you want to create the partition, and then click New Partition.
    2. To create a new logical drive in an Extended partition, right-click on the free space on an Extended partition where you want to create the logical drive, and then click New Logical Drive.
  2. In the New Partition Wizard, then click Next.
  3. Click the type of partition that you want to create (either Primary partition, Extended partition, or Logical drive), and then click Next.
  4. Specify the size of the partition in the Partition size in MB box, and then click Next.
  5. Decide whether to manually assign a drive letter, let the system automatically enumerate the drive, or not assign a drive letter to the new partition or logical drive, and then click Next.
  6. Specify the formatting options you want to use (such as setting a drive label name) by using one of the following procedures:
    1. If you do not want to format the partition, click Do not format this partition, and then click Next.
    2. If you want to format the partition, click Format this partition with the following settings, and then complete the fields in the Format dialog box.
  7. Confirm that the options selected are correct, and then click Finish.
  8. You should be able to see the new drive listed under My Computer with the new drive letter assignment and the drive label name.
Read More

Free MAC Data Reovery Program: Disk Drill

Recovery damaged, corrupted and deleted data from HFS, HFS+, FAT, NTFS & other file systems.

Version: Disk Drill 1.0.66
Publisher: www.cleverfiles.com
Operating system: Mac OS X 10.5+

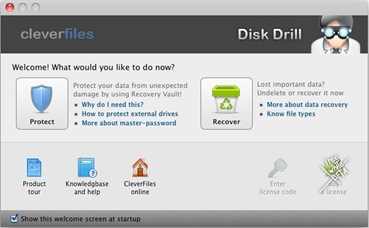
Disk Drill is a free data recovery program designed and created exclusively for Mac OS. Extremely clear wizard-like user interface guides you through the data recovery process and offers several options for successful MAC data recovery. Was your hard drive formatted? Is your external volume not accessible any more? CleverFiles will help you recover what is still available on a binary level.

* Note: It is free while beta!

Disk Drill Main Features:

  • File systems supported: HFS/HFS+, FAT, NTFS, etc.
  • Media supported: Memory cards, external and internal hard drives, iPod and iPhone, camera and so on.
  • Recovery in Seconds: You can use Quick Scan or Recover from Vault modes to quickly analyze existing file system catalog and recover deleted files unexpectedly fast.
  • Partition Recovery: Accidental repartitioning lead to data loss? Recover data from partitioned or formatted disk drives right on your Mac.

Disk Drill Main Screenshot:

Free MAC Data Reovery Program: Disk Drill

Disk Drill Free Mac Data Recovery Program Customer Reviews:

Disk Drill is the only true Mac-style software for data recovery and data protection. And it’s exactly what I was looking for”

Bravo! I just did the high level scan. Unbelievable! You are the only one capable of recovering from a CF 16GB. Every program I tried so far failed miserably. My hat to you.”

Disk Drill Free Download:

Free MAC Data Reovery Program: Disk Drill

Read More

Seagate Barracuda 7200.7 Hard Drive PCB

Buy Seagate Barracuda 7200.8 hard drive PCB(Printed Circuit Board) on HDDZone.com with low price, fast shipping and top-rated customer service! All kinds of Seagate Barracuda 7200.8 HDD PCB for your Data Recovery Needs!

Seagate Barracuda 7 PCB ST3160023AS 100328754
Name: ST3160023AS
Main Controller IC: 100328754
HDD Motor Combo IC: SH6950D
Seagate Barracuda 7 PCB ST3160023AS 100367025
Name: ST3160023AS
Main Controller IC: 100367025
HDD Motor Combo IC: SH6950D
Seagate Barracuda 7 PCB 100274360
Main Controller IC: 100274360
HDD Motor Combo IC: SH6950D/100244097
Seagate Barracuda 7 PCB 100277704 100252820
Board Number: 100277704
Main Controller IC: 100252820
Motor Combo IC: 100244097
Seagate Barracuda 7 PCB 100291893 REV A
Board Number: 100291893 REV A
Main Controller IC: 100319396
HDD Motor Combo IC: 100244097
Seagate Barracuda 7 PCB 100328755
Main Controller IC: 100328755
HDD Motor Combo IC: SH6950D
Seagate Barracuda 7 PCB 4490D6/100274360-74
Main Controller IC: 4490D6/100274360-74
HDD Motor Combo IC: 100244097
Seagate Barracuda 7 PCB 4490D6/100274360-74/100300639-83
Main Controller IC: 4490D6/100274360-74/100300639-83 HDD Motor Combo IC: SH6950D
Seagate Barracuda 7 PCB L4490D8/100342861-74
Main Controller IC: L4490D8/100342861-74
HDD Motor Combo IC: SH6950D/100343137
Seagate Barracuda 7 PCB ST3160023AS 100336321 REV A
Board Number: 100336321 REV A
Main Controller IC: 100328756
HDD Motor Combo IC: SH6950D
Seagate Barracuda 7 PCB ST3160023AS 100367024
Name: ST3160023AS
Main Controller IC: 100367024
HDD Motor Combo IC: SH6950D

Note: Hard drive failures are NOT always caused by circuit board failure. In most cases, you should exchange the BIOS chip before you swap the PCB. You should have certain technique.

Read More

Solutions for Seagate Barracuda 7200.11 HDD Common Errors(Part I)

There are two common errors on Seagate Barracuda 7200.11 HDDs (caused by bugs on firmware):

  • 0 LBA error: it happens when your BIOS can recognize your HDD at POST moment, but as an 0MB drive.
  • BSY error: it happens when your HDD enter on a halt state, or Busy state. In this condition, your HDD will not be recognized by BIOS at POST moment.

Solutions: You’ll need: TTL adapter

Attention: This guide might not be to every case. No responsible for any damage or data loss it can happen.

TX and RX connections from a SATA Seagate 3.5″:


TX and RX connections from a SATA Seagate 3.5"Photo with the real drive:

TX and RX connections from a SATA Seagate 3.5"

Connect TX and RX ports with RS232 to TLL adapter, you’ll need something like jumpers in order to do that, or soldering directly to the PCB board. Connect GND and +5V to PC power supply, or similar. Keep in mind those are direct from Seagate sides, so you’ll need to connect in this way:

– From PC (TX) to >>> RX (on Seagate)
– From PC (RX) to >>> TX (on Seagate)

You can use RED wire (+5V) from PC power supply. Blacks are GNDs (yellow is +12V so don’t use it).

If you don’t want to mess with power supply, just use a CR2032 (3V) battery:
https://www.isaleproducts.com/p-7709-3v-lit…ll-battery.aspx

An idea of whole setup (I used an USB to RS232 too):

Solutions for Seagate Barracuda 7200.11 HDDs Firmware Problem

Run HyperTerminal (or your favourite terminal software).

Configure the RS232 port to: 38400 8 N 1 (like this one):

Solutions for Seagate Barracuda 7200.11 HDDs Firmware Problem

Solutions for Seagate Barracuda 7200.11 HDDs Firmware Problem

Solutions for Seagate Barracuda 7200.11 HDDs Firmware Problem

Solutions for Seagate Barracuda 7200.11 HDDs Firmware Problem

Read More