How To Completely Clean Data From Your Hard Drives And SSDs? (Part II)

Seagate (including Maxtor)

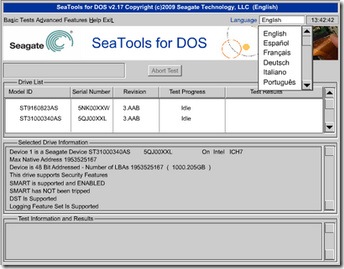
SeaTools for DOS
Use Full Erase to zero-fill your hard disk.

Seatools for Dos

Western Digital

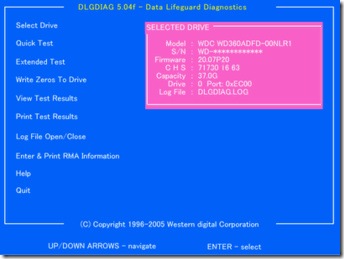
Data Lifeguard Diagnostics
Use Write Zeros to drive to zero-fill your hard disk

Data Lifeguard Diagnostics

1. Determine the brand and model of hard disk you want to overwrite.
2. Download a CD ISO image or a floppy disk image (depending upon your equipment) and use the image to create bootable media. The floppy disk image is self-contained: run it, insert a blank floppy disk when prompted, and the image is created on the disk. You will need to use a CD burning program that works with ISO images to convert the ISO image into a bootable CD.
3. Restart your computer with the bootable media you created in Step 2.
4. Select the hard disk to zero-fill when prompted.
5. Choose the option to zero-fill the hard disk.

Clean Data

6. When the program is finished, follow the on-screen instructions to shut down or restart your computer.
7. Remove the wiped hard disk; you can now reuse or recycle the hard disk.

Secure Wiping a Hard Disk

Secure wiping goes beyond zero-fill operations, and provides an extra level of security. Most secure wiping programs are designed to meet DoD 5220 standards, which require three passes of overwriting with a special numeric pattern and verification. More information about this and other secure standards are available from the DataErasure website.

(Note that the 2007 revision of the Defense Security Service, Updated DSS Clearing and Sanitization Matrix (June 28, 2007) (PDF) now recommends degaussing or drive destruction for maximum protection.

Clean Data

Stanford University’s Disk and Data Sanitization Policy and Guidelines, a must-read for understanding data wiping issues, recommends Darik’s Boot and Nuke (DBAN) for secure hard disk wiping.

Secure Wiping a Hard Disk with DBAN

Time Needed: several hours (varies with size and speed of drive)
Software: Darik’s Boot and Nuke (DBAN);
Available from http://www.dban.org/
Media: blank CD (all versions) or floppy disk (version 1.0.7 and older versions)

1. Download the DBAN boot image ZIP file (we used version 1.0.7 and beta version 2.0 for this article); we downloaded the ISO image for CD burning, but a floppy disk builder is also available
2. Extract the contents of the compressed file.
3. Burn the ISO image file extracted in Step 2 to CD; or use the built-in ISO CD image burning support in Windows 7. If you downloaded the floppy image builder, run the program to create a bootable floppy disk.
4. Restart the computer using the CD or floppy disk created in Step 3.
5. Press Enter to run DBAN in interactive mode.
6. Use up and down arrow keys to highlight the drive to wipe.
7. Press the space bar to select the drive.
8. Press M to select the wiping method.
9. Press F10 to begin the wipe process.

Wipe Data

10. At the end of the process, shut down the system. You can reuse or recycle the wiped hard disk.

Note: if DBAN is unable to recognize your SATA hard disks, configure your system BIOS to use IDE mode rather than AHCI mode.

Wiping Flash Memory Cards and USB Drives

Programs such as DBAN or vendor-supplied hard disk utilities are limited in the devices they support: they are designed to work with internal ATA/IDE or SATA hard disks only. Programs that work with flash memory cards and USB flash drives often support hard disks as well, enabling you to use a single program for all disk wiping processes. Roadkil’s DataWipe can be used with any hard disk, floppy disk, or flash drive that has a drive letter.

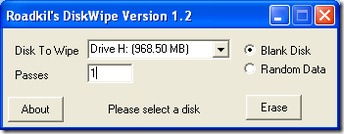
Wiping Flash Memory Cards with Roadkil’s DiskWipe

Time Needed: Varies; from a few minutes to several hours, depending upon size and speed of drive and computer
Software: Roadkil’s DiskWipe
Available from http://www.roadkil.net
Media: Can be run from Windows desktop

1. Download Roadkil’s DiskWipe.
2. Extract the contents of the compressed file.
3. Open DiskWipe. If you are running Windows Vista or Windows 7, right-click the program icon and select Run as Administrator.
4. Select the drive to wipe.
5. Select the type of wipe to perform; DiskWipe can zero-fill the disk or write random data.
6. Enter the number of passes.
7. Click Erase to start the process.

DiskWipe

8. At the end of the process, close the program. You can reuse the wiped disk.

Wiping SSDs

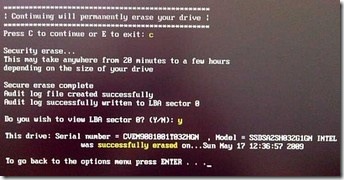
To solve write performance problems on drives that don’t support TRIM (check with your drive vendor for firmware upgrades) is to use wiper.exe (included with some SSDs) or to run the Secure Erase feature supported in most recent ATA/IDE and SATA drives. The Secure Erase feature can be activated on many systems by running Secure Erase 4.0 (HDDerase.exe), available from http://cmrr.ucsd.edu/people/Hughes/SecureErase.shtml. Version 4.0 works with most recent ATA/IDE and SATA hard disks and SSDs, but if you use an Intel X-25M, X-25E, or X-18M SSD, follow this link to download Secure Erase 3.3 http://www.iishacks.com/index.php/2009/06/30/how-to-secure-erase-reset-an-intel-solid-state-drive-ssd/ . Note that it is no longer being developed, and we were unable to use it on a system running an AMD 690 chipset.

Wipe SSD

Read More

How To Completely Clean Data From Your Hard Drives And SSDs? (Part III)

Wiping Drives and Free Space with SDelete

SDelete is a free program from Microsoft’s TechNet Sysinternals collection. It runs from the command line, and can be used to wipe drives, wipe files, or wipe free space.

Time Needed: Varies; from a few minutes to several hours, depending upon size and speed of drive and computer
Software: TechNet Sysinternal’s SDelete
Available from http://technet.microsoft.com

Media: Can be run from Windows desktop

1. Download SDelete.
2. Extract the contents of the compressed file.
3. Copy sdelete.exe to c:\windows\system32\ (this will enable you to run it from any location)
4. Open a command prompt session with Administrator rights.
5. To wipe all files on drive X: and its subdirectories and to wipe free space, enter Sdelete -p 2 –s -z X:\*.* (to see all command-line switches, enter Sdelete with no options)
6. Wait; the program displays status messages as it runs. When the program is finished, you can reuse or dispose of the drive.

Clean Data

Evaluating the Effectiveness of Disk Wiping Programs

We used demo versions of two popular data recovery programs to evaluate some of the disk wiping programs discussed in this article. To determine whether a typical data recovery program could recover files on a SD card wipe with Roadkil’s DiskWipe, we first of all formatted the card using a card reader. Ontrack’s EasyRecovery Data Recovery (available from http://www.ontrack.com) had no difficulty finding folders and files to retrieve.

EasyRecovery

However, when we used DiskWipe to wipe the drive using a one-pass blank disk (zero fill) operation, EasyRecovery DataRecovery was unable to find the file system, let alone any files or folders.

After reformatting the card, taking a few photos, and deleting the photos, EasyRecovery Data Recovery was able to find the new photos, but the contents of the card before running WipeDisk were unrecoverable.

Easy Recovery

To evaluate SDelete, we used SDelete to wipe all of the files on a hard disk, but omitted the –z switch; when –z is not used, SDelete deletes files and renames them, but does not clear free space. To determine what might be visible, we used a demo version of Disk Doctors NTFS Data Recovery software, available from http://www.diskdoctors.net.

Disk Doctors were able to locate the deleted folder and Outlook Express message folders, but SDelete had renamed them from their original names and DBX extensions (Outlook Express message folders). If you use SDelete, it’s very important that you take time to use the –z switch to clear free space on the disk (once a file is deleted, the space it occupies is free space).

Disk Doctor

We also used Disk Doctors to evaluate the effectiveness of a freeware program called Eraser, which can delete and overwrite files and folders from the right-click menu. We created a documents folder with a subfolder called Figures and used Eraser to overwrite the folder and subfolder using its default settings.

Disk Doctors was able to locate the folders, but the contents are files with garbage names and are zero bytes in size – except for leftover word processing temporary files (files that begin with $). These filenames were not changed, which could enable a snooper to figure out the names of the files in the folder – although the files themselves were destroyed. By using more overwrites or different methods available with Eraser, a more thorough wiping may be possible.

Disk Doctor

Conclusion

We’ve highlighted a variety of free ways to protect data on castoff drives from being retrieved. As you can see, your best bet is to overwrite data directly, but you also might want to consider using a program such as SDelete to scramble filenames first and then use a disk wiper such as Eraser or WipeDisk to finish the job.

Use demo versions of data recovery programs such as Ontrack Easy Recovery Data Recovery, Disk Doctors Data Recovery (various editions for NTFS, FAT, and flash media), and others to evaluate the effectiveness of your data wiping procedures. Remember, the full versions of these and other data recovery programs can save your data if you accidentally format or partition a disk because, until the data is overwritten, it’s still there.

Read More

SATA Hard Drive Cables

Connectors and cables present the most visible differences between SATA and parallel ATA drives. Unlike PATA, the same connectors are used on 3.5-inch SATA hard disks for desktop and server computers and 2.5-inch disks for portable or small computers; this allows 2.5-inch drives to be used in desktop computers with only a mounting bracket and no wiring adapter. Smaller disks may use the mini-SATA spec, suitable for small-form-factor Serial ATA drives and mini SSDs.

There is a special connector (eSATA) specified for external devices, and an optionally implemented provision for clips to hold internal connectors firmly in place. SATA drives may be plugged into SAS controllers and communicate on the same physical cable as native SAS disks, but SATA controllers cannot handle SAS disks.

There are SATA ports (on motherboards of a PC) that can use SATA data cable with locks or clips, thus, reducing the chance of accidentally unplugging while the PC is turned on. So does the same with SATA power connector and SATA data connector connected to a SATA HDD or SATA optical drive. Also, there are right-angled and left-angled connectors only on one end of SATA data cable, which can only be used when connecting to a SATA HDD or SATA optical drive.

The SATA standard specifies a different power connector than the decades-old four-pin Molex connector found on pre-SATA devices. Like the data cable, it is wafer-based, but its wider 15-pin shape prevents accidental mis-identification and forced insertion of the wrong connector type. Native SATA devices favor the SATA power-connector, although some early SATA drives retained older 4-pin Molex in addition to the SATA power connector.

SATA Power Cable

1. Molex 4pin Male To 15pin SATA Power Cable

SATA Power Cable

2. Molex 4pin Male To Two 15pin SATA Power Cable

SATA Power Cable

3. SATA Power Cable With Two 90 Degree Power Connector

SATA Power Cable

4. 15-Pin SATA Power Male to two Dual Molex 4-Pin Female

SATA Data Cable

5. SATA Data Cable

SATA Data Cable

6. Serial ATA data cable with single right-angle connector

SATA Data Cable

7. SATA Cable with 2 Right Angle Connectors

SATA Data Cable

8. SATA to eSATA Transition Cable

SATA Data Cable

9. Sata 1.8 inch All in one power and data cable

SATA Data Cable

10. SATA Internal Extension cable 22-pin extension cable male to female clip_image021[34]

SATA Data Cable

11. Serial ATA Data Cable with Power Adapter

SATA Data Cable

12. SATA Power Cable Extension Male to Female 15-Pinclip_image021[35]

SATA Data Cable

13. SATA Power Splitter Cable with Molex 4-Pin Outptu and Dual 15-pin Sata Output 7 inch cables

eSATA Cable

14. eSATA Extender Cable Internal to External Cable Bracketclip_image021[36]

Sata Power Cable

15. SATA Power Adapter Cable Splitter with 3-Molex Power outputs from One SATA Power Inputclip_image021[37]

Sata Power Cable

16. 4-Pin Molex Output from sata power cable input, SATA to Molex Y-Cableclip_image021[38]

SATA to eSATA cable

17. SATA I type Connector and SATA L type Connectorclip_image021[39]

SATA Power Connector

18. SATA Power Extender Plug 15-Pin Input to 15-Pin Outputclip_image021[40]

SATA Power Connector

19. SATA to Molex Power Cable Adapter 15-pin Female to 4-pin Maleclip_image021[41]

Read More

What are the common Reasons of Hard Disk Drive failure?

What are the common Reasons of Hard Disk Drive failure?

1. Electronic Component Failure
2. Motor Failure
3. Read / Write Head Failure
4. Media Damage
5. Firmware Corruption
6. Logical Failure

One or all of the above primary causes may be evident when diagnosing a failed hard disk drive.

Electronic Component Failure

Electronic components may fail due to voltage transients, heat or poor handling. Substitution, repair and re-programming is generally required in order to recover data stored on the hard disk. PCB assemblies are however hyper tuned at the manufacture stage and specialist re-programming and calibration is subsequently required to restore the hard disk to a working condition.

Motor Failure

Hard disk motor spindles have fluid bearings; sometimes this fluid leaks or becomes overheated and in-effective. The motor will then seize and the hard disk platters fail to rotate. Platter and component re-location to another hard disk assembly is required to effect a repair and restore data.

Read / Write Head Failure
Read / write heads are aerodynamically designed to “fly” at nanometer distances above the surface of the platters. Ceramic thin film sensors at their tip detect magnetic information (data) stored on the surface of the platter. Occasionally the atmosphere in the hard disk enclosure will become contaminated or vibration will cause the dynamic of the head to be disturbed. This disturbance will cause the read /write process to malfunction resulting in bad data read write cycles and eventual failure.
This type of failure usually manifests itself as a distinct clicking noise as the head actuator makes failed repeat attempts to locate data at the same platter track location.

Media Damage

Amazingly all computer hard disk magnetic storage media is manufactured imperfect but to acceptable and controllable levels. During normal operations imperfections will sometimes increase above the predefined acceptable level. This can be due to heat, vibration, head crash, shock or other factors. The operating system will flag errors or fail to boot and data files will then become in-accessible. Read/.Write head replacement and file repair will allow data file structures to be examined and assessed as to their validity.

Firmware Corruption

Hard disk firmware holds precise parameters relevant to the configuration of the assembly at the time of manufacture. Occasionally the firmware becomes corrupt or will “roll back” to an incorrect set of parameters. Under these conditions the location of the stored data as reported to the operating system will be lost. Simple restoration of the correct parameters will allow the hard disk to function correctly. What causes this corruption? Operating system to drive software bugs, control bus protocol failure, it is difficult to determine but failures do occur.

Logical Failure

Data files are stored at logical locations that relate to a number of physical locations on the surface of the hard disk platters. These logical locations are held in tables by the operating system and indexed when running specific software applications. Operating system errors, reloads or incorrect upgrade applications will sometimes corrupt these tables and data will become in-accessible. This is generally referred to as a logical failure. Logical errors can be repaired with software tools available from the internet. Be cautious however – if you are intending to run a fix utility on your disk you can inadvertently damage these tables irreparably and your data will be unrecoverable. This is especially true when running ScanDisk and Chkdsk on a damaged hard drive.

Hard Drive Failure Signs

  • Your computer “freezes” too often (the picture on the screen is still and does not react to mouse or keyboard manipulations)
  • Regular booting problems. That may be a sign of bad sectors on the disk with corrupted booting data.
  • You computer is terribly slow while accessing, saving and opening files.
  • The usual sound produced by your hard drive is louder than before
  • Regular appearance of BSOD (Blue Screen of Death), “Operating system not found or Missing Operating System” or “your hard drive is not formatted” messages at startup.

Even if you haven’t backed up your files yet, these signs give you a chance and some time to copy the data before the drive crashes.

Far more ominous signs are:

  • Your computer is still running normally, but you can hear unusual metallic sounds (grinding, clicking, whirring, scratching, buzzing). That’s a very bad sign that may imply mechanical damage.
  • You cannot hear any hard drive sounds at all. When the information is written to or read from the disk, it spins and produces sounds, you must be accustomed to these normal sounds. As an example, hard drive becomes silent when it’s inside components expand and get stuck because of overheating.
  • Your hard drive is clicking or producing grinding metallic sounds, your computer won’t recognize the hard disk. This is a sign that hard drive failure have happened.

If the above occurs, shut down immediately and contact a disk recovery service! If you keep your computer running the platters may be damaged and your files will be unrecoverable. Also, if your hard drive has undergone mechanical damage or was exposed to water, fire, smoke or high temperatures, don’t try to power it up. Contact a disk recovery service.

Read More

Maxtor HDD Firmware Repair Tool 2.0

Maxtor Firmware Repair 2.0 is a program  aiming at solution for typical firmware malfunction of Maxtor 541DX (2B020H1 2B010H1), which may manifest itself as follows:

1. HDD is not identified or identified by its factory alias “Maxtor Athena”;
2. HDD starts the motor and then hangs.

How does Maxtor Firmware Repair 2.0 work?

1. The restoration program will not overwrite the HDD data so it is applicable to data recovery.

2. It provides the users with a most friendly operation interface and it only takes you a few seconds to restore an HDD with typical firmware malfunction.

3. So, after you have this powerful freeware installed, all you have to do is to insert the bootable disk and have the target HDD connected correctly to you IDE slot. In minutes, you could start fixing the defective HDD using this powerful utility by pressing several keys.

4. This free version can only restore typical firmware malfunction of Maxtor 541DX series HDDs but not for others.If you need to restore other series of Maxtor HDD, you can purchase our professional version Maxtor Firmware Repairer PRO.

CD-ROM: Maxtor Firmware Repair 2.0
Floppy Disk: Maxtor Firmware Repair 2.0

Read More

HDD Scan and Repair Tool 3.0

Are you facing a scandisk on your HDD because there is some bad sectors?
Is it annoying and time-consuming? then you’ve come to the right place.

HDD Scan And Repair 3.0 is the only one known professional program which can scan HDD over 136 G directly that need not the support of computer mainboard with high speed. It can utmost afford 2000 G HDD in theory.

Notice: If you have recently installed Windows Service Pack 2 (SP2) you would be having problems with your SP2 after using HDD Scan And Repair 3.0 installation program to create the bootable floppy disk.

How does HDD Scan and Repair 3.0 work?

1. A breakthrough of this program is that, without depending on BIOS, it can control read and write to the HDD directly, with high-speed, veracity, friendly interface and simple management; there will be an intuitionistic and intact report for the physical defective sectors created after the scanning. The continual defective sectors can be easily skipped; therefore the defective HDD will not get stuck.?

2. There is a “Restorer” in this program which can restore the usual physical defective sectors by adding them into the G-list.

3. So, after you have this powerful freeware installed, all you have to do is to insert the bootable disk and have your target HDD connected correctly to you IDE slot. In minutes, you could start fixing the defective HDD using this powerful utility by pressing several keys.

CD ROM: HDD Scan And Repair 3.0
Floppy Disk: HDD Scan And Repair 3.0

Read More

Seagate HDD Firmware Repair Tool 5.0

Seagate Firmware Repair 5.0 is a demoware  aiming at one-key solution towards typical firmware malfunction of Seagate Barracuda VII drives, which may manifest itself as follows:
1. HDD is not identified or identified incorrectly;
2. HDD starts the motor and then hangs.

How does Seagate Firmware Repair Demo 5.0 work?

1.The restoration program will not destroy the HDD data so it is applicable to data recovery.

2.It provides the users with a most friendly operation interface. Powerful and easy in fixing HDD typical firmware malfunction: Just one click and your data and drive comes back (80% of corrupt Seagate drives are caused by typical malfunction).

3.Check HDD firmware: Powerful function that enables you to figure out the problem of a drive, there will be a check result created and saved as DIAGNOSIS.TXT; you can receive remote technology support from our experienced engineers on the drive then by simply sending the DIAGNOSIS.TXT to us.

4.So, after you had this powerful freeware installed, all you have to do is to enter the program and have the target HDD connected correctly. In minutes, you could start fixing the defective HDD using this powerful utility by pressing one single key.

5.This demo version can only restore typical firmware malfunction of Seagate Barracuda VII series HDDs, not for others. If you need to restore other series of Seagate HDD, you should purchase our PRO version with full support range

Demo: Seagate Firmware Repair Demo 5.0

Read More

Maxtor HDD Bad Sectors Repair Tool 2.0

Bad Sectors Repair 2.0 can add bad sectors of Maxtor 541DX(2B0X0H1) HDD into the factory defects list (P-LIST), up to 15,000 bad sectors can be added into the list at most.

How does Bad Sectosr Repair 2.0 work?

1. It is able to move defects from G-list to P-list, empty and reset both P-list and G-list, reset the HDD capacity and add your specific sector as defect into the P-list…

2. The HDD restored would work just as a brand-new HDD: There will be no bad sector,and it could be partitioned and formatted at your will.

3. So, after you have this powerful freeware installed, all you have to do is to insert the bootable disk and have your target HDD connected correctly to you IDE slot. In minutes, you could start fixing the defective HDD using this powerful utility by pressing several keys

CD-ROM: Bad Sectors Repair 2.0
Flobby Disk: Bad Sectors Repair 2.0

Read More

How to Upgrade Hard Drive Firmware?

Upgrade Hard Drive Firmware Firmware is a type of software stored directly inside hardware components, such as hard disk drives or motherboards, that tells the hardware how to interact with your computer’s operating system. You would typically only need to upgrade your hard drive’s firmware if you installed a new motherboard or upgraded to a new operating system that the drive was not originally intended to interact with. Firmware upgrades are meant to be administered through a floppy disk, but with some extra work you can also apply them with a standard CD as well.

Note: Save a backup copy of each of your important files to an external source before attempting to update the firmware of your hard drive. If you stop the upgrade process before its finished or accidentally install the wrong version of the firmware, your hard drive may stop functioning properly and you could lose all of your data.

  1. Open your web browser and navigate to the website for the manufacturer of your hard drive (see “Resources” below). Access the support or downloads section and search for the model number of your computer or the hard drive itself.
  2. Click on the download link to download the firmware upgrade. Insert a 3.5 inch floppy disk into your computer’s floppy disk drive if it has one or instead insert a rewritable CD into the computer’s CD drive. Transfer the firmware upgrade file to the floppy disk.
  3. Return to your web browser if you are using a rewritable CD instead of a floppy disk. Navigate to a website that offers ISO software such as “MagicISO” or “PowerISO” (see “Resources” below). Access the downloads section of the website and download the program’s installation file.
  4. Double-click on the file you downloaded and follow the instructions on the screen to install the ISO program. Open the program once it’s installed and follow its ISO burning procedures to burn a copy of the firmware upgrade to the rewritable CD.
  5. Leave the CD or floppy disk in the appropriate disk drive and re-start the computer. Wait for a new menu screen to appear and scroll down through the options using the arrow keys on the keyboard. Highlight the hard disk drive you need to update and hit the “Enter” key.
  6. Wait for the operating system to finish loading and then open the “My Computer” icon on the desktop. Navigate to the floppy disk drive or CD-RW drive. Double-click the executable file saved on the disk and then follow the instructions that will appear on the screen to upgrade the hard disk drive’s firmware.

Useful Links:

  • IBM Hard Drive Firmware Downloads
  • HP Hard Drive Firmware Downloads
  • Download MagicISO
  • Western Digital Firmware Downloads
  • Download PowerISO
Read More

Swap Hard Drive PCB Board

Hard Drive PCB Board If you’ve ever installed a hard drive, you have noticed the green board on the bottom of the drive. The green board is known as the hard disk drive’s PCB (Printed Circuit Board).

What A Hard Drive PCB Does?

The PCB is more than a simple way for a hard drive to contain power; it often contains part of the firmware of a drive, which lets the hard drive know how to operate properly and how to read data from the platters. For instance, part of its function is to store information about how many heads are contained within the drive, unique adaptive, and how to access continued microcode for successful drive start-up.

This information is put onto each PCB at the factory, and is programmed to be very specific to the particular hard drive for which it’s designed. While this may sound inefficient, it’s actually the culmination of dozens of years of hard drive technology; it allows larger and larger drives to be built that are both accurate and dependable.

PCB is one of the most complex and intriguing parts of a hard drive. When hard drives fail, occasionally it’s due to a malfunction of the PCB board. Power surges can cause this type of a failure, as well as dust contamination and many other common computer problems.

Hard Drive PCB Failure Symptoms

Hard drive PCB failures usually render a drive unable to boot up. Depending on the brand and model of the drive, some PCB problems cause a hard drive’s information to display inaccurately in the BIOS.

Swapping Out a Hard Drive’s PCB

Because of this customized firmware, however, it’s not possible to switch out a PCB board in many cases; of course, this varies depending on the manufacturer of a drive. For instance, some older drives have the same basic information on two PCB boards of the same model, provided that both drives were made at about the same time, before more unique adaptive were programmed into the next line of drives. If one of the PCBs fails, there is some chance of making a recovery by simply swapping the boards of the two drives. However, hard drives have contained “customized” firmware on at least an occasional basis since they’ve become a consumer product, so the chances of a straight “board swap” working are very low. In most cases, when you swap the PCB, you should also exchange the BIOS which includes the unique information.

Recommended PCB Boards Provider:

HDDzone.com can offer all kinds of HDD PCB boards which you want. You just need to contact them and issue your detailed requirements. They will send your requires with best price in short time.

Read More