Sata Data Transfer Rates VS RPM

I am looking to buy a new HDD, my SSD and 200GB HDD is not even close to enough storage for me, so im looking for either 1tb or 2tb, not too sure on the differences in performance, newegg has a deal right now for a 1tb caviar black 7200 rpm for $120, but its only sata 2 interface, however i could pick up a 2tb caviar green drive with sata 3 interface, but there only 5400 rpm for $130 im mainly going to be using the drive for storage, backup and games, since my OS is installed on my SSD. what would be the best bet here based on my needs?

Media servers don’t really stress the disk all that much, except maybe for caching. Any drive, probably even one from ten years ago, could handle the read rate for a media server. There’s an easy way to estimate how much bandwidth you’d need to serve a file.

Let’s say you have a 720p rip on your machine, at 4.5 GB. This movie is 90 minutes long, and you want to serve it from the media server. So, at minimum, your drive needs to be able to read 4.5 GB of data in the time it takes the movie to play. That’s only about 0.85 MB/s.
Because the initial buffering is going to hit the disk harder, you’ll have a higher utilization there, so let’s say we need to load the first minute of data (about 50 MB) as quickly as possible, say in under 5 seconds. That gives us a peak speed requirement of about 10 MB/s.
Even the worst 5400 RPM drive should be able to handle 10 MB/s, and 0.85 MB/s is a pathetically light load.

Which is better a 5400 RPM or a 7200 RPM  hard drive and why?

5400 is slower (doesn’t read and write as fast) but uses less power
7200 is faster, but uses more power.
Usually for a laptop 5400 is better.
So for Desktop 7200 is better.

Read More

Samsung Hard Drive PCB Boards Buying Guide

As we know:  Samsung HDD can’t spin; board/chip be burnt; interface broken; etc. These problems are caused by PCB malfunction. Swap PCB of your Samsung hard drives can resolve the problems.

1. Samsung Hard Drives PCB Buying Guide:

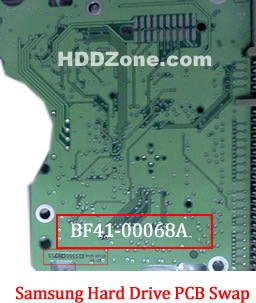
For Samsung HDD, just need the donor PCB has the same board number as yours.

samsung-hard-drive-pcb-swap

Samsung HDD PCB Swap

2. Before PCB Swap you should know:

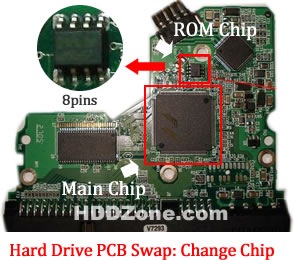
1. Most PCB’s BIOS chip(ROM Chip) store the unique information. We need change the BIOS form original PCB to replacement PCB, in order to make the replacement PCB compatible with the HDD.  The 8pins (4 pins on each sides) with 25P05VP、25P10VP、25F512、25F1024、25F1024AN、SST25VF512、SST25VF010, etc. are the BIOS Chip.

Tips: Most of the TV/Phone Repair Shop can offer these services for just $5-%20

hard-drive-pcb-swap-change-chip

Hard Drive PCB Swap: Change BIOS Chip, Main Chip

2. Some PCB don’t have separate BIOS. The BIOS be integrated on the Main Controller IC(The biggest chip on the board, also named Main Chip). We should exchange the Main Controller IC to let the HDD be recognized.

3. Where to buy Samsung PCB Circuit Boards?

SAMSUNG PCB BF41-00263A
SAMSUNG PCB BF41-00206B
SAMSUNG PCB BF41-00163A
SAMSUNG PCB BF41-00204B
SAMSUNG PCB BF41-00068A
SAMSUNG PCB BF41-00109A
SAMSUNG PCB BF41-00051A
SAMSUNG PCB BF41-00303A
SAMSUNG PCB BF41-00085A
SAMSUNG PCB BF41-00205B
SAMSUNG PCB BF41-00314A
SAMSUNG PCB BF41-00284A
SAMSUNG PCB SP0812C BF41-00069A
SAMSUNG PCB HD080HJ BF41-00095A
SAMSUNG PCB SV0411N BF41-00080A
SAMSUNG PCB BF41-00108A
SAMSUNG PCB SP1203N BF41-00112A
SAMSUNG PCB BF41-00133A
SAMSUNG PCB BF41-00086A
SAMSUNG PCB SP0822N BF41-00067A
SAMSUNG PCB BF41-00067B
SAMSUNG PCB BF41-00093A
SAMSUNG PCB BF41-00087A
SAMSUNG PCB BF41-00082A

Note: Samsung PCB sells on HDDZone.com are fully tested before shipment(worldwide free shipping now!); These are just PCB (Printed Circuit Boards), not the whole HDD (Hard Disk Drive).

More other pcb swap guide please refer to this post: hard Drive PCB Swap

Read More

To RAID-0 or Not To RAID-0

I was thinking about going down the RAID road with my rig and was wondering what people think is best RAID-0 or RAID 0+1(This is what i was thinking) or is there a better option advice would be well recived befor i go spend £150 on 3 more new drives to make the 4 needed for 0+1 and could you tell me how RAID 0+1 and RAID 1+0/10 differ please.

As was said up, it’s necessary to know the application before accurate advice can be given. RAID 0 will benefit you in database access, huge spreadsheets, video editing, CAD rendering and a few other specialized apps. For everybody else, all its going to do for you is getting you bragging rights for good benchmark scores.

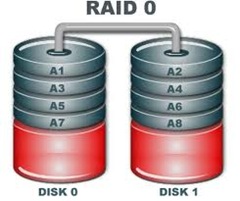
RAID 0

If you need data redundancy, and in reality who doesn’t, RAID 1 is a viable solution. For most data control situations an NAS presents a very convenient alternative and it easily performs the same job for multiple boxes. All data can be kept on the NAS with images of a standard “programs drive” as well as individual boot drives for each machine on the network, making cold metal restores a cinch. Many proprietary RAID formats will even allow ya to do rebuilds and expansions on the fly via “Hot Swap”. It’s also rather “portable” and the joke in my SOHO is that in case of fire, I can grab the NAS handle and run …. and after the data is safe come back in for the any employees, wife, kids, etc.

If your concern is only “one box”, RAID 1 provides data redundancy…..but so do other alternatives …. i.e. tape / optical, cloud backups …… RAID 0 , again unless you have specialized applications, will serve no observable benefit other than nice benchmark scores.

Read More

Seagate Board 100535537

I am looking for Segate board # 100535537 and the main chip is b5502c30. I see you have the board but the description says it contains a different chip b5502c20. Do you have the c30?

We also have this PCB with Main Controller IC of b5502c30. When you order, please note you need the b5502c30 one.

In fact, for this PCB swap, just need the donor PCB has the same board number 100535537 as yours. Then you need move your original PCB’s BIOS to the replacement PCB. The 8pins (4 pins on each sides) with 25P05VP、25P10VP、25F512、25F1024、25F1024AN、SST25VF512、SST25VF010, etc. are the BIOS.

Different Main Controller IC PCB can be used as same.

I received my board today, transfered the bios, but the drive is not powering up, is there anything else that needs to be transfered? The board I received does not have all components matching up, only 2 of the 3 main ic’s

In fact, for this PCB swap, just need the donor PCB has the same board number as yours. Also just need swap BIOS.

Please add more tin to solder the BIOS firmer and confirm you soldered the BIOS in right direction.

Thanks! I did have it in the right direction, just not enough solder.

Read More

Possible Hard Drive Disappeared Failure

Hard-Drive-Disappeared-Failure Q: So I just completed a clean install of Windows 7 and I was installing some software that was originally on my primary HDD to my secondary HDD ,and the installation was taking so much longer than usual, The progress bar was almost full then it slowed down, then completely stopped, so I just gave it some more time. I opened my browser (Opera) to go on youtube and pass the time but my speed dial was gone! and the “Speed Dial File” is located on my secondary HDD, so I thought to myself that either the file is corrupt or something happened to the hard drive. I checked “Computer” and sure enough its gone! Its gone on both Computer and Disk Management, but for some reason is detected by BIOS. its the “Seagate Barracuda 7200 3 TB 7200RPM ST3000DM001” This happened after only after 1 month of use. I have over 1.5 TB of data on that hard drive, and I pretty much install everything on that drive, I have a back up but my data is constantly changing, I wanted a RAID setup but I really dont have the money for that.

Seagate Barracuda 7200 3 TB 7200RPM SATA 6 Gb/s NCQ 64MB Cache 3.5-Inch Internal Bare Drive ST3000DM001 ($146 on Amazon.com)

Is there anything at all I can do? Is my data 100% lost? An help would be appreciated.

Specs:
ASUS M4A88T-M Motherboard
Seagate Barracuda 7200 320 GB
Seagate Barracuda 7200 3 TB 7200RPM ST3000DM001
AMD Phenom II X4 965 Black Edition Deneb 3.4GHz
Rosewill Stallion Series RD500-2DB 500W ATX12V Power Supply
SAPPHIRE Radeon 6950 OC Edition
Kingston ValueRAM 4GB 1333MHz
Windows 7 Ultimate X64

so I just rebooted my PC and the hard drive is back! Works just as good but what if it happens again? is this a sign of failure?

A: I would suggest you to change the sata cable and the power one from the psu see if that fix the issue adding this check if there is a new bios for those big drive on asus

Read More

Do It Yourself Laptop Repairs

As much as I like fast, shiny, new computer hardware, my actual needs are such that I get along fine with gear that is best described as “trailing edge technology.” I’ve been perfectly happy with a couple of older laptops for years now, but recently suffered hardware failures on both machines — one an easy fix, the other much, much harder to resolve. Thankfully, I was able to repair both machines, and, in this post, I’ll walk you through what was involved.

First up is the easy fix.

removingdeadharddrive Removing the dead hard drive

The hard drive on my aging Compaq N610C finally died on me. Fortunately, I have a few spare HDs kicking around, and replacing a drive in this laptop takes less than 5 minutes to accomplish. I simply had to remove a screw, slide out the old drive, swap the replacement and dead drive in the mounting bracket, then pop the “new” drive back in. Fast and easy!

Unfortunately, reinstalling the OS and needed software took far, far longer than the actual replacement of the drive (an hour later, as I type this, it’s still downloading updates).

deaddrivebracket The dead drive and the mounting bracket

The second repair was the non-trivial one, since it involved a failed backlight on my Dell D430. Let’s take a look at how involved this operation turned out to be:

removebezelkeyboard Step one was to remove the bezel and keyboard

To get to the backlight inside the display panel, I didn’t have to completely disassemble the laptop, but it was darned close. The keyboard needed to be removed to give me adequate slack on the cables, then the hinges needed to be unscrewed to free the display panel.

d430disassembled Keyboard and cables freed up, hinges released

Next up, the display panel was disassembled:

bezellcdpanel Next, the bezel on the LCD panel was removed

lcdpanelrevealed The LCD panel revealed

Now, the specific problem with the backlight was that it would flash for about a second when the laptop powered up, but then the light would go dark. Presumably this meant that either the light itself or the inverter board that powered the light was defective and in need of replacement. The lighting element on this laptop is actually a very tiny fluorescent tube, much like the large ones in common use in industrial settings. The inverter board takes care of converting the low-voltage DC current from the laptop batteries into high-voltage AC current to drive the lighting element.

Given the behavior of the display, I suspected the inverter board to be a problem. If the fluorescent tube were a problem, the display would likely have failed over time, appearing reddish and dim when the machine was first powered up. Since the display flashed brightly and briefly, I was pretty sure it was not the tube at fault.

In preparation for this repair job, I’d actually purchased a replacement inverter board. To confirm that this was the problem, I swapped out the cables between the old and new inverter and powered-up the D430. Surprisingly, the backlight displayed the exact same behavior with the new inverter! Given that, I sadly concluded that the problem lay with the lighting element itself, and I was faced with a much more complicated repair.

thebacklight The backlight itself

Removal of the lighting element from the panel was the trickiest part of all. The tube is about 2mm in diameter and is incredibly fragile. I was lucky to get it loose without breaking.

During disassembly of the tube, one of the power cables dropped free. These are soldered onto the ends of the tube — or should I say that they are supposed to be soldered onto the ends of the tube. Assuming that I had not pulled the cable loose, it seemed that I had found the problem. Apparently the solder join had failed over time, leaving just enough of a connection for the start-up current to flicker the backlight, but not enough for the light to function under normal operating current.

backlight The backlight completely stripped down

I carefully cleaned and resoldered the power cable, then reassembled the system enough to test:

lettherebelight Let there be light!

Thankfully, the backlight worked!

Having solved that problem, it was time to reassemble the thing.

tubeback Tube back in display panel, electrical tape applied

Before I completely closed up the laptop, I tested the display again. It really sucks to have to backtrack in this sort of repair.

displaypanel Another test of the display panel

And finally….

success Success!

So, an hour or so later, I had the D430 back in action.

In retrospect, I’m not sure I would have undertaken the backlight repair if I’d known it was going to be this involved. I’m glad to have resurrected the laptop, rather than consigning it to some sketchy recycling program or paying someone else a hundred bucks or more to fix it; however, I honestly don’t enjoy this kind of thing as much as I used to.

So, no, I really will not fix your computer for you.

Read More

How to Repair Hard Drive PCB Circuit Boards?

harddrivepcb Many hard drive failures are caused by problems with the PCB(HDD can’t spin; PCB board/chip be burnt; PCB interface broken; etc). If your hard drive does not spin when powered on, PCB replacement may allow you to recover your data. PCB replacement will not fix all hard drive failures, however, and like most other do-it-yourself repairs, it may void any remaining warranty on the drive. This process should be used only as a last resort after all other options have been exhausted. If you are not comfortable performing repairs yourself, many data recovery companies will perform this task — for a fee.

Before Repairing Hard Drive PCB Circuit Boards You Should Know:

  • Replacement HDD PCBs are almost always sold in limited quantities, so be sure to check auction sites and contact specialty vendors.
  • Don’t be tempted to use a similar-looking PCB that is not identical to the original; this will almost always cause damage.
  • Use caution when handling small electronic components. Hard drives are very sensitive to bumps; a small fall could do serious damage.

Instructions of Repairing Hard Drive PCB Printed Circuit Boards:

1. Confirm that the PCB actually needs to be replaced. If your hard drive spins when powered on or makes clicking noises, the fault is mechanical and will require professional data recovery. If the drive does nothing when powered on or shuts off intermittently, the PCB may be at fault.

2. Locate a suitable replacement PCB. To do this, you will need the model number of the PCB, which is usually etched somewhere on the board itself. To remove the PCB, simply remove the screws that fasten it to the drive and carefully disconnect the ribbon cable. Many hard-drive manufacturers use specially shaped star or hex screws, so be sure to use the appropriate screwdriver to prevent stripping. Tearing the ribbon cable will render the drive unrepairable, so be gentle; it should come free with minimal force.

3. Purchase a replacement PCB. These can often be difficult to find, though many online resellers offer a wide variety; be sure to contact as many vendors as you can. You will need an identical board, both in physical shape and size as well as model number; substituting different boards may cause permanent data loss.

HDDZone.com is recommended, they provide all kinds of hard drive PCBs including Seagate, Maxtor, Western Digital, Samsung and others with worldwide free shipping.

4. Connect the replacement PCB. Gently connect the ribbon cable; make sure that it’s fully connected before mounting the PCB to the drive with the screws you removed before. Be sure to mount the PCB exactly as the original was mounted.

5. Test that the new PCB is working by turning off your computer and connecting only the power line to the drive. When you press the power button to turn the computer back on, the drive should spin. If it appears to be spinning properly, turn the computer off again and connect the hard drive as it would normally be configured to recover your data.

6. Cut the power and disconnect the drive if the hard drive fails to spin or makes any unusual noises when powered on. Ensure that you connected the PCB properly and that it is mounted securely. If you have performed these steps as stated and the hard drive still fails to spin, the problem is likely mechanical and will require professional data recovery.

Related Links:

Hard Drive PCB Swap Guide (Seagate, Western Digital, Samsung, Maxtor and others)

Read More

Seagate Barracuda 7200.9 PCB Buying Guide

As we know:  Seagate Barracuda 7200.9 HDD can’t spin; board/chip be burnt; interface broken; etc. These problems are caused by PCB malfunction. Swap PCB of your Seagate Barracuda 7200.9 hard drives can resolve the problems.

1. Seagate Barracuda 7200.9 Hard Drives PCB Buying Guide:

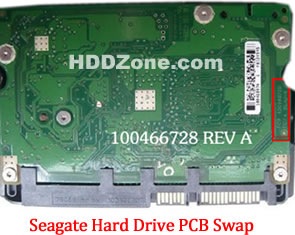
For Seagate HDD, just need the donor PCB has the same board number as yours.

seagate-hard-drive-pcb-swap

* Seagate Hard Drive PCB Swap

2. Before Seagate Barracuda 7200.9 HDD PCB Swap you should know:

1. Most PCB’s BIOS chip(ROM Chip) store the unique information. We need change the BIOS form original PCB to replacement PCB, in order to make the replacement PCB compatible with the HDD.  The 8pins (4 pins on each sides) with 25P05VP、25P10VP、25F512、25F1024、25F1024AN、SST25VF512、SST25VF010, etc. are the BIOS Chip.

Tips: Most of the TV/Phone Repair Shop can offer these services for just $5-%20

hard-drive-pcb-swap-change-chip

* Hard Drive PCB Swap: Change BIOS Chip, Main Chip

2. Some PCB don’t have separate BIOS. The BIOS be integrated on the Main Controller IC(The biggest chip on the board, also named Main Chip). We should exchange the Main Controller IC to let the HDD be recognized.

3. Where to buy Seagate Barracuda 7200.9 PCB Circuit Boards?

Seagate 100383767 PCB
Seagate 100389148 PCB
Seagate 100387575 PCB
Seagate 100406937 REV B PCB
Seagate 100387574 PCB
Seagate 100368182 PCB
Seagate 100389148 PCB
Seagate 100355589 PCB
Seagate 100367025 PCB
Seagate 100367026 ST3200827AS PCB
Seagate 100367028 PCB
Seagate 100404226 PCB

Note: Seagate Barracuda 7200.9 PCB sells on HDDZone.com are fully tested before shipment(worldwide free shipping now!); These are just PCB (Printed Circuit Boards), not the whole HDD (Hard Disk Drive).

More other pcb swap guide please refer to this post: hard Drive PCB Swap

Read More

Can a Regular Person Repair a Damaged Hard Drive?

This story was written to detail the options a user has when a hard drive with important data dies unexpectedly. Many of you have left comments advocating the freezer trick, stating that used as a Hail Mary, you’ve had good results. I do not dispute that the freezer trick *can* work. If you have a hard drive you don’t really care about, and you’re curious to see if you can get the data, by all means, freeze it.

If you do need your data back to the point that you’re considering paying someone to retrieve it, do not freeze the drive, even as a Hail Mary. You may very well make the problem worse and end up costing yourself money.

On June 22, 2012, my primary hard drive, a Samsung HD103SI, quietly passed away. There was no warning — no grinding, no clicks, clacks, or sudden bang. One moment, I was working on a story, the next, I wasn’t.

It quickly became clear that something more serious than a simple system lock had happened. Post-reboot, the HDD would spin up smoothly, beep 12 times, and then spin down. The drive was never recognized in BIOS, which nixed any chance of using disk recovery software to extract data.

This is a story of my efforts to repair the drive myself, my research into the question of whether or not users can repair modern hard drives, and the results of my efforts. If your drive is still detected in BIOS, you may be able to use software tools to retrieve your data. Here, we’re going to focus exclusively on hardware-related failures, and what your options are.

Part of the reason for writing this story is that data recovery is difficult to accurately research unless you’re fairly versed in it to start with. There are dozens of data recovery firms, all promising clean rooms, the latest tools, and highly trained professional staff. Many firms refuse to publish their prices online, which makes comparisons difficult, and it’s apparently common for small companies to farm tough jobs out to larger ones.

Step 1: Broadly identify the type of problem

There are two broad categories of problems that can nuke a drive: PCB issues and internal component failures. If the problem is inside the drive, skip down to Step 3. If the problem is on the PCB, there is a glimmer of hope.

damaged-hard-drive-pcb

The best kind of PCB problem to have is a blown Transient Voltage Supressor (TVS) diode, as shown above. According to Seagate’s FAQ, a TVS diode “protects a sensitive circuit by diverting damaging overvoltages and spikes away from the load.” When a spike occurs, the diode blows. Because the diode is no longer functional, the drive won’t power up. Snip the diode off, and the drive will function normally, albeit in an unprotected fashion. Copy your data over to a functional unit, toss the old one, and count yourself lucky.

My hard drive unfortunately didn’t die this way. There was no visible damage to the PCB but when I removed the board and flipped it over I found a burned-out contact point.

Step 2: Understand your options

From here, you’ve got two choices. You can opt for a replacement PCB, or you can buy an entire donor drive. It’s important to secure as close a match as possible between the original HDD and the donor drive/board. In my case, that meant finding an HD103SI PCB that matched my drive’s make/model number, PCB number, board revision, and drive family (Trinity, in this case).

hdd-pcb

The drive controller model number and PCB codes are outlined in red.

hard-drive-pcb

Understand this: Simply replacing the PCB almost certainly won’t fix a dead drive. If it does, you’ve gotten lucky. Each drive ROM contains parameters and data unique to that particular device — if the parameters for your dead drive are different from those contained on the donor PCB, it won’t function.

In my case, I opted for just a PCB. In retrospect, a full drive might have been the better option, but the purchase only set me back $22 and ~14 days while my part took the slowboat from China. Swapping out the PCB eliminated the 12 beeps, but accomplished nothing else. Beep-less, my drive sat mute — spinning, but unrecognized in BIOS.

Your options at this point depend on what sort of HDD you have. Some hard drives have an externally mounted ROM/NVRAM chip that can be removed and soldered on to a new PCB. Other drives, like mine, incorporate the ROM into the controller. The only way to find out is to go digging for information online, and you’ve got to apply a strong sort filter to estimate the value of what you’ll find. A number of dubious websites advertise a “PC3000 PCI” card, for example, but this is almost always a Chinese clone of the original product, and is far too old to handle modern drives in any case. The real PC3000 UDMA test kit runs over $4000 — far more than the typical cost of a data recovery.

After my simple PCB swap didn’t work, I decided to try to repair the burned contacts on the original board. Here, your options are to either buy a conductive ink pen or to use something a bit more humble. I took the humble option, trotted over to an auto parts store, and picked up a rear window defroster repair kit. I taped off the damaged contact, applied the conductive ink, gave it 12 hours of drying time, fired up the drive…

hdd-pcb-3

My repaired PCB. The burned contact is at the far lower right of the group

And nothing had changed. The drive still spun up, emitted twelve beeps, and spun back down.

That was my second major disappointment and it leads directly to the next step…

Step 3: Resist the urge to do something stupid

Surf the internet for more than two minutes, and you’ll find people who recommend you do one of the following things:

  • Stick your hard drive in the freezer
  • Pop your hard drive into the oven
  • Give it a few taps with a hammer or rubber mallet

People will swear by these options and promise you that they’ve revived 15 drives just this way. Don’t listen. I’m not claiming that no person ever brought a disk back to life by jamming in amongst the frozen peas, but this strategy is far more likely to cause irreparable damage than it is to miraculously affect repairs. Keeping the drive in a ziplock bag while in the freezer won’t help; condensation will form on the drive when you remove it from the bag prior to firing it up again.

drive-freezer

This is what happens when you take a drive out of a freezer — whether you bagged it or not

Leaving the drive in the bag until it’s returned to ambient air temperature might prevent condensation from forming on the platters or heads, but the point of the freezer trick is to run the drive at a lower temperature.

Every repair attempt you make should be balanced against the chance of doing additional damage. To that end, never open the enclosure. If putting your hard drive in the freezer is a bad idea, opening it is infinitely worse. You are not qualified to adjust the alignment of heads or platters that normally spin at 75 mph and are aligned to tolerances measured in micrometers.

Step 4: Hire a professional

This is where I ended up. I talked to a number of data retrieval companies, including Datacent and Secure Data Recovery Services. Datacent quoted me a $750 rate for drive head replacement; Secure Data Recovery was less certain of the cause, but believed repair would likely run between $1,200-$1,500. As of this writing, I haven’t decided what to do. Even after extensive research, my objective visibility on Datacent (or any other data recovery firm) is just about nil. If I opt for repair, I’ll certainly report back on my experience, but ultimately I have no way of knowing how difficult it will be for a properly equipped facility to recover my files, how long it will take, or what constitutes a fair market rate.

With all of that said, here’s a few tips on what to look for (and what to avoid).

  • No data, no fee: Avoid companies that insist on charging you for the privilege of failing to provide a useful service.
  • Low-cost evaluation + return fee: Many firms offer a free diagnosis but will charge relatively high postage to send the drive back. $25-$30 for an evaluation+postage seems fairly reasonable, we’d be cautious of companies charging $50 or more for the two services combined.
  • Avoid broad estimates: No firm can completely diagnose a hard drive by remote, but that doesn’t mean they can’t get an idea for what’s wrong. Beware of companies that offer estimates broad enough to buy a car with. At the very least, ask for estimates that fit the typical cost of specific problems
  • Check the price of parts: The quotes we received typically included the cost of replacement parts. Most companies also note, however, that difficult-to-find hardware may still add additional cost. It doesn’t hurt to see if you can self-source the part, particularly when the cost of a donor drive or PCB is a very small fraction of the total recovery fee.

Step 5: Get a (better) backup solution

I’ve learned two important lessons from this failure. The first is that different models of hard drive are more and less user-friendly; careful selection on my part when I bought the drive four years ago would’ve made it much easier to recover my data. The second is that a better backup strategy would’ve made the first point moot. Because I had a basic, episodic backup solution, much of my older data is safe. The only data I lost… was all the data related to ongoing projects that hadn’t been published yet.

That stung. The difficulty of recovering my information in the intervening month only made the situation that much more frustrating.

If you don’t have a backup solution and you actually care about your data, get one. There’s no guaranteed solution once the drive has failed and, unless you get lucky with a TVS burnout, no easy fixes. A burned out drive is your ticket to a whole lot of website surfing, information sifting, and one enormous headache from trying to separate “My cousin’s uncle’s friend’s neighbor’s dog knew a dude who threw his hard drive in a pool and it worked great” from real, reliable, data.

The forums and information at HDDGuru are a good place to start checking for information, but don’t be surprised if you have to check other places just to get an idea of what the problem might be. These waters are largely uncharted, and dragons lurk in the deep.

PS. Don’t do the freezer thing. Really.

Article By Joel Hruska.

Read More

Genie Backup Home 9.0

“Genie Backup Manager Professional has a clear simple interface which lets you manage the application without problems and in just a few minutes. As soon as you start working with it, you’ll see that behind it’s simple appearance lie some advanced options not found in higher-end products.” – Personal Computing World magazine

Genie Backup Manager Home 9.0

genie-backup-manager-home Genie Backup Home 9.0 is a powerful tool for backing up whatever files or folders you consider important.

If you just want to run a quick and simple backup then you’ll appreciate the program’s list of common “Backup Items”. These include your Outlook emails, desktop, Registry, Windows settings and more, and including these in your backup can be as simple as checking a box.

Most of the time you’ll have your own ideas, of course, but it’s almost as easy to choose your own files and folders. Just check the My Folders box, browse the Explorer-type window and check the box next to whatever files or folders you’d like to protect.

The program supports multiple backup types (Full, Incremental, Mirror); your archive can be compressed, or encrypted, then saved to local, removable or LAN folders, FTP servers, or burned to CD, DVD or Blu-ray discs.

And you can then restore individual files or an entire backup later, from within the program. Or, if your system won’t start at all, a bootable Disaster Recovery disc can help you restore normal working order.

The main new features this time are relatively limited (Outlook 2010 support, backups to secure FTP, Windows 8 support). But there are lots of incremental improvements: an enhanced interface, better Volume Shadow Copy support, reduced RAM requirements, improved performance and so on. And that all helps to make a very likeable backup tool, packed with features yet extremely easy to use.

If you need more, though, it might be worth considering Backup Manager Pro 9.0, which adds more powerful encryption; extra scheduling options; the ability to run commands before and after a backup; differential backup support, the ability to back up to an Amazon S3 account, and more.

What’s new in Genie Backup Manager Home 9

  • Enhanced FTP engine.
  • Secure FTP (FTPS) Support.
  • Added Outlook 2010 support
  • Added Windows 8 support.
  • New and enhanced interface.
  • Enhanced Volume Shadow Copy support.
  • Improved Disaster Recovery engine.
  • New CD/DVD/Blu-ray burner.
  • Enhanced Blu-ray support.
  • Enhanced performance.
  • Enhanced memory management; takes less memory resources
  • Updated Genie Agent notifications
  • Enhanced system schedule
  • Added social integration elements.

Platforms: Windows 7 (32 bit), Windows 7 (64 bit), Windows 8, Windows Vista (32 bit), Windows Vista (64 bit), Windows XP

Read More