1. First, we should judge the HDD’s problem was caused by PCB or not?
- HDD can’t spin up. Either no sound or a short, quiet tickling sound can be heard.
- A burning smell can be sensed coming from the HDD or PCB.
- Burned components on the PCB.
- The HDD be connected to wrong power supply.
- PCB’s interface damaged.
If your HDD has the above symptoms, you can swap PCB to try.
2. Second, we should find the HDD’s donor PCB
For Example: a Seagate Barracuda hard drive
1. The donor PCB should has the same board number as the damaged PCB
From the above photo, we know this PCB’s board number is 100717520. Then we can go to www.hddzone.com and put the number 100717520 in the search box:
Click on “search”
Now, we find the donor board: https://www.hddzone.com/seagate-100717520-pcb-p-553.html
3. take off the bad board from HDD.
Most PCB’s screw can be taken off by using the T6/T8 star screw driver. If you don’t have the suited screw driver, you can order one with the PCB on HDDZone.com.
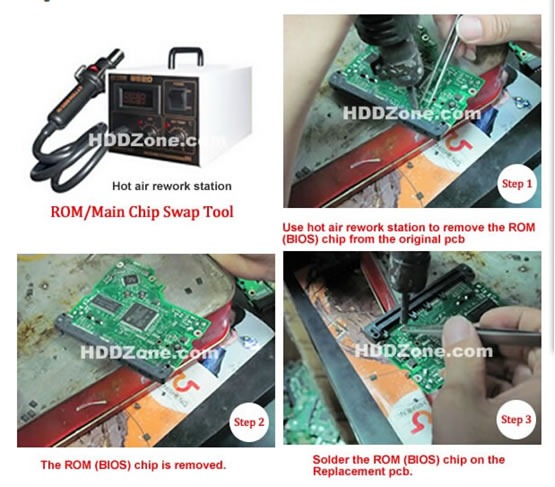
4. PCB’s BIOS (firmware) transfer
It means to transfer the PCB’s BIOS (firmware) from the bad board to the good donor board.
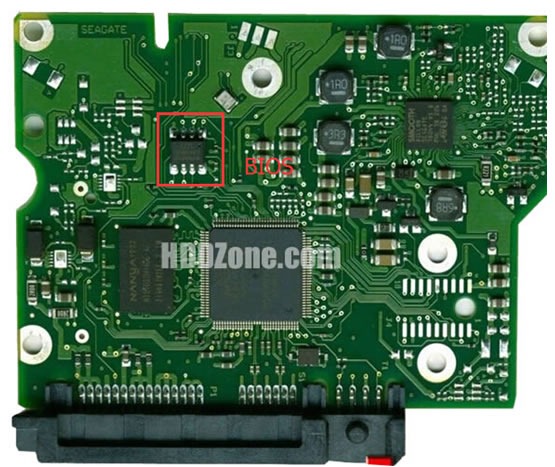
How to know which chip is BIOS?
All of the 8pins (4 pins on each sides) with 25P05VP、25P10VP、25F512、25F1024、25F1024AN、SST25VF512、SST25VF010, etc. are the BIOS.
Why we need to transfer the PCB’s BIOS?
The BIOS (firmware) includes HDD’s unique configuration data. The HDD needs this unique configuration data to work. In order to have same circuit board firmware, we have to transfer the unique configuration data from the bad board to the good donor board.
How to change the BIOS:

5 Put on the donor board
6 Test the hard drive
Put the repaired hard driver back to your computer
If it works, congratulations! Your hard driver had been fixed. If not, that means the hard drive got problem beyond the PCB. HDD includes 3 parts: PCB, hardware, heads-stack. One of them got problem, the hard driver would not work properly.


