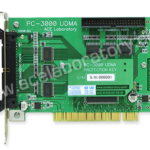
The features of Pirated PC3000 PCI

PC3000 PCIPC3000 PCI version, this Pirated product will not perform or functions:

1). Product will run a while with limited functionality and after a while it will stop working due to DATE/TIME, hard disk with bad sectors, any changes to the G-LIST will make the card unusable.

2). Certain functions will not work properly, often hang or crashes, Hard disk that comes with PC3000 PCI cloned must be Maxtor 4D040H2 or 6Y080L types, imagine these drives have full potential of breaking down, they purposely use these type of HDD so they can sell more pirated PC3000 PCI cloned.

3). Windows operating system in Chinese language so guess what…it will drive you crazy.

4). Hard Disk must be cloned again once the PC3000 PCI is locked due to piracy prevention is detected (e.g. Asking for renew license key), cloning procedure is totally time wasting.

5). If something goes wrong, Chinese seller will deny and ask you to get F##CK!

6). PC3000 PCI is updated regularly meaning that once you bought the pirated ones you can’t update the software. The Chinese will ask you to buy a new one instead. (That’s the trick…they will keep asking to buy a new updated PCI claiming it is better than the previous version, e.g. PC3000 PCI version 1.1, 2.2, 2.XX and so on), after a while they will tell you a new system is added so you don’t have to clone if something goes wrong, guess what? they will ask you to buy a new one again because your old one can’t be updated.

7). Average pirated copy of PC3000 PCI selling for around US$400 – US$600, every few months there is a new version comes out, so you keep spending $600, over the course of 1 year you can buy the new original PC3000 PCI with free updates for 1 year.

8). New original PC3000 PCI can run on any motherboard, Windows Operating systems English or other language, any types of CPU, HDD etc.

Hope this article helps people in deciding whether or not it’s worth buying the clones PC3000.

Read More

Few bad troubles on Seagate Barracuda 7.7200

For example: Seagate Barracuda 7.7200 40Gb. When scan it by MHDD almost all surface looks perfect, but drive have 1 bad block (or little bit more) in first sectors. How to fix the problem?

First rule: if data is important you must save it first, before do any “repair” or you can lose you data in this drive at any moment.

Now, then data saved we can start drive diagnostic. If drive have few bad blocks we can divide situation to the following case:

Universal:

1) software damaged – this is actually not damage, but sectors with incorrect ECC info, simply rewrite sectors to remove trouble.(MHDD erase waits will help)

2) actual damaged – well sometimes surface can be worn and we have actual damage. If we have not very much damage that we can try remap them. Try simple rewrite bad sector (most drives perform remap on write) or use MHDD remap on etc. (then bad sector remapped SMART Reallocated sector count attribute increased )

Seagate 7.7200:

3) head problem – drive firmware detect head problem and switch to “read only” mode. This can be diagnosed by following symptoms:

①. after drive power on, it take long time to become ready (BSY status cleared)

②. drive don’t write if you run MHDD “erase” (not fast erase, but normal erase) everything stopped after MHDD write 765 sectors. (Really nothing wrote at all, if you try writing disk sectors with disk editor, you see what nothing changed)

Such troubles most likely can’t be fixed by MHDD, because they caused by bad head. You should use the head replace tools to fix this problem.

Read More

Noise related to PCB in WD HDDs (Part II)

2- The Continuous Noise

Sometimes there is a continuous noise come from WD HDDs mainly with L-shape PCBs
with motor ICs ( Smooth 1.3) , (L6278 1.7) & (L6278 1.2).

The noise is like: Trrrrrrrrrrrrrr or Trrrr….Trrrr…Trrrrr

so all we have to do for fixing this problem is:

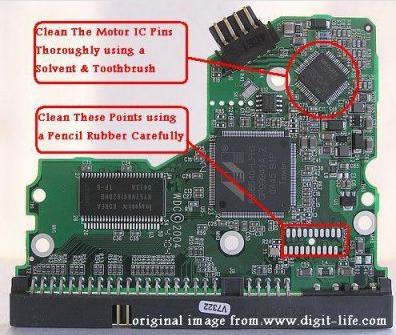
1) – clean the connection points which connect the head stack pins with the PCB using a pencil Rubber …carefully.

2) – clean the motor IC pins thoroughly using a solvent & Toothbrush then wipe it with a piece of smooth handkerchief to remove the dust & dirt from it.
Note- the two steps mentioned above solve the problem in few cases.

3) – if the two steps mentioned above didn’t fix the problem , you have to replace the motor IC cause it’s damaged.
Note- in case of Motor ICs (L6278 1.7) & (L6278 1.2) first try to desolder them then resolder them again before u decide to replace them with a new ones … this sometimes work , but if it didn’t work … replace them directly.
– In case of Motor IC (Smooth 1.3) you must replace it directly.

The image below Shows you where to clean:

wd pcb

Read More

Noise related to PCB in WD HDDs (Part I)

Now discuss the Causes & Solutions of Two Main types of Noise which is occurred in WD HDDs (Especially Related To L-shape PCBs).

Clicking Noise and Continuous Noise:

1- The Clicking Noise
when you power on the hard drive u will hear a noise like (click,click….click,click…click,click)
this noise may be related to the head stack or PCB, the first thing you have to do is to check the PCB By The following steps:

1)- first you have to clean the Whole PCB With a Solvent & Toothbrush then wipe it with a piece of smooth handkerchief to remove the dust & dirt from it.
Caution: Cleaning of the PCB must be done carefully to avoid removal of any small electronic components.

2)- Check the Resistor (R120), [the right value of this Resistor is (0.12 Ohm)], you may adjust your multimeter to Resistor Measuring Mode to determine its Value, if its damaged you have to replace it. but before that, you have to check Transistor Q3 , it’s a 6 pins transistor , for measuring this transistor you may adjust your multimeter to Diode Mode,[ the right Value will be: (first two pins = 0.000 , second two pins =0.000 , Third two pins = nearly over 600)]
if Q3 is Damaged it will burn ur R120 after u replace it , so be sure that Q3 is ok before replacing R120 & u may also Check Transistor Q6 by the previous method to be completely sure it’s safe to replace R120.
Note: ( to be sure of The right values of these electronic components u may compare the values u have measured with the values of a working PCB’s Components)

3)- Check The Coils (such as L2 & L7) – adjust your multimeter to diode mode then the right value must be ( 0.000 ) for any coil as u all know.

4) – inspect the whole PCB for any removed component (such as small capacitors or Resistors) … the removal of these small components may occurred while forced cleaning of the PCB…. so be careful while cleaning it.

5) – in rare cases the firmware microchip may be damaged.

Read More

Most Popular Freeware for HDD Diagnostics (MHDD)

mhddMHDD is the most popular freeware program for low-level HDD diagnostics.

MHDD supports these interfaces: IDE, Serial ATA, and SCSI. Also there is a possibility to access USB storage; there are drivers for emulation (USB->SCSI).

This software can make precise diagnostic of the mechanical part of a drive, view SMART attributes, and perform Low-level format, bad sector repair, different tests and tens of other functions.

More information on: http://hddguru.com/content/en/software/2005.10.02-MHDD/

Read More

Basic Information of Hard Disk Drive (Part III)

Firmware ‘overlay’ code are specific code functions. Why not just put all firmware code into one section? Well, since the RAM in the drive is a limited resource, they’ve put some code into ‘overlay files’, so that this specific code can be swapped into RAM when that specific function is needed. When the function is not needed, it can be swapped out of ram and some other function can be swapped into it again.

The firmware update files from Maxtor (I think the same goes for the other vendors) are not scrambled/encrypted/packed in anyway. In fact, you can find the exact same code in these files also in the ‘*.RPM’ files that PC3K produces for example.

Maxtor distributes their firmware file in a so called “.DMC” file. This DMC file is a package of 4 files, a ‘.Bxx’ file, a ‘.cxx’ file, a ‘.bbr’ file and a ‘.cbr’ file. Like I mentioned, this DMC container is not packed or scrambled in anyway. You can just cut the files out of it. The first 0x150 bytes of this file is the header. This header contains the four filenames, the offsets at which bytes in the package these files can be found, the length of the files and a checksum (not 100% sure about the checksum though). The ‘.bxx’ file is the biggest file and contains the overlay modules. You can find all code overlay modules by looking for ‘MO’ in the file. Right after this 2 byte string, you’ll find the hexadecimal overlay module ID. The ‘.bbr’ file contains the main firmware code. The last 2 files are very small, not sure what they contain, probably some checksums for the firmware and overlay modules.

Like said, the firmware code and overlay modules can also be found in the ‘*.RPM’ files of course, since this represents the firmware code on disk. So, you can look through these RPM files and scan for the ‘MO’ string to find any specific overlay module.

So, in short, if a vendor has released a firmware upload tool (most vendors have), BUT haven’t released a firmware file for your specific drive type, you could create your firmware, if you have the dumped modules (for example, obtained from this site). You could rip the main code and overlay modules and paste them into an existing DMC package. However, since I don’t know the checksum calculation and the meaning of these .cxx and .cbr files (probably checksums), you’d have to do more research, but in theory, it would be possible to create your own firmware files and flash them with such standard Vendor program to disk, so you wouldn’t need to buy an expensive tool like PC3000 (at least not if your sole goal was to upload a new firmware).

Of course, you could also create your own flasher program, instead of using the one supplied by the vendor. However, since vendors use specific versions of the ‘download microcode’ ATA command, you’d have to do research into this.

Furthermore, you could create a program that does EVERYTHING that a tool like PC3000 does. However, like pointed out, you’ll need very detailed information on the vendor specific ATA commands and the structure of the SA for that specific drive type and since this info is not made public by anyone, this means a LOT of work. “But hey, the PC3000 tool features a special hardware PCI card!” Yes, but as you’ll understand by now, you can think of that card as nothing more than a copy protection. They could have perfectly created the tool without it, but I guess they would have sold quite some copies less So you really can’t blame them for it, in fact, I think it’s quite a smart move to stop piracy.

Read More

Basic Information of Hard Disk Drive (Part II)

If a drive has damaged data in the SA, for example in the firmware code module, it might become unusable. To repair these disks, the HDD can be switched to a so called ‘safe mode’, by setting specific jumpers on the drive. If the drive is operating in safe mode, it bypasses its own firmware. Instead, it wants the user to upload firmware to its ram. If the user uploads a correct ‘temporary’ firmware to RAM, it starts executing that firmware. If this uploaded RAM code (the ‘loader’) starts operating, the user can then start to issue ATA commands to the drive to modify the damaged modules.

Firmware files that you can find on a site like this contain a lot of files. First, there is the ‘loader’ file (*.LDR). This file is the ‘temporary’ firmware code, that’s being uploaded to the RAM (so, it’s not being written to disk). Then, there are a lot of ‘*.RPM’ files. These files represent the different modules, which can be written to the SA. The filenames consist of 8 numbers. The first 4 numbers specify the (hex) UBA and the second 4 numbers represent the hexadecimal module size in sectors (each sector normally contains 512 bytes, so for example, if a filename ends in 0002, then that module is 1024 bytes long). So, in short, after uploading the loader to RAM, the user can start replacing damaged modules by overwriting them with correct ones.

BTW, please note that the term ‘firmware’ for the packages on this site is not very well chosen, since these packages contain all needed modules to repair a HDD and not just the firmware (=code) module.

Anyway, if you’re looking for a specific firmware module, you can do 3 things:

1) rip the firmware modules from the SA of an identical HDD
2) get these modules from a friend (or for example, from the files section on this site: www.firmwarebase.com)
3) use a firmware update program from the vendor.

About this last option: firmware updates from vendors are pretty rare, since firmware code almost never needs to be replaced. However, Maxtor for example, had some problems with the firmware code on some Diamondmax HDD models. So, they issued a firmware update. This update consists of 2 files:

1) the executable file that issues the ATA ‘download microcode’ command to upload the firmware files to the HDD
2) The firmware code, consisting of the ‘main’ firmware code and ‘overlay’ code modules.

Read More

The Solutions for Clicking Noise HDD

First of all you need to find out what is the real problem with your drive. You have to be 100% sure that you diagnosed the hard drive correctly. And serial port (so-called “Terminal”) is the only “proper” way to diagnose the hard drive. Forget about swapping heads until you are absolutely sure they are the problem. There is no room for mistake.

There are lots of reasons why a hard drive can make clicking noise, and yes, the most common reason is malfunctioning head stack (either a head itself or the preamplifier chip that is located on the head stack). But there are chances that the problem is not the head stack. You need to find that out via hard drive’s serial port.

Again, never open a drive unless you are 100% sure that the problem is inside. This applies to everyone, including all data recovery people out there.

Now, speaking about heads, it is possible to change the head stack without damaging platters. Cool guys somehow manage to swap 14+ heads head stacks without it being something very special to them. You just need some good experience. I believe it’s been told hundreds of times, but it is worth repeating: good data recovery people spent years to gain the knowledge and experience needed to perform something that is slightly more than just swapping PCBs and using Winhex.

Hope this will give you some better understanding of the situation.

Read More

Basic Information of Hard Disk Drive (Part I)

Modern hard disks feature an area that contains information that the CPU on the HDD logic board uses to operate the drive. The area is called the “system area” (“SA”). This area contains for example the drive ‘microcode’ (a.k.a. firmware), HDD Configuration Tables, Defect sector tables, SMART information, Security info (drive passwords etc), Disk ID info and more. These categories of information are called ‘modules’. So the SA contains a module for the firmware code, a module for the SMART info etc.

The SA is stored on ‘negative cylinders’ of the HDD and therefore is not accessible by normal read commands. However, the area can be accessed with other ATA commands. An example of a (more or less) ‘standard’ ATA command that can access info on the SA is the ‘download microcode’ ATA command that can be used to update information in the firmware code module. However, most of the commands that can be used to access the SA are vendor specific. Since vendors (obviously) don’t want users to mess around with the SA, these commands are generally not made public. However, these commands can be deduced by, for example, reverse engineering the firmware code itself.

This reverse engineering has been done and led to development of tools that can issue these (vendor specific) ATA commands and can read/write almost all sectors in the SA. One example of such tool is PC3000 (‘PC3K’). A tool like this contains tables per HDD model, containing these vendor specific ATA commands and also tables with sector numbers on which the different modules are stored, also per HDD model. SA Sector numbers are counted in “UBA’s”. For example, one specific HDD might use UBA 4 to store the ‘DISK ID’ module, where another HDD model might use another sector for this module.

So in short, to create a tool that can read/write data in the SA, you need to:

1) know (and understand) the (vendor-) specific ATA commands that can be used to access this area and

2) know on which UBA sector the specific modules are stored.

Read More

New Seagate Replica PC Backup Appliance

SeagateSeagate introduced a new backup appliance that completely eliminates the need to manually learn, manage, or dedicate any time to the backup process. The new Seagate® Replica™ backup appliance is a complete PC backup system, which automatically and continuously stores up-to-date copies of everything on a PC, including installed applications, operating system, e-mail, pictures, music, movies, Internet bookmarks and settings. Available in two configurations, the Seagate Replica solution delivers seamless backup for either a single PC or multiple PCs in a household.

The multi-PC version of Seagate Replica backup appliance includes a dock and is available for homes with two or more PCs for a manufacturer’s suggested retail price (MSRP) of $199.99. A single-PC version of the Seagate Replica is recommended for use with individual laptop or desktop computers and is available for a manufacturer’s suggested retail price (MSRP) of $129.99. Seagate Replica Backup System will be available in May.

Read More