CD Optical Storage

Optical storage is a term from engineering referring to the storage of data on an optically readable medium. Data is recorded by making marks in a pattern that can be read back with the aid of light. A common modern technique used by computers involves a tiny beam of laser light precisely focused on a spinning disc. An older example, that does not require the use of computers, is microform. There are other means of optically storing data and new methods are in development. Optical storage differs from other data storage techniques that make use of other technologies such as magnetism or semiconductors.

The term optical drive usually refers to a device in a computer that can read CD-ROMs or other optical discs.

Read More

RAID 0 Data Recovery

Raid1. RAID 0 Data Recovery FAQ:

Q: What is a “RAID 0” configuration?
A: A RAID 0 (zero) volume set is a group of hard disk drives that are combined and accessed together based on a pre-defined configuration to allow for “data striping” across multiple drives. The term “RAID” refers to a “Redundant Array of Inexpensive (or Independent) Disks”. RAID 0 drive sets are also described as “striped without parity” and “non-redundant” volumes.

Q: What is meant by the term “disk striping”?
A: Within a disk striping (RAID 0) volume, information will be written evenly , or “striped”, over at least 2 (if not more) disk drives.

Q: How many drives are needed for a RAID 0 volume?
A: To establish a RAID 0 volume, a minimum of at least 2 hard disk drives ar required. Unlike RAID 1, the number of drives used in the array can be an odd or even number.

Q: What is the difference between “hardware” and “software” RAID 0 configurations?
A: Hardware-based RAID 0 uses a physical controller (either as a separate plug-in board or as part of the motherboard) that provides for the striping of data across the drives in the volume. With a software-based RAID 0 volume, the drives are attached to a normal drive contoller and software controls the order and writing to drives in the volume set.

Q: What are the benefits of using drives set up as a RAID 0?
A: A RAID 0 (disk striping) set will use the maximum amount of available storage capacity of each drive in the array, and allows for faster access and retrieval of data.

Q: What are the negatives associated with RAID 0?
A: RAID 0 (disk striping) does not provide any protection against drive failures. If one or more drives fail, all of the information contained on the volume becomes totally inaccessable. On the other hand, with a mirrored disk volume (RAID 1), information is written to the first drive and then to a second (or “mirror”) drive at the same time. If one of the hard drives in the mirror volume fails, the remaining hard drive can be placed in service as a single drive with no loss of information. Similar to a RAID 0 volume, RAID 1 volumes require a minimum of two (2) drives.

Q: Can RAID 0 be combined with another type of RAID, like RAID 1?
A: The combination of striping and then mirroring is referred to as RAID 0+1. In this scenario, the configuration will provide disk striping (RAID 0) across 2 or more drives and will “mirror” the data in real-time to a duplicate drive set (RAID 1). This unique combination will provide fault tolerance, but it does so at the expense of usable storage space. A volume established as a RAID 0+1 volume will need four (4) hard drives at a minimum to be configured.

Q: Can data be recovered from a re-formatted RAID 0 volume?
A: Many times information is still recoverable, depending on how the drives were re-formatted. Re-formatting a volume using Windows, for example, will create what will appear to be a new “clean” volume – but the original data will still be on the disk in the “free and available” space. A low-level format to “wipe” or overwrite every single block takes a considerable amount of time and destroys the original data.

Q: Could data recovery software utilities be used to recover my RAID 0?
A: Perhaps, but it wouldn’t be the safest approach. Most data recovery software will require the read / write heads to constantly travel over areas of the original disk that, if there is any physical damage, could render the surfaces useless and beyond recovery. The safest method of recovering data from a failed or corrupted RAID 0 volume (or with any storage device) is to create a block-level copy of every sector on each hard drive. The copied image is then used to reconstruct the original volume and rescue the required files and directories. This approach, while more time consuming, maintains and preserves the data integrity of the drive media and limits the number of times that the original drive needs to be accessed. It also protects against any writing to the original media, which could result in an inadvertent overwrite of the data that needs to be recovered.

Q: With RAID 0, if one or more drives become corrupted or fail, is data recoverable?
A: In most situations, data will be recoverable. The quality and integrity of the data recovered will depend on the extent of the damage incurred to each failed storage device. The drives will need to be addressed and recovered individually before attempting to address the set as a volume.

2. How Raid 0 Data Recovery?

Use at your own risk, and always make backups of your disks before performing any data recovery procedure.

RAID 0 is simply blocks of data striped between two disks. Block size can be anything, but is typically 64kB (128 sectors) Disk 0 will contain the first sector 0 through 127, disk 1 will contain sectors 128 through 255, and this will continue to alternate throughout the entire virtual disk. One complication can be expected in some cases, and that is the presence of an offset. An offset is a number of sectors before the first striped block. The presence of an offset is common in Adaptec cards. The offset can easily be found by searching for the partition table. When found, simply take the sector number where the partition table is located, and clone the disk to a file starting with this sector.

The next step is to find the stripe size. This is a very critical step and you must be absolutely sure. Typically the stripe size will be the same as the default setting for the card that was used. For instance, a Dell PERC 2 adaptec RAID card has a stripe size of 32K (64 sectors) and an offset of 64K (128 sectors). Use this as your starting point if possible. If you do not know the card type used, it is wise to use 64K (128 sectors) as your starting point as this is most common among all cards.

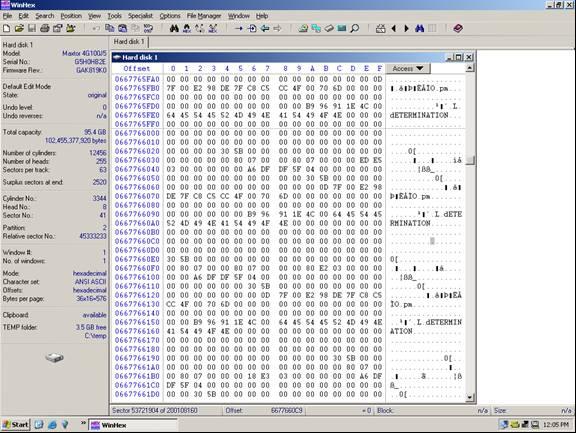
Now use Winhex to find a location on the disk that is easy to see a pattern. See the example below.

Raid 0 data recovery

Notice above how we have text, apparently from a database of some sort. This text can be used to identify a data pattern. Now look at the current sector (53,721,904). Divide this number by the suspected stripe size in sectors. In this case the stripe size we are attempting to validate is 128 sectors. The resulting number will probably not be a whole number. In this case it is 419702.375. Take the whole number of 419702 and multiply this by the suspected stripe size (128). The resulting number is what we will refer to as the stripe break point. It is necessary to know this simple calculation for all types of RAID except RAID 1 (mirroring).

Find the break point:
53721904/128=419702.375
419702*128 = 53721856

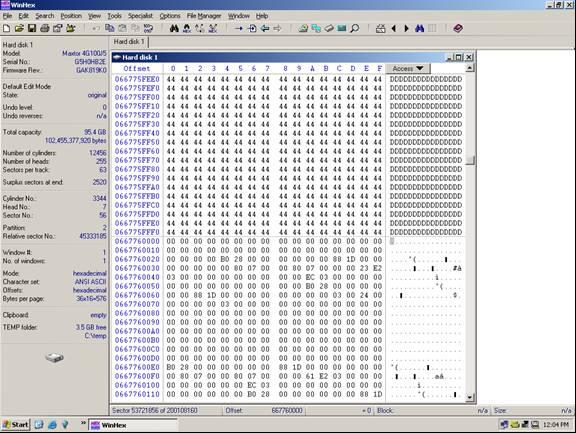
Answer: A break point is located at sector 53, 721, 856 (see illustration below)

raid level 0 data recovery

Notice how at the exact break point of 53, 721, 856 we have a definite difference of data. This is because the stripe is from a separate area of the volume. Not all break points will be this easy. In some cases you will have to look at the actual data and determine if consistency exists. Train your eyes to catch a break point while you are scrolling the sectors using the page down function, and you will become very proficient. You will often have to repeat the steps above on different areas of the disk if the data is too inconsistent to determine the break point.

Once the break point is discovered, you will then be able to start the de-striping process. Using a software utility, such as the hex editor Winhex, place the disk images in the proper order, adjust the stripe size, and clone to a hard disk. Once complete, the disk should be mountable. Refer to the partition and boot sector repair section of this manual if the disk is not mountable, or review the stripe break points.

Read More

Online Data Recovery

1. What we usually do after data loss?
After data loss, we usually go to the web to find some solutions. Some people will try themselves to do recovery. But most of us do the follows: try to find some recovery freeware or to buy a recovery shareware and get the professional tech support. However, is there any other method you know? Yes, you are right. You can choose online data recovery.

2. What online data recovery can help you?
Recover lost data, including deleted files, damaged or deleted partition, format, Fdisk, corrupt or missing operating system files, corrupt files, missing partitions etc.

3. What should you do during online data recovery?

  • An internet connection (Preferably high speed)
  • A secondary storage device like an External USB hard drive, mapped network drive, secondary data drive or Zip drive(To save your recovered data to).
  • A secondary computer to connect your drive to. (You must avoid writing data to the drive you want recovered at all costs to eliminate the risk of overwriting the files you want to get back)

4. Why we should choose online data recovery?

  • Save time
  • Save money

5. How Online Data Recovery Service Work?

  • They will connect to your computer over the internet using a secure connection (Such as Team Viewer)
  • Once connected, they will perform some basic diagnostics tests to determine the proper steps and procedures to safeguard your data and prevent further damage.
  • They begin rebuilding file structures and looking for your most important files.
  • They will go through the recoverable files with you to verify their integrity
  • You will be provided with a list of recoverable files an a total price
  • You authorize recovery and they begin saving your files
  • Depending on drive size, internet connection speed and type of damage your files can be recovered in 1 to 2 hours.

6. Some Online data recovery companies:

  • http://www.webrecover.com/
  • http://www.recoverdatatools.com/remote-data-recovery.html
  • http://onlinedatarecovery.net/
Read More

3D Data Recovery

1. What is “3D” Data Recovery?
DeepSpar Data Recovery Systems pioneered the 3D Data Recovery process – a professional approach to data recovery centred on three phases (listed below). DeepSpar has developed training materials, professional services, and industrial hard drive data recovery tools to deal with the challenges of all three phases.

2. Why 3D Data Recovery?
Data recovery industry was in need of a structured, multi-dimensional approach to drive restoration, disk imaging, and data retrieval. Many companies were claiming to do “full” data recovery, but were in fact only using software processes to gather the easiest layer of available data while leaving behind, or worse, destroying, data trapped at deeper levels. The DeepSpar 3D Data Recovery approach addresses drive-level, disk-level and data-level issues so that the maximum amount of data is retrieved.

3. 3D Data Recovery Details:

Phase I:Hard Drive Diagnostics and Repair:
This phase deals with drives that are not responding, and drives that appear functional and can be imaged, but produce useless data.

The solution is to diagnose the drive for damage and make repairs as necessary.

3 types of drive-level problems:

  • Mechanical problems. Most professional data recovery companies have tools and methods for addressing mechanical problems.
  • Electronic problems. Most professional data recovery companies have only a partial solution for addressing electronic problems.
  • Firmware problems. Only the top data recovery companies have the experience and the resources to fix firmware problems.

The DeepSpar 3D Data Recovery Process complements your current methods with a tool that diagnoses mechanical and electronic issues and fixes up to 80%-90% of firmware problems.

Fixing Phase I problems:
DeepSpar recommends PC-3000 Drive Restoration System by ACE Laboratory Russia, which can identify damage using diagnostics, reporting, and specialized utilities.

Phase II:Hard Drive Imaging / Disk Imaging:
This phase deals with drives that have read instability problems, bad sectors or are in danger of failure.

In this phase, the contents of the repaired drive are read and copied to another disk using disk imaging software and hardware. Disk imaging prevents further data loss caused by working with an unstable drive during the subsequent data retrieval phase.

Phase II problems
Most Data Recovery companies are using imaging tools that are designed only for use on “good” drives. This does not provide maximum data for three reasons:

  • The imaging software processes are so intense that they further damage hard drives.
  • The imaging software skips bad sectors and only copies good sectors.
  • The imaging software takes days or weeks to image bad drives.

DeepSpar Data Recovery Systems provides hardware and software imaging tools that handle disk-level issues.

Fixing Phase II problems:
DeepSpar recommend Disk Imager for this phase, because it uses lighter, faster operations to minimize disk degradation, even when reading bad sectors.

Phase III :File System Recovery and Data Retrieval:
In this phase, original files that were copied to the image drive are retrieved using software.

Phase III problems
Using generic data retrieval / file system recovery tools, data recovery companies typically run into the following areas of difficulty:

  • They can’t retrieve files because of a corrupt file system.
  • They can’t guarantee the integrity of the files they have recovered.
  • They can’t handle corrupted files that have been retrieved.

The DeepSpar 3D File System Recovery Process provides tools that address drive-level, disk-level and data-level issues so that the maximum amount of data is retrieved.

Fixing Phase III problems:
DeepSpar Data Recovery Systems offers a number of tools to address the issues that arise in Phase III:

* File system recovery: Corrupted file system structures such as corrupted directories or boot sectors are rebuilt using PC-3000 Data Extractor.

* File verification: Recovered files are tested for potential corruption. DeepSpar provides a file verification tool that generates a report which can be delivered to the client.

* File repair: If necessary, corrupted files are repaired if data could not be fully restored in previous phases, or if corruption has occurred because of partial restoration, disk imaging is repeated to retrieve more sectors.

Related Links:

Read More

The advantages of USB Flash Drive

USB Flash DriveA USB flash drive is a NAND type flash memory. The NAND type flash memory was designed for the exchange and saving of data as alternative to the magnetic disk. The NAND type flash memory has the capacity to hold large volumes of data. The writing and erasing speed is also fast. The USB drive can be easily inserted into the USB port of the computer. With the help of USB flash drive, data can be safely and easily transferred. The USB drive is more reliable and safer than the floppy disks. The USB drives are small and compact.

A USB flash drive is a NAND type flash memory. The NAND type flash memory was designed for the exchange and saving of data as alternative to the magnetic disk. The NAND type flash memory has the capacity to hold large volumes of data. The writing and erasing speed is also fast. On the other hand the random access is rather slow because it uses block as a unit for the purpose of writing and reading.

The USB drive is made up of secure case small circuit board and is integrated with a universal serial bus connector. The secure case is typically made up of rubber or metal. This secure case protects the circuit board of the USB drive from damage and increases the robustness. The USB drives are very much smaller than the floppy disks and are rewritable.

The USB drive can be easily inserted into the USB port of the computer. With the help of USB flash drive, data can be safely and easily transferred. The USB drive is more reliable and safer than the floppy disks. The USB drives are small and compact, therefore the users can carry them easily in their pockets or they can attach it with their key chains as well.

The USB drives are more reliable when huge amounts of data has to be moved. Some of the USB drives allow 1 million erase or write cycles. The USB Memory card readers have a removable flash memory card. The USB flash drives provide more benefits to its users than the other storage devices. Almost all the computers and laptops have the USB ports, therefore the users can easily transfer the data. Most of the modern operating systems have the USB mass storage standard which is required by the USB flash drives to operate.

The USB 2.0 are much faster than the optical disk in terms of the data storage in much smaller space. The name “drive” is given to the USB flash drive because the USB flash appears to the OS of the computer like a mechanical drive and the method of access is also the same.

The USB connector must be protected and kept safe using a removable cap or by retracting the USB connector into the body of the USB flash drive. The USB flash drives use all the power supply from the host connection. Some high speed USB drives may require more power supply than provided by the bus powered USB hub. Therefore these drives will function when they are directly plugged into the self powered hub or the host controller.

The USB drives are most often composed of three components, the male connector type A, crystal oscillator and the USB mass storage controller. The function of the type A connector is to interface with the system of the host computer. While on the other hand the USB mass storage controller helps in balancing and storage of the data. The USB mass storage controller enhances and carries out smooth processing of the decoding, encryption and transfer of the data between the systems. The function of the crystal oscillator is to make sure that the output of the flash drive is of the best quality.

The reason that the USB drives became more popular is that the floppy drives were most of the time failed to read the data from the floppy disk. Therefore, the users had problems while transferring the data using the floppy disks. The USB flash drives do not have movable parts like the floppy disks had.

Read More

Simpletech USB External Hard Disk Drive

Simpletech usb external hard disk driveThe external hard drives can be portable and connects to the computer system from external. Cable is used for connecting the external hard drives to computer system; it supports the IDE, SCSI and USB. The other bus standards are also compatible.  For windows operating system, the internal hard drives were used in the computer systems during the last years of the twentieth century. On the other hand the external drives were mostly used on Apple Macintosh during the twentieth century.
The USB SimpleTech external hard disc drive is the best solution to fulfill the high capacity data storage medium for transferring the data. It provides high performance with low cost per gigabyte and therefore, it creates good value and customer satisfaction. The design of the SimpleTech USB external hard disc drive is very stylish and its size is also small. On top of the external drive are 4 Light emitting diodes in the form of a circle, these LED are used as a “capacity meter”.

The 25% of total capacity of the external drive is represented by each of the LED. These Light emitting diodes show the used storage space. When the free storage space is lesser than 10%, then the LEDs flash in red color giving an indication to the user. When copying is being done then the LEDs also flash at that time.

The external USB hard disks gain popularity as the backup storage needs increased with the introduction of the internet. The data was to be protected from threats of viruses and unauthorized usage. Therefore, the use of USB disk drives increased. The design and the internal structure are very much similar of both the internal and the external hard disks and are mounted on disc enclosure.

The Linux, UNIX and Windows all the 3 leading operating systems support the USB external hard disk drives. All these operating systems provide the partitioning and the disc formatting tools for the external hard drives. The Operating system can also be installed on the external drives, in this way the applications and programs can run on the computer. The file systems like the NTFS and FAT can also run on the USB external hard disks. In the Windows2000, Windows Vista and WindowsXP the Disk Management Console tool can be used for the partition and formatting of the USB external hard discs. For UNIX operating system the boot camp and the disk utility can be used for this purpose. And for the Linux operating system, the qtparted or the gparted can be used for formatting and partitioning purpose. The small sized external drives are also known as the “pocket drives”.

The flash drives are smaller in size than the pocket hard disks, but they USB external hard drives can transfer and store huge volumes of data. The data storage capacity of the pocket external drives is about 4GB to 8GB. The pocket USB external hard drive is little bit bigger in size than the USB flash drive. There are built in drivers of the pocket external hard disk drives in the operating systems of modern computers. The SimpleTech USB external hard disc drive has recording capacity of 320GB, 750GB and up to 1 Terabyte.

Read More

“3+1” Data Recovery

1. What is “3+1” Data Recovery?
SalvationDATA Data Recovery Solutions pioneered the Broad Sense Data Recovery Approach – A professional approach contains three plus one (3+1) aspects (listed below). SalvationDATA has now developed manufacturer-level tools, in-depth trainings & materials and tech-support services to deal with the challenges of all 3+1 aspects.

2. Why “3+1” data recovery?
Data recovery industry was in need of a more comprehensive approach to the broad sense data recovery need that handles all aspects: microcode, hardware component, bad sector/ instable head and file system. Many companies were claiming to do “full” data recovery, but were in fact only doing the data-level recovery probably by downloading software, while in the meantime 40%-50% potential data on the lower level is left behind, or worse, gone forever. The SalvationDATA 3+1 Data Recovery approach addresses hardware-level and software-level issues like microcode, hardware component, bad sector/ instable head and file system so that to make sure the maximum amount of data is retrieved.

3. “3+1” Data Recovery Details:

Step 1. Drive diagnosis & restoration
This stage repairs drives that are undetected, not responding, and drives that can be accessed but produce null data.

Being the primary stage of the Data Recovery flow, another use of it is to carry out all round diagnosis to the drive and decide which stage to go.

Challenges:

  • Mechanical component problems
    This has been widely acknowledged and practiced. But still there are two difficulties remains: maintain multiple platters alignment with each other when doing platter swap; platter extraction from new design drives with spacers between platters. 3+1 data recovery flow deals with this issue on Stage +1 specially using Stage 1 tool.
  • Bad sector problems
    Bad sector will not be repaired in case you still need to recover data from the target drive; but we can’t just skip those bad sectors directly since “bad” sectors contain valuable data. 3+1 data recovery flow deals with this issue on Stage 2 specially using Stage 2 tool.
  • Microcode problems
    Includes problems of PCB chip microcode as well as SA microcode. This will be the problems that Stage 1 addresses.

The SalvationDATA 3+1 Data Recovery Process complements your current methods with a tool that diagnosiss mechanical and electronic issues and fixes up to 80%-90% of firmware problems.

Tool you need for Stage 1 solution:
SalvationDATA recommends HD Doctor Suite, which can diagnosis different drive problems for review, and provides specialized utilities to handle with microcode problems.

Step 2. Disk Data Extraction
This stage deals with drives that have read inability problems because of physical/ logical bad sectors on SA and/ or user area.

In this Stage 2, we read contents of each sector physically byte-to-byte, including good and bad, and copied to a good disk using data extraction software and hardware. Disk data extraction enables you to work on a stable HDD in next stage coming-Stage 3: Data Retrieval. Another most important task of Stage 2 is to handle HDD with SA media defects, which cause the SA microcode to be collapsed and irrecoverable because the media storing the module can not be read or written. The solution is to boot the drive without using the drive’s SA and extract the user data.

Challenges:

  • The ordinary user-level repeated-read access method that used by imaging software bring a risk of damaging the disk and head, making data lost irretrievable.
  • The imaging software skips bad sectors directly in order not to get hang.
  • The imaging software takes days or weeks to image bad drives. Even so it gets hang most of the time in case the drive has lots of bad sectors.
  • The imaging software can not handle those drives undetected because of SA media defects.

Most data recovery companies are using imaging tools only for Stage 2, and those tools are designed only for use on “good” HDD without media defects and instable heads. Therefore they still can’t get the maximum data (even damaging deeper layer data) even though the have been proficient in the previous Drive Restoration stage.

SalvationDATA Data Compass provides hardware-software complex data extraction tool that handle all the above challenges.

SalvationDATA provides you with comprehensive data extraction tool.

Tool you need for Stage 2 solution:
SalvationDATA recommends Data Compass, which adopts high-end technologies and protocols to perform SA analog for initializing/boot HDD, minimize disk degradation and hang in read attempt to bad sectors.

Step 3.File system rebuilding & Data Retrieval
This stage involves file system rebuilding and user data retrieving.

The traditional practice of this final stage happens only after the disk imaging, that is to say even what you need is only a few files, still you need to perform a complete disk image, because Stage 3 software can not work on patient HDD, which takes a lot of time. Now a better way pioneered by SalvationDATA allows you to retrieve specific files directly without imaging.

Using traditional data retrieval / file system recovery tools, you will have the following headaches.

Challenges

  • You can’t deal with file retrieval out of a corrupt file system.
  • Most of the files you retrieve contain useless or no content, you can not tell which ones are usable.
  • You have to waste lots of time in disk imaging even though what you need is just a few specific files.

The SalvationDATA 3+1 File System Recovery Flow provides advance tools that enhance and innovate in your current practice in data retrieval.

A Win-Win-Win result: SalvationDATA gets reputation, you get profit, and your client gets the data.

Tool you need for Stage 3 issues solution:
Having bad experience like the old saying “suffer defeat on the verge of victory”? SalvationDATA recommends Data Compass, which handles all your headaches in Stage 3.

Step 3+1. Mechanical component exchanging
An extra but very important stage follows the Stage 1 diagnosis. This special stage handles with hardware component issues which can’t be repaired but the only solution is to have the components exchanged using donor parts.

Special extra stage handles the deepest layer of HD malfunction

This stage is to be carried out after the drive diagnosis in Stage 1. Finishing the Stage +1 will take you back to Stage 1 for diagnosis again to decide which stage to go.

Challenges

  • Head stack problems. How to dismount the head stack and then reinstall properly without damaging the sensitive heads is the key, and also most of us cares about.
  • Spindle motor problems. Only a few top professionals with plenty of practical experience can handle spindle motor problems.
  • Platter alignment & spacer problems. So far they are still a headache for most of us without proper tools.

SalvationDATA 3+1 Data Recovery pioneers an independent stage which handles with the mechanical component problems.

Tool you need for Stage +1 solution:
SalvationDATA recommends HD HPE PRO, which solves the annoying headaches in mechanical component exchanging with specially designed utilities.

Read More

Best Data Recovery Softwares 2009

Digital Rescue Premium
Price: $49.99
An easy-to-use interface and “Smart Wizard” make finding and restoring your accidentally deleted photos, videos, music, emails and other files easier than ever before.

Recover My Files
Version: 3.9.8.6307
Price:$69.95
Recover My Files data recovery software will easily recover deleted files emptied from the Windows Recycle Bin, or lost due to the format or corruption of a hard drive, virus or Trojan infection, unexpected system shutdown or software failure.

Data Recovery Wizard
Version: V4.3.6
$69.95
Advanced data recovery software to do format recovery and recover deleted files emptied from Recycle Bin or lost data due to partition loss or damage.

Windows Data Recovery Software
$129.00
Disk Doctors Windows Data Recovery is much more then an simple undelete software or a file recovery program. Its versatility begins when other software fails to recover or even is not able to display data.

Handy Recovery
$49.00
Handy Recovery™ is an easy-to-use data recovery software designed to restore files accidentally deleted from hard disks and memory cards.

ParetoLogic Data Recovery Pro
$49.95
Bring accidentally deleted emails and their attachments back to life. You can also recover a wide variety of other file types.

Quick Recovery
$69.00
Quick Recovery FAT & NTFS is professional windows data recovery software & rated as best data recovery tool to undelete data, recover deleted files & recover deleted data from formatted partition of Windows Operating System.

GetDataBack
Version:3.64
For NTFS:$79
GetDataBack is good data recovery software that scans your hard drive and then allows you to browse through options to find and view files before you actually recover them.

R-Studio
$79.99
an ideal file recovery solution for IT specialists and advanced users who need to recover or undelete lost data .R-Studio offers many tools to help you to find your lost or deleted data. With this product you can recover data over a network, make virtual RAIDS and recover data off a CD or DVD.

Restorer2000
Version:3.3
$49.99
Restorer2000 3.3 is the reliable data recovery utility that provides you with powerful undelete, data recovery and disk restoration functionality.

Read More

HDD Repair And Data Restoration Tool: PC3000 UDMA

1.What is pc3000 UDMA?
PC3000 UDMA is a new product of ACE Laboratory combining a wealth of long experience in data recovery and HDD repair market with 18 years of work with their first products: PC-2000 MFM/RLL, PC-3000 DOS (ISA), and PC-3000 for Windows PCI recognized by data recovery experts worldwide.
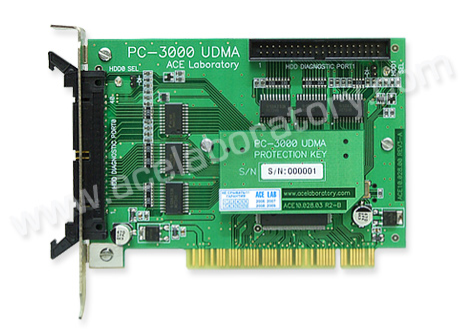
PC3000 UDMA
(Specialized two-port tester card PC-3000 UDMA)

2.Which problems can be solved using PC-3000 UDMA?
The features provided by PC-3000 UDMA can be conventionally subdivided into two parts according to their purpose:

  • HDD repair
  • Restoration of user data

Operations with HDD printed circuit board (PCB):

  • Scanning of firmware microcode in ROM; verification of configuration data in ROM; verification of firmware version in ROM; buffer RAM test; performance of self-diagnostics.
  • Reading and recording of Flash ROM containing firmware microcode and configuration data in ROM. The data for programming of Flash ROM can be copied from the resource database of the PC-3000 for Windows (UDMA) suite.

Operations with HDD service area (SA):

  • Testing of service area for BAD sectors; scanning of service modules to detect possibly corrupted sections.
  • Erasure and formatting of service area; restoration of damaged SA modules or their overwriting with standard reference data from the resource database of PC-3000 for Windows (UDMA).

Operations with HDD disks:

  • Surface testing and detection of BAD sectors; launching the internal low-level format procedure.
  • Relocation of revealed surface defects updating the defect tables; launching the Self Test procedure.

Operations with reading/writing HDD heads:

  • Head testing (for some drive families only).
  • Isolation of malfunctioning heads. HDD capacity decreases in such cases but the drive may become completely functional.

Universal features for operations with HDD:

  • An opportunity to reset SMART parameters of a HDD.
  • An opportunity to correct drive identificatin data (ID).
  • An opportunity to unlock USER and MASTER passwords in a HDD.
  • An opportunity to delete HDD data quickly without impeding its functionality.
  • Read data in UDMA66 mode.

3. PC3000 UDMA FAQS:

1. Can users add new factory modes on their own?
Yes, if the user is quite proficient and familiar with programming basics! For this, PC-3000 for Windows (UDMA) suite has:

  • Built-in script engine, which allows independent extension of utility features. Of course, the task may be daunting for novice users, but after some experience someone who has mastered the product perfectly may attempt to enhance its functionality. Open interface of the PC-3000 for Windows (UDMA) suite provides a wide range of opportunities for that purpose. Besides, users of PC-3000 for Windows (UDMA) can exchange the resources and ready scripts for new factory modes.
  • ATA Commander is another tool that allows inspection of new HDD modes. In fact, it offers a real research lab for users who wish to analyze HDD operation on their own. АТА Commander allows you to send to a HDD any command including factory ones. It also supports their classification, reuse and conversion to scripts, if necessary.

2. Does PC-3000 UDMA support 2.5″ and 1.8″ HDDs?
Yes, the package of PC-3000 for Windows (UDMA) includes a special PC-2″ mini ATA adapter for connection of 2.5″ and 1.8″ HDDs to the PC-3000 UDMA tester board. The software portion of the complex includes factory mode utilities for 2.5″ and 1.8″ drives manufactured by IBM, Hitachi, Toshiba, Fujitsu, Seagate, Western Digital, and Samsung.

3. Does PC-3000 for Windows (UDMA) support 1.0″ Microdrive HDDs?
1.0″ HDD are relatively new. They are designed for use in portable devices featuring the Compact Flash interface. PC-3000 for Windows (UDMA) suite includes a special PC-CF adapter with the Compact Flash interface, which allows connection of such drives to the PC-3000 UDMA tester board. A specialised utility for Hitachi 4-16 Gb Microdrives is currently in development.

4. Does PC-3000 for Windows (UDMA) support SATA HDDs?
Yes, the package of PC-3000 for Windows (UDMA) includes a special PC PATA-SATA adapter for connecting SATA HDDs to the PC-3000 UDMA tester board. The software part of the suite includes factory mode utilities for operations with SATA HDD.

5. Can PC-3000 for Windows (UDMA) be used to unlock a password-protected HDD?
Yes, it can. Factory mode utilities feature a special mode for work with the password-based security subsystem of HDDs. The mode allows you to view and erase existing Master and User passwords thus unlocking the HDD. For most 3.5″ and 2.5″ HDD unlocking is based entirely on software methods in factory mode. Some types of 2.5″ HDD require special Unlock 2,3 probes.

4. PC3000 UDMA Case studies:

Case 1. A Western Digital WD1200PB-00FBA0 drive cannot be identified in computer BIOS, we need to recover user data.

In the first place it is necessary to power-up the HDD and listen carefully to check whether the spindle motor spins up and the drive produces recalibration sounds (PC-3000 is not required during that stage). If the spindle motor spins up, check the settings of configuration jumpers, they should set the drive to be Master Only (in WD drives the mode is on when all jumpers are disabled), then you can connect the drive to the PC-3000 UDMA tester board.

That can be accomplished using a flat IDE cable connected to port 0 or 1 and a power cable. Then it is time to run the software (PC-3000 for Windows), power-up the HDD and launch the PC-3000 universal utility.

If the universal utility is unable to read ID from that HDD and reports error 04h (ABRT), then you should launch a specialized utility for Western Digital HDDs. It will switch the drive to factory mode and attempt to read firmware header in ROM and the configuration sector in service area on disk.

If the utility succeeds and outputs drive information to a report on display, then it starts service area structure test taking several minutes. Then the test results will be displayed. They will likely inform about damaged firmware modules 20h, 21h and 25h. The cause of HDD malfunction becomes evident. Using the “service modules” wizard one can tell that the modules belong to drive translator; modules 20h and 25h at that will be able to recover without assistance when the “regenerate translator” procedure is performed, but module 21h has to be overwritten. To do so, you will have to select from the database of the PC-3000 complex for Windows module 21h, having specified model WD1200PB-00FBA0 and firmware version 15.05R15 as search criteria. Use the list of suggestions to pick any module 21h and select the “write to drive” option. Then you will have to select the “regenerate translator” option and the default menu item; the program will also display the “recommended for data recovery” tip. Then switch the drive’s power supply off and on again to make it initialize itself with new parameters and ensure than the drive is functional and user data can be accessed. Now you can connect that HDD to a computer normally and copy necessary data from it.

Case 2. A Fujitsu MHS2020AT is identified normally in computer BIOS, but during the startup procedure you receive a message about HDD malfunction. We need to recover user data from it.

To connect that 2.5″ HDD to your PC-3000 for Windows system, you will have to use the PC-2″ adapter included into the package. Then power-up the HDD and listen carefully to check whether the spindle motor spins up and the drive produces recalibration sounds (PC-3000 is not necessary during that stage). If the spindle motor spins up, then you can connect the drive to the PC-3000 UDMA tester board and launch the PC-3000 universal utility. At the start the latter will attempt to read identification parameters of the HDD and display the information in its report. In that case the utility would read drive description, but it would also output the following message: “WARNING! Security locked drive”. The cause of HDD malfunction becomes evident.

You may not know the password defined for that HDD, so you should start a specialized utility for 2.5″ Fujitsu drives. Then select the “Security disable password” mode from the “Security subsystem” menu of the utility. The operation will take only a couple of seconds and the password will be disabled. Then switch the drive’s power supply off and on again to make it initialize itself with new parameters. Make sure than the drive is functional and user data can be accessed. Now you can connect that HDD to a computer normally and copy necessary data from it.

Read More

SD Memory Cards

SD Memory CardThe SD memory cards known as the “Secure Digital” first began as miniature cards. Afterwards the new and advanced form of the SD memory card SDIO “Secure Digital Input/output” was introduced into the market. The SDA “Secure Digital Association” included new features and technology to the SD memory cards. The SDA included new varieties of card functions. These new card functions included wireless “Local Area Network LAN” devices, cell phones, GPS receiver, digital video camera etc. The memory card readers that were used in the Secure Digital devices connected to the Universal Serial Bus (USB). The Windows Operating System detects and manages the SD (Secure Digital) memory cards through the driver called the (USB) Universal Serial Bus mass storage. The (SD) Secure Digital host controllers are supported by the Operating System. The Operating System connects the host controller SD to the Peripheral Component Interconnect (PCI) bus. When the SD-host controller is detected by the operating system, the “SD Secure Digital bus driver” is loaded by the operating system OS. When the SD card is inserted by the user, the windows Operating system loads two drivers the “Storage mini-port” and the “SD Secure Digital Storage Class”. These two drivers are loaded on top of “Bus driver” by the Windows Operating System. On the other hand if the SD memory card of a different function like the wireless Local Area Network (LAN) or the Global Positioning System is inserted by the user, then the Windows Operating System loads the driver that is supplied by the vendor. It is necessary that both the vendor supplied and the native drivers in the (SD) Secure Digital stack communicate with “Secure Digital Bus”. The device drivers call the routines to communication with the “Secure Digital Bus”. These routines are called in the static “Secure Digital Bus library”. When the SD Secure Digital drivers compile, it is necessary that they link to the “Secure Digital SD Bus library”. There are some limitations for the SD device drivers. The “Host Controller Register” is not directly accessible by the Secure Digital device drivers.

The SD device drivers call the routines of “Secure Digital Library”. Then the Secure Digital Library forwards the Secure Digital commands to “Host Controller”. Music can be stored in the Flash Memory card and it is most advantageous than storing it in the Hard drives.  The SD flash memory cards consume less power and are more portable. The SD flash cards also have resistance to shocks. The SD card facilities its users and they can easily record the data to their personal liking like music, pictures. The users can easily carry and move the data with ease and comfort. The SD memory card has the technology to fulfill the requirements of the future networked society. The tiny SD memory card provides many advantages to their users. These memory cards are highly compatible and they can link to different digital equipments. Because of the compatibility of the SD memory cards, their usage is more likely to expand even more in the future. The SD card has now become a standard of memory cards that are used for digital connectivity. In the near by future, the SD cards will be universally accessible to more wide array of Multimedia data. The size of the SD memory card is approximately 24mm x 32mm x 2.1mm. The design of the SD card is very compact and slim. Therefore, they are easy to handle and the user can easily transfer the data.

The devices that are compatible with SD card can play video clips & music with the help of “decoder software”. The DVD & CD players use “drive mechanism” while the SD memory cards do not require “drive mechanism” to play the video clips. So, this gives the product designers more freedom and they can be more creative and innovative. The other popular form of the SD memory card is the miniSD memory card. The size of the mini-SD card is approximately 20mm x 21.5mm x 1.4mm. The miniSD card is smaller in size than the SD card.

The SD memory cards have different recording capacitates, their capacity reaches up to 8GB. The large capacity helps to store the High quality videos. The demand for high capacity SD cards with fast data transfer speed has increased because of the increased digital content range. The SD cards also have the technology of “Copyright Protection”. This “Copyright Protection” technology enables new distribution system. This provides safety and security to the illegal copying of the data.The SD card has built in technology called the Key Revocation. The SD memory card has “Control Circuit”, which allows to read & write the after the detection of the external devices. The data is written and read within the “protection area” of the card. The authentication among the digital devices has to be enabled so that the SD card could be accessed.

Read More