Noise related to PCB in WD HDDs (Part I)

Now discuss the Causes & Solutions of Two Main types of Noise which is occurred in WD HDDs (Especially Related To L-shape PCBs).

Clicking Noise and Continuous Noise:

1- The Clicking Noise
when you power on the hard drive u will hear a noise like (click,click….click,click…click,click)
this noise may be related to the head stack or PCB, the first thing you have to do is to check the PCB By The following steps:

1)- first you have to clean the Whole PCB With a Solvent & Toothbrush then wipe it with a piece of smooth handkerchief to remove the dust & dirt from it.
Caution: Cleaning of the PCB must be done carefully to avoid removal of any small electronic components.

2)- Check the Resistor (R120), [the right value of this Resistor is (0.12 Ohm)], you may adjust your multimeter to Resistor Measuring Mode to determine its Value, if its damaged you have to replace it. but before that, you have to check Transistor Q3 , it’s a 6 pins transistor , for measuring this transistor you may adjust your multimeter to Diode Mode,[ the right Value will be: (first two pins = 0.000 , second two pins =0.000 , Third two pins = nearly over 600)]
if Q3 is Damaged it will burn ur R120 after u replace it , so be sure that Q3 is ok before replacing R120 & u may also Check Transistor Q6 by the previous method to be completely sure it’s safe to replace R120.
Note: ( to be sure of The right values of these electronic components u may compare the values u have measured with the values of a working PCB’s Components)

3)- Check The Coils (such as L2 & L7) – adjust your multimeter to diode mode then the right value must be ( 0.000 ) for any coil as u all know.

4) – inspect the whole PCB for any removed component (such as small capacitors or Resistors) … the removal of these small components may occurred while forced cleaning of the PCB…. so be careful while cleaning it.

5) – in rare cases the firmware microchip may be damaged.

Read More

The Solutions for Clicking Noise HDD

First of all you need to find out what is the real problem with your drive. You have to be 100% sure that you diagnosed the hard drive correctly. And serial port (so-called “Terminal”) is the only “proper” way to diagnose the hard drive. Forget about swapping heads until you are absolutely sure they are the problem. There is no room for mistake.

There are lots of reasons why a hard drive can make clicking noise, and yes, the most common reason is malfunctioning head stack (either a head itself or the preamplifier chip that is located on the head stack). But there are chances that the problem is not the head stack. You need to find that out via hard drive’s serial port.

Again, never open a drive unless you are 100% sure that the problem is inside. This applies to everyone, including all data recovery people out there.

Now, speaking about heads, it is possible to change the head stack without damaging platters. Cool guys somehow manage to swap 14+ heads head stacks without it being something very special to them. You just need some good experience. I believe it’s been told hundreds of times, but it is worth repeating: good data recovery people spent years to gain the knowledge and experience needed to perform something that is slightly more than just swapping PCBs and using Winhex.

Hope this will give you some better understanding of the situation.

Read More

WD HDDs Noise related to PCB

The Causes & Solutions of Two Main types of Noise which is occurred in WD HDDs (Especially Related To L-shape PCBs).Continuous Noise & Clicking Noise
1- The Continuous Noise

Sometimes there is a continuous noise come from WD HDDs mainly with L-shape PCBs
with motor ICs (Smooth 1.3) , (L6278 1.7) & (L6278 1.2).
the noise is like : Trrrrrrrrrrrrrr or Trrrr….Trrrr…Trrrrr

so all we have to do for fixing this problem is:

1- clean the connection points which connect the head stack pins with the PCB using a pencil Rubber …carefully.

2- clean the motor IC pins thoroughly using a solvent & Toothbrush then wipe it with a piece of smooth handkerchief to remove the dust & dirt from it.

-Note- the two steps mentioned above solve the problem in few cases.

3- If the two steps mentioned above didn’t fix the problem , you have to replace the motor IC cause it’s damaged.

2-The Clicking Noise
when u power on the hard drive u will hear a noise like (click,click….click,click…click,click)
this noise may be related to the head stack or PCB, the first thing you have to do is to check the PCB By The following steps:

1- first u have to clean the Whole PCB With a Solvent & Toothbrush then wipe it with a piece of smooth handkerchief to remove the dust & dirt from it.
Caution: Cleaning of the PCB must be done carefully to avoid removal of any small electronic components.

2- Check the Resistor (R120) , [ the right value of this Resistor is (0.12 Ohm) ] ,you may adjust your multimeter to Resistor Measuring Mode to Determine its Value ,if it’s Damaged u have to replace it. but before that, u have to check Transistor Q3 , it’s a 6 pins transistor , for measuring this transistor u may adjust your multimeter to Diode Mode,[ the right Value will be: (first two pins = 0.000 , second two pins =0.000 , Third two pins = nearly over 600)]
if Q3 is Damaged it will burn ur R120 after u replace it , so be sure that Q3 is ok before replacing R120 & u may also Check Transistor Q6 by the previous method to be completely sure it’s safe to replace R120.
Note: ( to be sure of The right values of these electronic components u may compare the values u have measured with the values of a working PCB’s Components)

3- Check The Coils (such as L2 & L7) – adjust your multimeter to diode mode then the right value must be ( 0.000 ) for any coil as u all know.

4- Inspect the whole PCB for any removed component ( such as small capacitors or Resistors ) … the removal of these small components may occurred while forced cleaning of the PCB …. so be careful while cleaning it.

5- In rare cases the firmware microchip may be damaged.

——————————————————————————————

-Note- in case of Motor ICs (L6278 1.7) & (L6278 1.2) first try to desolder them then resolder them again before u decide to replace them with a new ones … this sometimes work , but if it didn’t work … replace them directly.
– in case of Motor IC (Smooth 1.3) you must replace it directly.

The image below shows you where to clean.

Read More

Hard Disk Details (2)

The hard drive knows nothing about your files and is not aware in any way of the content. That is the job of the Operating System (OS from here on). When the OS asks for a file, the OS will request a logical block from the drive; the drive will translate that to the physical location in CHS. An example is that it might request data from Cylinder 2500 at head 2 located on sector 234. The drive has many spare sectors and sometimes spare tracks to be used to compensate for errors and relocation of data. NOTE: Look at $BadClus on a NTFS File system for what the OS thinks is bad.

In a previous speech here at Defcon 14, I gave the basic inner workings of a hard drive and several ways you can repair it. I am sure that you can get that previous speech on DVD, find it on the web, or on www.myharddrivedied.com and it will give you a large amount of info that I am not going to discuss here today.  Additionally, there is a whitepaper on the CD that includes more data and notes about repairing a hard drive.

Since my last speech one of the most common questions I get everyday is “What is that clicking noise? How do I fix it?” This is not a simple problem by any means.  So my goal today is to give you more insight into the inner workings your hard drive and explain how this problem occurs and what you might be able to do to fix it.

Slide 1208: In this speech we are looking at the platter assembly where the heads are located, through the area of the preamp and the IC Logic Board down to the PCB.  This is the area that affects what is causing the clicking noise that you hear.  I am now going to explain how each of these things works and walk you through the drive functions.

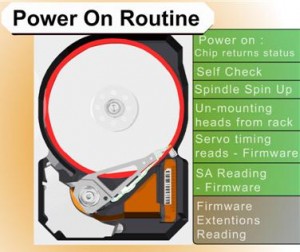
Part of what causes this clicking problem is related to the power on routine functions.

The boot sequence of a drive is as follows:
1.      Power on chip returns status
2.      Self check
3.      Spindle spin up
4.      Un-mounting heads from rack
5.      Servo timing reads – firmware
6.      SA reading – firmware
7.      Firmware extensions reading
8.      Error – read SA from other secondary copies

Read More

Hard Disk Details (1)

Data recovery is necessary when source material fails and where no good backup exists, either Physical or Logical. There are two types of data recovery in the standard basic sense.  One type of data recovery is when there is damage to the media and the pre-existing data need to be retrieved. This will usually require the media to be repaired.

The second form of data recovery is when files were purposely or accidently deleted.  When this type of data recovery is necessary there is usually no damage to the media and standard software can be used to recover the data.  This is the process that most software performs. Very few software programs understand damaged media. Because most software relies on calls and functions from the operating system for its input, it has no control itself over error correction or any functions that the operating system performs on the drive. I believe there a four phases to any data recovery.

Four Phases of Recovery
1. Repair the Hard Drive so it is running in some form, usually requiring hardware or special equipment.

2. Image, Copy or recover the physical drive and sectors primarily by bitstream imaging. If the drive is functioning, it is possible to do this with software, however there are some hardware solutions that work very well; i.e. DeepSpar Disk Imager. This is a situation where some software is better than others, such as dd_rescue (use with dd_rhelp script) on a Linux system has a special feature that allow it to image backward (understanding why you need to image backwards is very important in data recovery).

3. Perform Logical Recovery of files, partition structures, or necessary items; usually this is by software and is the most common type of application sold.

4. Repair of files that might have existed in damaged space or sectors to recover what is possible.  This is usually the requirement in Forensics to be able to re-assemble data to display what was there, if whole or not. This is also applied in data recovery for corrupt Word and Excel documents.

Read More