How to use Disk Management to set up a Hard Drive

How to use Disk Management to set up a Hard Drive To start Disk Management:

  1. Log on as administrator or as a member of the Administrators group.
  2. Click Start -> Run -> type compmgmt.msc -> click OK. Alternatively, right-click on the My Computer icon and select ‘Manage’.
  3. In the console tree, click Disk Management. The Disk Management window appears. Your disks and volumes appear in a graphical view and list view. To customize how you view your disks and volumes in the upper and lower panes of the window, point to Top or Bottom on the View menu, and then click the view that you want to use.

How to create a new partition or a new logical drive:

To create a new partition or logical drive on a basic disk:

  1. In the Disk Management window, complete one of the following procedures, and then continue to step 2:
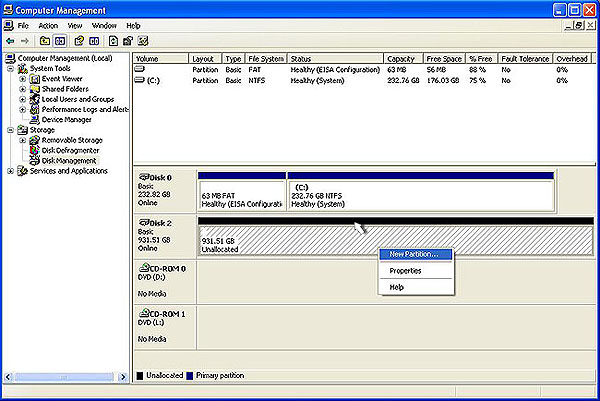
    1. To create a new partition, right-click on the Unallocated space on the Basic disk where you want to create the partition, and then click New Partition.
    2. To create a new logical drive in an Extended partition, right-click on the free space on an Extended partition where you want to create the logical drive, and then click New Logical Drive.
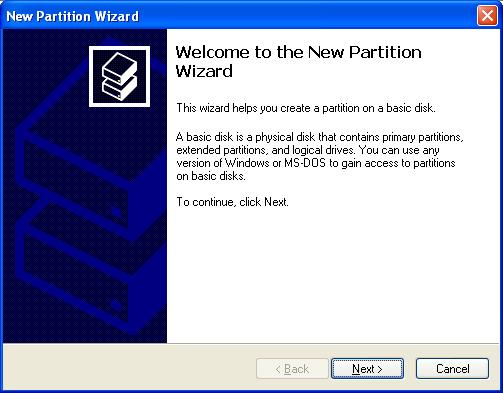
  2. In the New Partition Wizard, then click Next.
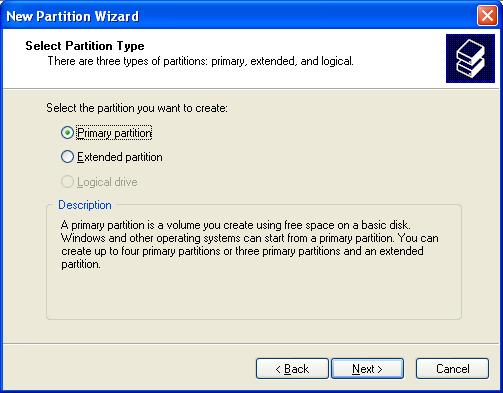
  3. Click the type of partition that you want to create (either Primary partition, Extended partition, or Logical drive), and then click Next.
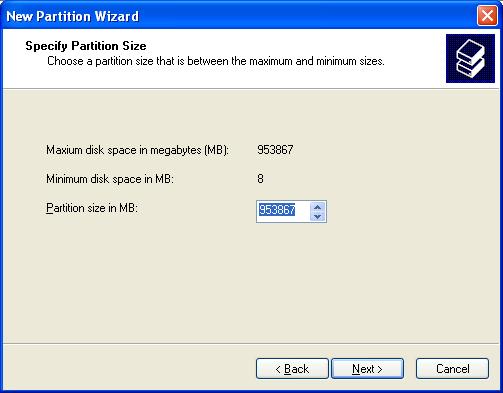
  4. Specify the size of the partition in the Partition size in MB box, and then click Next.
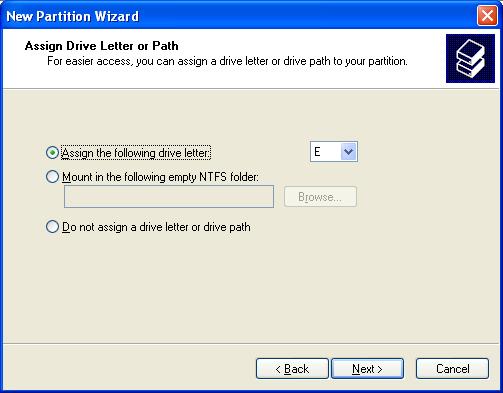
  5. Decide whether to manually assign a drive letter, let the system automatically enumerate the drive, or not assign a drive letter to the new partition or logical drive, and then click Next.
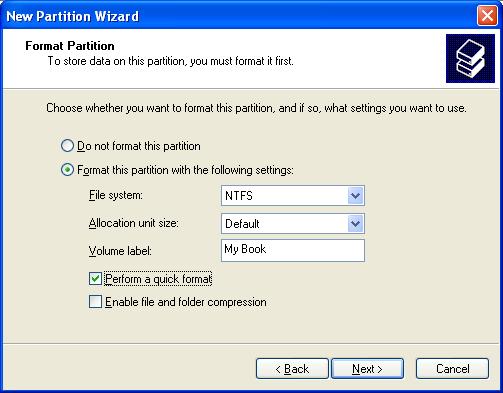
  6. Specify the formatting options you want to use (such as setting a drive label name) by using one of the following procedures:
    1. If you do not want to format the partition, click Do not format this partition, and then click Next.
    2. If you want to format the partition, click Format this partition with the following settings, and then complete the fields in the Format dialog box.
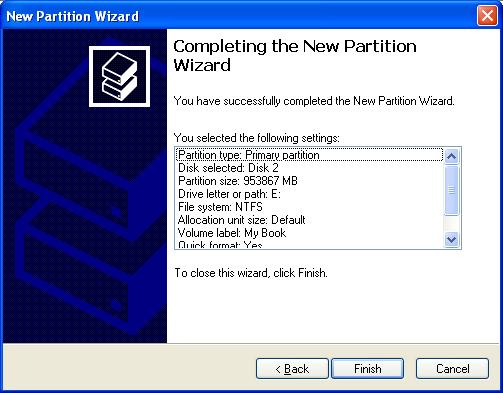
  7. Confirm that the options selected are correct, and then click Finish.
  8. You should be able to see the new drive listed under My Computer with the new drive letter assignment and the drive label name.
Read More

How to access Disk Management in Windows

Disk Management Disk Management is a utility built into WIndows 2000, XP, and Vista which can be used to create, delete, and format partitions.

To access Disk Management in WIndows 2000 and XP please follow the instructions below:

  1. From the desktop or Start Menu of Windows, right-click on My Computer.
  2. Left-click Manage.
  3. Left-click Disk Management.

To access Disk Management in Windows Vista, and Windows 7 please follow the instructions below:

  1. From the desktop or Start Menu of Windows, right-click on the Computer icon and then left-click on Manage from the dropdown list.
  2. Once you’re in Computer Management, you will see Disk Management on the left side. Click on Disk Management to open it up on the right side of the Computer Management window.
  3. You can also click on Start, Control Panel, System and Maintenance, Administrative Tools, and then double-click on Computer Management and then click on Disk Management under the Storage Navigation pane.

Note: Disk Management can also be used to view partitions and their formatted file systems on the hard drive

Read More

Windows 2000/XP Restarts Repeatedly After Adding A Drive

Problem:
After adding an additional drive to the system, Windows 2000/XP may fail to completely load. The system may end up in a loop in which it restarts repeatedly.

Cause:
Windows has a setting that dictates what happens when a system failure state occurs. This may be causing the restarts.

Resolution:
To check for this, do the following:

  1. Shut down the system and remove the recently added drive. At this point, Windows should boot up normally.
  2. Once the desktop appears, right-click on My Computer and click Properties.
  3. Click the Advanced tab at the top of the resulting window.
  4. Click Startup and Recovery at the bottom of the next window. Look for the Automatically reboot option and uncheck it.
  5. Click OK twice to close the remaining windows.
  6. At this point, shut the system down and reconnect the drive. You should now be able to start the system and boot up completely into Windows.
  7. If necessary, proceed as normal to configure the drive using Disk Management.
Read More

How to install, partition, format, or reformat a WD external hard drive in Windows XP?

To partition and format the external hard drive with Disk Management, follow these steps:

  1. To begin, access Disk Management by right-clicking on My Computer and left-click on Manage. If you don’t have My Computer on your desktop, it should be located in your Start Menu.
  2. The Computer Management window will open. It will have two panes. On the left pane, there will be a list of items. Under Storage, click on Disk Management. This will load a right pane with 2 windows on the right side. You may need to maximize the Computer Management window to see all your drives.
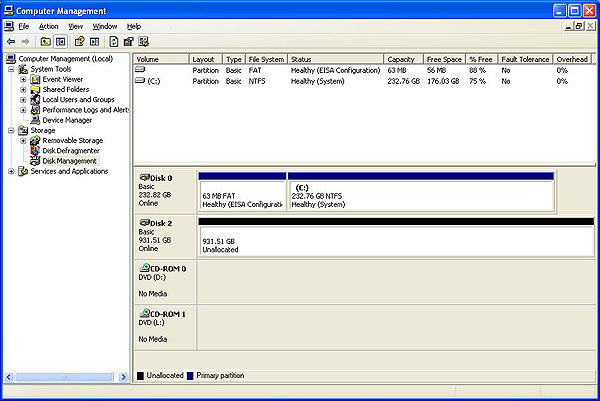
  3. In the lower right pane, you should see a graphical list of all available drives or devices. Find the drive listing that corresponds to the drive that you want to partition and format. It typically has a black barindicating unallocated space.If there is a blue bar, then the drive has already been partitioned and formatted. Make sure, that if you have data on the drive, you back it up before proceeding. Once you are ready to proceed, right-click on the blue bar and choose Delete Partition… You will get a pop-up window asking you if you really want to delete the partition. Click Yes. The bar should now be black.

    Image

  4. Right-click on the black bar to see a menu of available options. Select New Partition…Image
  5. The Welcome to New Partition Wizard will come up. Click on Nextto proceed to the next screen.Image
  6. Choose Primary Partition and press Next.Image
  7. This is where you can set a partition on the drive. By default Windows chooses the whole drive so click on Next.Note: You can also chose to create more than one partition by choosing a smaller size for this partition. Later, you can come back to this window, and create another partition on this drive, by repeating this process.

    Image

  8. Choose the drive letter that you want the drive to have. By default Windows will choose the next available drive letter. Then click on Next.Image
  9. This is the format screen. Make sure that the File System is set to NTFS. In the Volume Label field you can give the drive a name if you want. Check the box that says Perform a Quick Format so that the drive will be formatted quickly. Make sure to leave the Allocation unit size to Default, and then click Next.Image
  10. This screen gives you a confirmation of all the steps that you just went through. Click on Next.Image
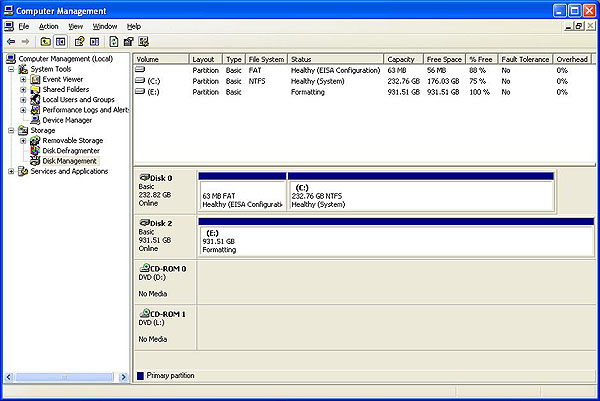
  11. The listing for the drive (Disk 2 in the picture below) will say Formattingas it formats the drive.Image
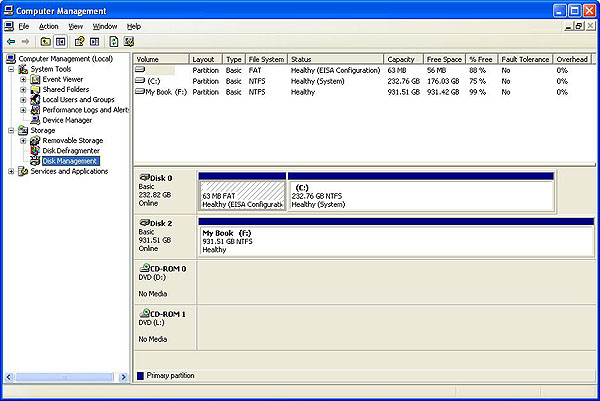
  12. When the drive is done (Disk 2 in the picture below) the bar will be blue and the drive will say Healthy.Image

Note: Once the drivers are installed, you can follow the directions to partition and format the hard drive, if necessary.

Read More