Use External Hard Drive as an Internal Hard Drive

Hi guys. Hard drive prices as you all know have been hiked up terribly. Here in South Africa, internal hard drives 1Tb was R600 = $75. The world shortage caused the hard drives to skyrocket in price from R600 to R1800. That’s a $150 price increase!

Now down to business. I have an external hard drive. Samsung Story. 1TB. I would just like to know what the possibility is, to take the hard drive out of it’s enclosure, connecting it via a SATA port and using it as the internal hard drive. (booting windows, installing games and programs)

You should easily be able to do this, however, I would be careful when removing the case. A lot of them are made not to come off, so be careful not to damage the drive when removing the case. It should be a standard hard drive inside. You might want to make sure it’s out of warranty before opening the case though. Also, I don’t think the enclosure’s controller is doing anything funny with the data, but if it is, you may need to reformat the drive once it’s in your computer.

Use Internal Hard Drive as an External Hard Drive

It is easy and inexpensive to convert an internal hard drive to an external one. All you need is a hard drive enclosure that fits your existing internal hard drive. Hard drive enclosures are widely available at computer stores and online. Prices range from as little as five dollars for a basic one-drive USB 2.0 enclosure to over a hundred dollars for enclosures that hold multiple internal drives in RAID arrays with eSATA interfaces. You probably don’t need to spend more than $20 for a basic one-drive enclosure.

Removing a hard drive from a laptop or desktop is easy. Power down and unplug the computer. On most laptops, you’ll remove a plastic panel from the underside of the laptop with one or two small screws. Remove the drive by gently tugging it free from the connectors, and you’re done. On a desktop, open the system case, and locate the hard drive in its metal bay. Disconnect the power and data cables, remove the screws holding the drive in the bay, and slide it out. Just remember, you’re removing the hard drive, but NOT opening it up. Doing so will damage the sensitive internal components.

You do need to make sure you buy the right kind of drive enclosure kit, so it will be compatible with the drive you’ve removed from the desktop or laptop.

The first consideration is the size of your hard drive. Laptop drives are all 2.5 inches, while desktop drives are usually 3.5 inches. Determine the size of your internal hard drive and shop for a hard drive enclosure into which it fits. Note that 3.5 inch drives generally require an external power supply, while 2.5 inch drives can pull their power from the computer to which they connect.

The drive interface is another critical factor. Old hard drives may use an IDE interface. Many new drives use the speedier SATA interface. Make sure the enclosure you select supports your internal hard drive’s interface. If you have any confusion about the size or interface for your drive, just Google the name. For example, I have an old hard drive that I pulled from a defunct desktop computer. The markings on the drive say “WD Caviar 36400” so a quick search for that phrase tells me it’s a 6.4GB Western Digital, 3.5 inch, IDE drive.

Use internal hard drive as an external drive

Connecting the External Hard Drive to Your Computer

The connector on a hard drive enclosure is the means by which it is connected to your computer. USB 2.0 is a common connector because most computers support it. Firewire is another option if your computer has an available Firewire port. An eSATA connector is faster than USB 2.0 or Firewire, but relatively few computers and enclosures support eSATA at this time.

The enclosure box may be made of aluminum, plastic, or some other material. A box sporting LED indicators helps you observe drive activity. Other bells and whistles are optional.

Installing an internal drive is into an enclosure is easy. You may need a screwdriver, but no special tools are required. Just avoid static electricity and don’t force any connectors. If you are enclosing an IDE drive, make sure to set its master/slave jumpers to the positions recommended in the enclosure’s instructions. SATA drives do not require jumper settings.

Connect the enclosure’s interface cable to the internal hard drive’s interface connector. Plug the enclosure’s power cable into the drive. Fasten the drive into the enclosure with the fasteners provided. Close up the enclosure.

If necessary, plug in the external drive’s power cord. If you don’t need external power, just plug the connector cable into the appropriate USB, Firewire, or eSATA port on your computer. Mac and Windows computers should recognize the new drive automatically. It should appear in your drives list with its own drive letter. Copy a few files to and from the new drive to make sure everything is working. Then enjoy your new external hard drive!

Read More

External Hard Drive Speed

I am going to be housing large data sets on an external hard drive. From it I will be doing a lot of reading/writing as I process data from my laptop via a USB 3.0 port.

what should I get to make this run fast when using it. Will there be a bottleneck caused by using a USB cable that will make other factors relevant to speed inconsequential?

USB3 has a higher transfer rate than any mechanical HDD so there is no bottleneck from it.

Other choices would be an external HDD with eSATA and if there are multiple devices that may need access to the data sets, NAS with Gigabit would be recommended as well, I’ve found that Synology makes great performing NAS Devices with single to 8 HDD units. They are expensive but worth every penny and perform better than most other NAS boxes out there.

But in terms of USB3, Your HDD will be the bottle neck on this so if performance is really a critical piece to your puzzle, find a USB3 enclosure and throw in an SSD for the max performance.

Read More

Toshiba Portable External Hard Drives

Toshiba Portable External Hard Drives Toshiba’s Portable External Hard Drives make computer backup simple. They take the complexity out of backing up your computer data by providing easy-to-use backup software for both Windows and Mac users. Powered by USB 2.0, you can take your files just about anywhere. Just one click and you’re on your way to creating a digital safety net to help protect your files.

Toshiba Canvio 3.0 Portable Hard Drives – 500/750GB/1TB

  • Interface: USB 3.0
  • Speed: Up to 5 Gb/sec
  • Drive Warranty: Three (3) Year Limited Warranty
  • Country of Origin: Assembled in China with drive manufactured in Japan, Philippines, Thailand, or China.
  • Compatible: Microsoft Windows XP, Vista and Windows 7
  • Certifications: FCC/CE/UL/cUL RoHS Compatible

Toshiba Canvio for Mac Portable Hard Drives – 500/750GB/1TB

  • Interface: USB 2.0
  • Speed: Up to 480Mb/s
  • Drive Warranty: Three (3) Year Limited Warranty
  • Country of Origin: Assembled in China with drive manufactured in Japan, Philippines, Thailand or China
  • Compatible: Mac OS X 10.5 or later, Apple Time Machine compatible, Mac computers with a USB 2.0 port
  • Certifications: FCC/CE/UL/cUL RoHS Compatible

Toshiba Canvio Portable Hard Drives – 320/500/640/750GB/1TB

  • Buffer Size: 8MB
  • Interface: USB 2.0
  • Drive Warranty: Three (3) Year Limited Warranty
  • Compatible: Microsoft Windows XP, Windows Vista and Windows 7

Toshiba Canvio Basics Portable Hard Drives – 320/500/750GB

  • Interface: USB 2.0
  • Transfer Rate: Up to 480Mb/s
  • Drive Warranty: Three (3) Year Limited Warranty
  • Country of Origin: Assembled in China with drive manufactured in Japan, Philippines, Thailand, or China
  • Compatible: Microsoft Windows XP, Vista and Windows 7
  • Certifications: FCC/CE/UL/cUL RoHS Compatible

Toshiba USB 2.0 Portable External Hard Drives – 320/500/640GB

  • Buffer Size: 8MB
  • Interface: USB 2.0
  • Drive Warranty: Three (3) Year Limited Warranty
  • Compatible: Microsoft Windows XP, Vista and Windows 7. Mac OS X 10.3.9 or later

More details: Toshiba Portable External Hard Drives

Read More

5 Tips for Choosing an External Hard Drive

External Hard Drive External hard drives are great way to back up your favourite photos, videos, music and work documents – especially as they can be stored separately, ensuring your important files remain safe should anything happen to your laptop or computer. If you’ve never bought an external hard drive before then there’s a few pointers here that may help to have on your shopping list before you go and make that final purchase.

1. Buy A Brand
Do yourself a huge favor and buy a brand name that you easily recognize. Sure these may cost a little more than brand but with computer accessories like this you really do get what you pay for. If a Western Digital 1TB external hard drive costs $90 and another brand ITB hard drive costs $70 why do you think that is? Because the company likes you? Because they like making smaller profits? No it’s because it’s a cheaper drive made with inferior parts that’s going to break a lot sooner than you might expect.

The other aspect of sticking with a brand is your warranty. For example Maxtor, Western Digital and Iomega are all reliable companies and well known for their external hard disks. If something goes wrong with your drive you can have it fixed. With brand you’ll probably not even be able to find an email address that you can contact the parent company on. Is saving a few dollars worth that risk?

2. Google It
Whatever brand or model you decide on make sure you do some research before purchasing. Always, always Google the exact brand and model of the drive you’re considering buying. Look for reviews and especially any feedback on how reliable a drive is. You’ll be very surprised to find that some companies have particularly bad reputations in terms of equipment reliability and what’s known as the “click of death” in the external hard drive industry. Spend time in Google checking out your prospective purchase. You’ll be glad that you did.

3. Connectivity
When it comes to external hard drives you’ll need to choose carefully when selecting your connection types. Your external hard drive will support either USB or Firewire. Firewire is the fastest option available at the moment but your computer may not support this. The vast majority of modern computers will, however, feature a USB port.

The next question now is what type of USB port do you have – USB 1.0 or 2.0? If your computer only has a USB 1.0 port then your external hard drive is going to transfer data VERY slowly. USB 2.0 is the minimum you should consider as connection options for both your computer and your external hard drive. If you don’t have a USB 2.0 port (also called HiSpeed USB) on your computer you may need to get a USB 2.0 card fitted.

4. Speed
Now of course we need to talk about speed. The faster your hard drive operates the faster data will get transferred to your computer and vice versa. Without boggling you with computer jargon there’s a couple of technical things you need to include on your shopping list.

Seek time – this needs to be 10ms (milliseconds) or less.
Buffer size – more is better. Get a drive with at least a 4MB buffer.
RPM – higher is better. 5400 RPM as a minimum. 7200 RPM being preferred.
Stick to the above basic pointers and you’ll do just fine.

5. Capacity
This is the simple part of the whole “buying an external hard drive” equation. Buy as much as you can afford. If you can afford 100GB then get it. However if you can afford 200GB then get it. Then again if you scraped together a few dollars more you could afford 300GB then do it.

This isn’t a sales pitch. Far from it. There is simply no such thing as having too much data storage space. The 160GB drive that I have here was filled up in a little under a month. Currently 1TB external hard drive sounds good for my future needs.

Always add 50% to your data storage requirements. Honestly. You’ll thanks yourself within the first 90 days of buying your external drive.

Hopefully now you’ll be better prepared for purchasing your new external hard drive. It’s one of the best purchases you’ll ever make.

Read More

Things you should know about external hard drives

  • Depending on availability of parts during production, the internal hard drive in an external enclosure could be either SATA or EIDE.
  • They can only guarantee drive capacity. They cannot guarantee a particular internal hard drive model, data interface, rotational speed, or cache size in the external hard drive enclosure.
  • Dismantling any single-drive external enclosure to obtain this information will void the warranty of the hard drive.
  • Interface and cache of the hard drives inside the external enclosure does not affect the performance or the data transfer rate of the external hard drive unit.

Note: With the exception of eSATA and USB 3.0 external hard drives, USB 2.0 and Firewire 400/800 have yet to approach the transfer rates of the internal hard drives we use in our external enclosures.

Read More

External Hard Drive

image An external hard drive is a type of hard drive which is connected to a computer by a USB cable or other means. Modern entries into the market consist of standard SATA, IDE, or SCSI hard drives in portable disk enclosures with SCSI, USB, IEEE 1394 Firewire, eSATA client interfaces to connect to the host computer.

Modern external hard drives are compatible with all operating systems supporting the relevant interface standards they operate with, such as USB MSC or IEEE1394. These standards are supported by all major modern server and desktop operating systems and many embedded devices. Obsolete systems such as Windows 98 (original edition), Windows NT (any version before Windows 2000) old versions of Linux (older than kernel 2.4), or Mac OS 8.5.1 or older do not support them out-of-the-box, but may depend on later updates or third party drivers.

How to add an External Hard Drive to you computer?

Adding an external hard drive to your computer is an easy way to increase your computer storage. You can use your external drive to back up files or transfer files from computer to computer.

  1. External hard drives connect to your computer via an USB, firewire or SATA cable. Check your computer to see which interface your computer supports. In general, firewire is the fastest, so if your top priority is transfer speeds you may choose to go with firewire. On the other hand, if you intend on using the drive with multiple computers you may prefer to get a USB 2.0 external hard drive since most computers have a USB interface port.
  2. Determine your storage needs. Computer storage is pretty cheap these days so it’s a good idea to get the most storage you can. 100GB may seem like a lot, but if you download music and movies it can add up quickly. Compare prices and find a compatible drive with sufficient space for your needs
  3. Once you have found the right drive for your computer, it’s time to attach it. External drives are very easy to add since they do not require you to open up your computer. Simply connect it to a power source and use the cable it came with to attach it to your USB, firewire, or SATA interface.
  4. Your pc will recognize the drive when you plug it in. After attaching your drive, your computer should recognize it immediately and assign it a letter and name, such as “Removable Drive F:”. At this point your drive is ready to use and you can click on it as you would any other drive to access its contents.

How to Partition an External Hard Drive?

When you add an external hard drive, you may do so for a number of reasons. But once you have that hard drive installed, creating different partitions for different purposes can expand your available options. Partitioning an external hard drive is just like partitioning an internal hard drive—just be sure that you are careful when you start your partitioning and make sure you are working with the external hard drive and not a drive that you want—partitioning a drive will immediately erase all information on the drive forever.

  1. Check your external hard drive to ensure that there is no data on the hard drive that you want. As soon as you start the partitioning process, all data on that drive will be completely and forever erased.
  2. Run the Microsoft Management Console. This can be started by typing “MMC” in a command prompt window, or just typing “MMC” in the “Start Search” box in the Windows Start menu.
  3. In MMC, add the Disk Management snap-in. This can be done through the File menu by selecting add snap-in. Select “Disk Management” from the list.
  4. Right-click on the disk in the list of disks at the bottom of the snap-in. From this short-cut menu, you will have various options related to the partitioning of the drive. You can expand the partition, delete the partition, or shrink the partition. You can also mark it as the primary partition if you like.
  5. Format the new partitions. Using the same shortcut menu, you should format all the partitions that you wish to use. You can also set their drive letters here if you like, so your operating system will know which drive is which letter.

Plan ahead how many partitions you want and what size they will be so you know how you will set this up when you get to that point. Partitioning completely erases all contents of a disk immediately.

Where to buy External Hard Drive?

  • Find the right external hard drive for you at Oyyy.co.uk
  • Top 20 Most Popular External Hard Drives on Amazon.com
Read More

How to Install a Seagate External Hard Drive As Internal?

Seagate External Hard Drive Seagate is a popular brand of hard drive, both external hard drive and internal hard drive. Hard drives are versatile pieces of equipment that can be used as both portable or stationary mediums for storage. If you have an external hard drive that you want to convert into an internal hard drive, this can be accomplished easily using a screwdriver and some basic knowledge of the inner workings of a computer.
Step 1. Ensure that your current computer can support the external drive. If you currently have an IDE drive installed in your tower, your external drive must be IDE as well. This is the same for SATA drives. You can locate your hard drive specs on the hard drive label itself.

Step 2. Unscrew the support screws on the external drive using your screwdriver. Unplug the cord that connects the hard drive to the case. Gently slide the drive out of the case and place it to the side.

Step 3. Unplug the computer tower from all devices and power sources. Lay the tower on a flat level surface to serve as your work space.

Step 4. Remove the sides of the tower and lay aside. Locate the hard drive, which is normally located under the CD-ROM drive. Unscrew the support screws and unplug the wires leading to the drive. Gently slide the drive from the tower. Set the drive aside.

Step 5. Insert the Seagate drive that you removed from its external case in Step 2. Replace the supporting screws and carefully plug the cords back into the appropriate areas. Ensure everything is tightly secured and then replace the sides of the tower.

Note: If you are not sure whether your drive is IDE or SATA, take the components to your local computer store and have then examine and identify the parts for you.

You will most likely need to format the new hard drive in your computer tower before use. Back up all information on the hard drive and then format the drive. By backing up your information, you can then replace the data on the new drive.

Read More

External Hard Disk Box

images11. An external hard disk box, used for installing a hard disk, wherein there is a first fastening hole and a second fastening hole on a bottom and two sides of the hard disk, the external hard disk box comprising: a lower cover having a receiving space for receiving the hard disk, wherein there is a first positioning portion that corresponds to the first fastening hole on the bottom surface of the receiving space; an upper cover covering the lower cover; and at least one positioning structure located on one side of the receiving space, wherein the positioning structure has a second positioning portion that corresponds to the second fastening hole.

2. The external hard disk box as claimed in claim 1, wherein the positioning structure is located on one side of the hard disk, the first positioning portion is plugged into the first fastening hole, and the second positioning portion is plugged into the second fastening hole.

3. The external hard disk box as claimed in claim 1, wherein the positioning structure is a flexible flake, the flexible flake has a side board, and the second positioning portion is located on the side board.

4. The external hard disk box as claimed in claim 1, wherein the positioning structure includes an external mask, a spring flake, and a pushing element, the external mask has a through hole that corresponds to the second positioning portion, one end of the spring flake is connected with the external mask, a second end of the spring flake is a free end and has the second positioning portion, and the pushing element is slidably located in the external mask and contacts the second end of the spring flake.

5. The external hard disk box as claimed in claim 1, wherein the positioning structure is a flexible element, one side of the flexible element bends to form a linking flake, one end of the linking flake is a free end and forms a pushing portion, and the pushing portion extends to form the second positioning portion.

6. The external hard disk box as claimed in claim 5, wherein the upper cover is slidably assembled with the lower cover, two leg columns extend from two sides of the bottom surface of the upper cover, and the leg column corresponds to the pushing portion.

7. The external hard disk box as claimed in claim 6, wherein there is a first wedged portion and a second wedged portion on the lower cover and the upper cover.

8. The external hard disk box as claimed in claim 5, wherein each of the flexible elements bends upwards to form at least one curved portion, and the curved portion pushes and contacts a bottom surface of the upper cover.

Read More

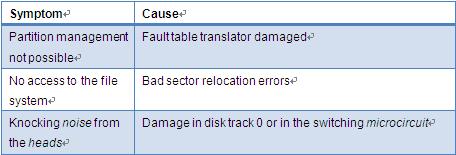
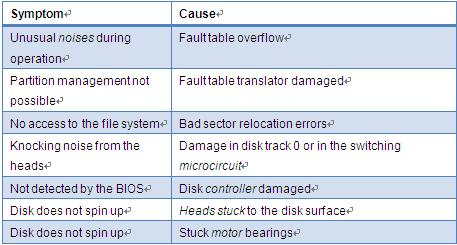
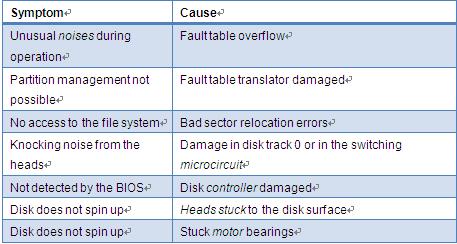
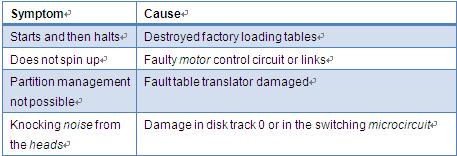
External Hard Drive Problems

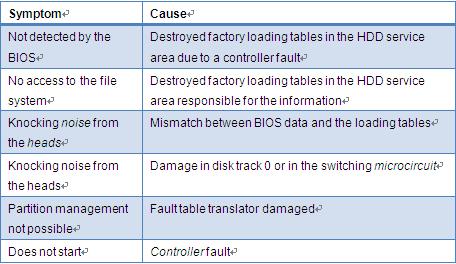
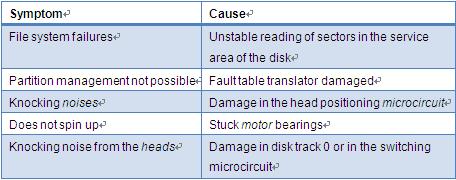
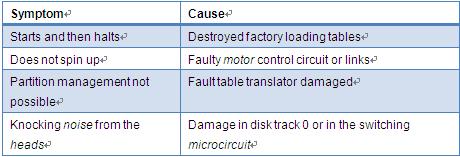
Seagate are presently among the most popular and reliable hard disks drives. The disks of the Barracuda ATA 4, ATA 5 and SATA series are relatively fast and advanced models, the only major drawback of which is their considerable heating during operation. Most frequently repairs are called for because of damaged controller components or stuck spindle motors. Disks from the U series also suffer from reading problems due to erratic development of unstable regions on the disk surface which are impossible to eliminate in any conventional way. Data recovery from Seagate HDD’s is a labor consuming process, especially in cases of mechanical damage, and may take up a lot of time, but the chances of success are typically high.

seagate external hard drive problems

Maxtor, former Quantum, are inexpensive and relatively fast disks, although with quite a few downsides. With time the motor noise increases, the disk tends to develop surface defects and detection failures by the system may occur with increasing frequency. It is not recommended to use these disks for storing critical information and regular backups are just obligatory. While in most cases repair works are attempted for the sole purpose of data recovery, the repaired disk itself can be operational for a long time, except for the slim models which usually fail again within several weeks. The owners of such disks are advised to consider replacement with a more reliable brand. Data from these disks can be recovered successfully, but the repair work must always be trusted to a specialized service shop.

maxtor external hard drive problems

Western Digital disks, although quite widespread in the past, have never been regarded as very reliable. Disks manufactured only three or four years ago are now rarely to be found in a good operating condition. Current models of WD have a satisfactory price/capacity ratio. The new models of WD are called in for repair not very often, maybe also due to their low popularity. A characteristic feature of these disks is the sudden appearance and quick development of bad sectors in different areas of the disk surface. In some cases the disk fails to be detected by the BIOS because of faults in the switching microcircuits. The specific design and circuitry of these disks can sometimes make the task of data recovery after a physical damage too complicated.

wd external hard drive problems
IBM (presently Hitachi) are fast and advanced hard disk drives, however not very reliable, especially the glass plate models (DTLA and AVER series). If during startup the disk is not detected or detection is slow, then repair time has certainly come. These disks are highly serviceable and, if treated properly, can continue to operate reliably for a long time. Exception are the cases when the disk repeatedly emits a strong squeaking noise, which is a sign of a serious physical damage of the magnetic surface. Data can still be recovered, but quite complicated situations are possible when the magnetic surface has begun to destroy, thus making the data recovery task more time consuming and problematical. Isolated batches (assembled in Hungary and Romania) with numerous identical defects have also been registered. The production of HDD’s by IBM was discontinued.

ibm external hard drive problems
Hitachi is successor to the IBM HDD manufacturing division. Most of the remarks about IBM disks are valid for Hitachi as well.

hitachi external hard drive problems

Samsung hard disks are noteworthy for their combination of good performance, high reliability and attractive price. Current models (SP series) are hardly ever called in for repairs, unlike earlier models (Wiener series) most of which are already out of use. Samsung disks usually fail suddenly and for no obvious reason. With the IDE models service problems begin to appear after at least one or two years of operation. Data recovery is very difficult because of the specific design of these disks. Therefore, regular backups are strongly advised.

samsung external hard drive problems
Fujitsu, while known in the past as expensive and extremely reliable, with the advent of the MPG series these disks now present a sorry sight. The disk begins to shut off during operation and periodically fails to be detected by the system. Next comes full inoperability of the disk. Hopes for spontaneous revival are illusory since these misfortunate events repeat again and again. Data recovery from a damaged disk is in most cases successful. The disk can be repaired, but it is impossible to guarantee its stable operation. Fujitsu is discontinuing the production of hard disks for personal computers.

fujitsu external hard drive problems

Read More