Data Recovery: Just Do It!

Data Recovery: Just Do It!Read the following tips on how to diagnose your hard drive crash and determine which recovery options are available to you. Differing causes of drive failure require differing solutions.

To find out if your drive is suffering from a physical crash or software problems, look at the lights on your hard drive. If there’s no light activity at all, or if you don’t hear or feel the disk spin inside or hear strange buzzing or different sounds than normal inside the casing, your disk crash is, in all probability, due to physical problems.

Option I: Hard Drive Boots

If you are still able to boot up your system, try booting from your recovery disk.

Many PC packages come with a disk recovery system. If you are able to boot from your recovery disk, click the START button on Windows and go on command line mode. Try running chkdisk or defrag to see if this fixes your hard drive. Oftentimes, formatting problems and disk fragmentation leads to drive crashes/corrupted disks.

After you have defragged your problematic drive, run your antivirus program and see if it cleans out any viruses. In many situations, viruses can corrupt your operating system or key drivers leading to system crashes. See if this takes care of the problem.

If your data is located in undamaged folders, copy them onto a CD or USB drive and make a list of all your applications. Make sure you know where to download your applications or where you stored the original copy.

If you cannot find your data, or it was stored in a corrupted location, don’t panic! To recover your data, try one of the many data recovery softwares available on the Internet today. These software packages help you restore your disk partitions, folder structure, or even recreate folders so you can find and recover your data.

If you cannot recover your data with data recovery software, skip to options III. Make sure to exhaust all your options before you go and seek professional help since professional data recovery assistance can come with a hefty price tag.

Once you have your data and your applications ready for reinstallation, “wipe” your disk and reinstall your OS. Make sure that your OS is patched with all its current updates.

Option II: Hard drive doesn’t boot but the drive still has blinking lights.

In this situation, plug in a spare working hard drive into a USB port or on a vacant controller slot on your motherboard. In the case of inserting a new master drive into your desktop PC’s chassis, make sure you rearrange the controller jumper on the main board so that it recognizes the new master / slave settings of your hard drives. Upon boot up, get into the boot settings of your computer and set up the new drive as the MASTER and the non-booting drive as the SLAVE.

Once you’ve booted, run your recovery disk and run chckdisk/fdisk and defrag on your slave disk. Follow the rest of the steps and options outlined in Option I above.

Option III: Hard drive is physically damaged!

If your drive has physically crashed, you may still be able to recover your data, even if physical damage has occurred.

Physical hard drive damage usually involves problems with the disk motor or the disk reading head is physically misaligned and fails to work. Sadly, physical damage often means that some of your data might be permanently lost. Just because your hard drive has suffered physical damage, don’t automatically assume that the only solution left is to go seek professional help. Try the tips below first before seeking professional data recovery.

Can you still boot but your PC is really slow? If this is the case, install and use data recovery software to isolate your data and load it onto a storage device like a USB stick. Once you have archived your data and make an inventory of your installed applications, take out the drive and replace it with a new drive.

Does your hard drive make a weird noise? Strange noises are indicative of hardware problems. However, if your drive still works regardless of the noise, install and use data recovery software to find and move your data before you replace your drive.

If none of the options above don’t apply, it is time to seek professional data recovery assistance. Professional data recovery services are not cheap. The cost goes up based on the amount of data you want recovered. Since this situation involves the outlay of substantial amounts of money, here’re some tips to help you select the right data recovery company.

Tips for finding the right data recovery companies:

  • Do a search for data recovery on the Internet. See if there are existing unbiased reviews of your service provider. Avoid services that have too many negative comments from many differing sources.
  • Check your online business better bureau to see if the company you are considering is a member in good standing or have some complaints against it.
  • Ask the company if they have any guarantees. Legitimate data recovery companies DO NOT give guarantees as to how much data they can recover. It is okay if they give estimates. However, it is suspicious if they give out guarantees.
  • Ask if you can pay by credit card. Credit card payments give you some measure of protection because you can chargeback your card if the data recovery service turned out to be a rip off.
  • Get a clear idea of WHEN you will get results. Many companies drag out results over several weeks. Make sure you see eye to eye with the service provider regarding deliverables and timelines.

In closing, a hard drive crash, as traumatic as it can be, is not a death sentence. Make sure you are aware of your do it yourself and professional data recovery options. Keep the options above so you can save time and money. One final note: always remember to back your data up either yourself or by using a data backup software. Do it early. Do it often. Just Do It!

Read More

Hard Drive Crash

Hard Drive Crash Sometimes a hard drive may experience failure or sudden crash without any warning, but many times there are warning signs that will let you know when to take action. Changes in performance, intermittent failures, or unexpected blue screens are major signs that the hard drive may be dying out permanently. The most obvious warning sign with a hard drive is unusual clicking, grinding, or scraping noises.

In practice, the term hard drive crash often refers to both mechanical or electrical failue and logical failure. The case of mechanical / electrical hard drive crash is the worst, it requires professional help of data recovery service, recovery programs won’t help.

Hard Drive Crash Signs

If your PC is experiencing any of the following signs of impeding doom then you must run (not walk) and grab CDs to burn backups of all your essential data.

Sign 1 – You hear high-pitched whining, loud clicking or grinding noises coming from the drive
A normally operating drive will make a smooth “whirling” sound as is spins up or down. But if a drive has a grinding or clicking sounds (the Read/Write heads scraping too close to the magnetic platters), then your drive is sick and is on the way out.

Sign 2 – You see the infamous “Blue Screen of Death“, repeatedly
BSODs (Blue Screens of Death) are actually called “Stop” errors and they only appear when your Windows system is experiencing severe software or hardware issues. Often BSODs can cured with a careful “Repair Install” of the Windows operating system or by removal of a bad device driver. But if these software fast fixes don’t seem stick, then your hard drive is usually on its last legs

Sign 3 – Your computer keeps re-booting on its own
I admit, I have only seen this problem a few times in my 18+ year career and in all instances it was due to hardware issues. Once it was a dust covered motherboard, and another time an overheating processor. But all the other times it was due to bad drives.

Sign 4 – Your system keeps having frequent freezes or hang ups
You are working along just fine, and then suddenly everything comes to a halt. The program freezes up on you. Your mouse and keyboard seem to stop responding. The only solution is to reboot.

Sign 5 – Error message: hard drive is not formatted
This a fun message that you will get when you start up your machine. You maybe able to restart and get it to boot into Windows a few more times but this error is “fur-sure” sign that you drive is very close to death. And by the way don’t try to format the drive! You will lose all your data.

Sign 6 – Error message: boot drive or device not found or drive cannot be accessed
This is another favorite of mine. You can check the CD/DVD trays or the floppy drive to make sure no stray disks are stuck inside. You can also check the BIOS to make sure the system is booting from the hard drive first. If all these tests are no-good, then the drive is a goner.

Sign 7 – Errors: Operating system not found or Missing Operating System
This is a bad one. Even the Microsoft technical support knowledgebase has only got a few causes for this error message. Basically your PC can no longer detect the hard drive or the drive is too severely damaged to read (DOA).

What to do if your drive has any of these signs?

1) First, listen up, if possible, BACKUP YOUR FILES NOW!
2) Create a boot disk and run Windows Scandisk and set it to automatically fix errors. If it finds more than a few bad sectors then see the point above
3) If possible download and use a hard drive diagnostic program. All the major hard drive manufacturers have free utilities on their websites.

WARNING:

You should never open the cover of a failed hard disk drive in attempt to repair, salvage or recover data. Today’s hard disk drives tolerances are very tight and the materials used inside are so technologically advanced that even the smallest speck of dust, contaminants or even gaseous can disrupt the delicate balance of the drives ecosystem. Any such disruption not only destroys the drive but all the data contained on it.

Read More

How To Fix Hard Drive with built-in Hard Drive Utility

Fix Hard DriveBefore you start to fix a hard drive, make sure you have an up-to-date backup. After that, let us do some simple diagnostics and repairs. Both Windows and Mac OS come with built-in hard-drive utility that scans your hard disk for errors and attempts to fix them.

Fix Bad Sectors on a Hard Drive

For Windows
1. Double-click on My Computer to open the My Computer window.
2. Select the Drive that you want to diagnose and repair.
3. Choose Properties from the File menu. You should see the Properties window for the drive that you selected.
4. Choose the Tools tab.
5. Click the Check Now button under Error Checking Status.
6. Depending on your version of Windows, choose either “Thorough” or “Scan for and Attempt Recovery of Bad Sectors.”
7. Click on Start

Fix Hard Drive Crash

Computer hard Drives may fail or crash. One of the common causes is a computer virus, it may have corrupted or broken your computer system.  Here is a way to fix a hard Drive that has crashed.

1. Look for tell-tale signs that your computer is about to crash or fail. Extreme slowness, repeated blue screen and noise or clicking are sometimes signs that your computer hard drive is about to crash. When you hear the sound of clicking, scraping or grinding, immediately turn off or shut down your computer. Doing so will prevent any loss of data.

2. Power down and then power up. Sometimes, hard drive crashes can be easily recovered by doing a power shutdown of the computer. Then, after waiting for a couple of minutes, power it back up again. The initial hard drive crash may not be too serious, but if it happens often, start performing a full system backup, if you haven’t been doing so, to be able to recover your data should the inevitable happen.

3. Ensure that your hard drive and other internal components are seated properly. If Steps 1 and 2 do not work, you may need to open your computer’s CPU to check on some of the drive connections. Sometimes connections get dislodged, especially if you move your computer box often. The symptom will manifest as if the hard drive has crashed, giving you a “Drive error” when you try to boot up your computer. First, turn off your computer and unplug it. Then remove the case of your computer box. Press on each connector to connect it properly. Put the cover back again, plug the computer and power it back up.

4. Insert your boot disc and try to boot up your computer using the disc. Once you are able to do so, you can reinstall your operating system. After installing your software, proceed to perform data recovery using your ghost CD or backup.

5. Use an emergency repair disc to get your computer to work again. Then restore from the last known good configuration.

6. Reinstall your operating system using the installation or system restore CD that came with your computer when you first purchased it. It will take you through a series of steps that include formatting your hard drive, which will then erase your data. Do this as a last resort.

7. Recover your data by using a restore and recovery software or using your most recent backup after you have reinstalled the operating system in the previous step.

8. Reinstall your applications that did not come with your computer when you bought it. Some examples would be Adobe Photoshop, anti-virus software and movie-making software.

Fix Locked Up Hard Drives

A hard Drive is a computer storage device that manages and organizes computer data from the actual CPU. The hard Drive also stores all critical system data required for a computer to startup. Without a hard Drive, a computer cannot function. Fixing a locked up hard drive that prevents a computer from functioning is an important aspect of computer maintenance and repair.

1. Check that the computer hardware is plugged into a reliable power source. Turn on the computer.

2. Hold down the “F2” key on your keyboard if you’re using the Microsoft Windows operating system. If using the Mac operating system, hold down “Option-Command-Shift-Delete” on your keyboard.

3. Use your keyboard’s arrow keys to select “BIOS Setup Menu” in the screen that appears (Windows OS). If using a Mac, wait for the startup bypass process to finish and use your keyboard’s arrow keys to select a primary startup volume.

4. Select “Hard Drive Priority” in your Windows BIOS system, or your main hard drive in the Mac operating system.

5. Check that your boot hard drive is listed on the top of the boot-up list (applicable in both PCs and Macs). In Windows, continue further by selecting the “Disable Hard Drive Auto-lock” option in the BIOS system screen.

6. Save and exit, allowing the operating system to boot-up. This will clear any system errors causing the wrong hard drive to lock up.

Fix an External Hard Drive

As with any piece of electronic equipment, plenty of things can go wrong with an external hard drive. There are two types of problems: hardware and software. Hardware problems are physical flaws that prevent the Drives from spinning and accessing data. Software problems are digital mixups that make retrieving data more difficult.

1. Figure out whether you need a hardware or software fix. Look for grinding sounds from your drive or humming that starts or stops. These are signs that the actuator arm and discs are no longer in alignment and your drive is timing out. If it seems as though nothing is wrong with your hard drive, it’s probably time for a software fix.

2. Run one of the many software fixes, if you think the problem is related to software. These programs feature on-screen directions, making it easy for you to progress through them. If this works, you don’t need to fix a physical problem.

3. Remove the many tiny screws that holds the drive together. Eventually, you’ll get to the innards of your drive. Be very careful not to bend or force a piece to go where it doesn’t want to.

4. Determine if you’ve set things straight. Look to see whether anything was loose inside your external hard drive. If you have recently dropped it or traveled with it, it is possible that something came loose. Also check that all the arms and platters are straight and do not appear bent in any way. If they are bent, straighten them with your hands or pliers.

5. Put everything back together and check that everything in your external hard drive is working properly.

6. Try using the external hard drive on another computer. Maybe your computer or USB port is the problem and needs replaced.

Fix a Physically Broken Hard Drive

Like cars, computer parts can give out when you need them most. The hard drive is one of the most important computer components. Luckily, it gives warning signs before a complete crash. “Bad Sector” or “Read/Write Errors” warn that the hard drive is failing. It is important to back up your important data at least once a week.

The hard Drive Makes No Noise, or Powers on and Makes a Grinding Noise
1. Open the computer and remove the hard drive. Find and remove the drive’s logic board. Inspect the area underneath the board. Look for signs of other damage.

2. Replace the board with the logic board from an identical working hard drive. If you find more damaged areas, just replace the entire hard drive.

3. Test the repaired drive.

The Hard Drive Powers on and Then Goes Silent
1. Separate the logic board from the hard drive. Ground the hard drive to an electrostatic point.

2. Replace the logic board and re-install the hard drive.

3. Boot the hard drive. If successful, immediately back up all data. Disk utilities, like ScanDisk, can move data from bad sectors to undamaged areas. This is only a temporary solution-the drive will fail again.

4. If the drive does not boot, you will need to make it a secondary drive in a different computer. Change the jumpers from “master” to “slave” position. Use Data Recovery Software to transfer your data.

Useful Tools:
1. Free Disk Image/Backup Software
2. Hard drive diagnostic software
3. Free file and disk Utilities
4. Disk Repair Tools
5. Data Recovery Softwares

Read More

Platter Scratch Repairing

Hard Disk Drive Crash
Take the case of computer systems. We become so used to working on the computer on a regular basis that we are rarely ready to face the consequences if things go wrong. This is truer of a computer hard disk drive crash than of anything else. Hard drive malfunction can be divided into two types: one is the so called Firmware Level malfunction that can be repaired using relating software or factory commands; the other one left is the Physical Level malfunction caused by physical hard drive components damage. As to the latter Physical Level crash, the typical case in data recovery practices is that the head crash and serious platter scratches caused by direct contact between the head and the platter surface; such drives manifest themselves as undetected, staying BUSY, besides an ominous scratching sound may start to emanate from the disk. This is a serious problem. It is indicative of nothing less than a crash of the hard disk drive.

Functioning of a Hard Disk Drive
In order to understand the problem of a hard disk drive crash, it is important to first understand the mechanism of a hard drive. Only after knowing how the disk drive functions can one understand the nature of the problem.

Components
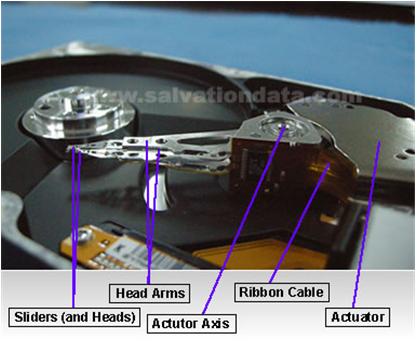
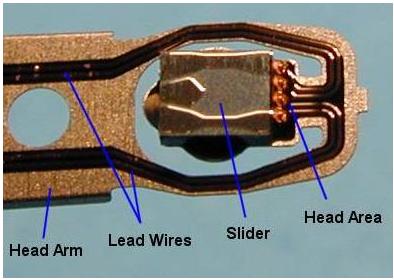
Read-Write Head: The read-write heads of the hard disk drives are those mechanisms that, as the name suggests read or write the data from the magnetic fields of the platters.

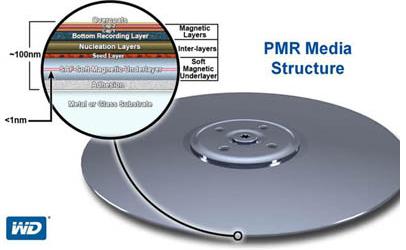
Hard Disk Platter: A hard disk platter is a circular disk within the hard disk drive. It is circular in shape and the magnetic media of the disk drive is stored on it. Generally multiple platters are mounted on a single spindle of the hard disk drive.

Lubricant Layer: This is the topmost layer of the platters and is made of a substance similar to Teflon. Carbon: There is a layer of sputtered carbon just below the lubricant layer. Magnetic Layer: This is below the layer of carbon.

Functioning
The magnetic layer of the hard disk drive stores all the data. The two layers of carbon and the lubricant like material saves this magnetic layer from coming into accidental contact with the read-write head of the disk, we can say they exist as the protection layer of the magnetic layer (of course, another important function of them is to maintain the stability of the flying read-write head)

Read More