Install and Troubleshoot Serial ATA (SATA) Hard Drives in a Macintosh

Sata Hard Drive Serial ATA interface disk drives are designed for easy installation. It is not necessary to set any jumpers, terminators, or other settings on this drive for proper operation. The jumper block adjacent to the SATA interface connector on SATA 150MB/s drives is for factory use only.  The jumper block adjacent to the SATA interface connector on SATA 300MB/s drives can be used to force the drive into SATA 150MB/s mode for use with older SATA controllers that only work with SATA 150MB/s drives.

With a Serial ATA interface, each disk drive has its own cable that connects directly to a Serial ATA host adapter or a Serial ATA port on your motherboard. Unlike Parallel ATA, there is no master-slave relationship between drives that use a Serial ATA interface.

You can use a Serial ATA drive in the same system with Parallel ATA drives as long as both interfaces are supported on the motherboard or with a host adapter. This makes it easy to add Serial ATA compatibility to your existing system without removing existing Parallel ATA disk drives.

What You Need?

  • A Phillips screwdriver and four 6-32 UNC drive mounting screws.
  • A Serial ATA interface cable (sold separately). Maximum length is 39 inches (1 meter).
  • A Serial ATA-compatible power cable or adapter (sold separately).
  • A system with a motherboard that has a Serial ATA connector on it, or a Serial ATA host adapter and available PCI slot in which to install the adapter.

Refer to your computer system documentation to see if your system supports Serial ATA on the motherboard and to locate the Serial ATA connector. If your system does not have a Serial ATA connector on the motherboard, you must purchase a Serial ATA host adapter that is compatible with your computer and operating system and install it with the appropriate device driver according to the host adapter manufacturer’s installation instructions.

Handling Precautions

  • Disc drives are fragile. Do not drop or jar the drive. Handle the drive only by the edges or frame. Keep the drive in the protective anti-static container until you are ready to install it to minimize handling damage.
  • Drive electronics are extremely sensitive to static electricity. While installing the drive, wear a wrist strap and cable connected to ground.
  • Turn off the power to the host system during installation.
  • Do not disassemble the drive. Doing so voids the warranty.
  • Do not apply pressure or attach labels to the circuit board or to the top of the drive.

See your Power Mac or Macintosh Server documentation for information about internal storage options and installation instructions.

Note: You must purchase and install a Mac OS-compatible Serial ATA host adapter into an open PCI slot to install this drive in your Macintosh.

Mounting the Drive

  1. Turn off your computer.
  2. Open your computer case (See your computer manual for instructions).
  3. Slide your new drive into an open drive bay.
    Orient the drive with the drive label facing up and the PCB facing down. You may find it easier to attach cables to your new drive before installing it. If so, follow the cabling steps below, and then return to this step to install the drive.
  4. Use four (4) mounting screws to secure your drive.
    If you want to mount your new Seagate drive in a 5.25-inch drive bay, you must purchase drive rails at a computer supply store.

Attaching the Cables

  1. Attach the cables to your new drive.
    Attach the Serial ATA interface and power-adapter cables. Connect either end of the interface cable to the drive. Both connectors are keyed the same to ensure proper orientation. You can connect only one end of the power-adapter cable to the drive. That connector is also keyed to ensure proper orientation.
    Note: Do not disturb the power and interface cables that are attached to your existing drive.
  2. Attach the Serial ATA interface cable to your computer.
    Connect the open end of your Serial ATA interface cable directly to your motherboard if your computer supports Serial ATA. If not, you must have an open PCI slot on your motherboard into which you install a Serial ATA host adapter (sold separately).
  3. Connect your power-adapter cable
    Connect the open end of the Serial ATA power-adapter cable to any available connector from your computer’s power supply. If none is available, you can purchase a Y-adapter cable to convert any one existing power connector into two, one of which you can use to power your new drive.

Initialize Your Drive

Use one of the following Apple utilities to initialize your new drive:

Mac OS X
Use Apple’s Disk Utility application.

Mac OS 9
Use Apple’s Drive Setup application.

These applications are normally located in your Applications/Utilities folder.

Note: DiscWizard is a PC (Windows/DOS) application. You do not need DiscWizard to install your drive in a Macintosh system.

Troubleshooting

If your drive is not working properly, these troubleshooting tips may help solve the problem.

  1. Does the drive spin up?
    A spinning drive produces a faint whine and clicking noise. If your drive does not spin, check that the power connector and interface cable are securely attached.
  2. Does the computer recognize the drive?
    Verify that the drive is enabled in the system CMOS or setup program. If not, select the autodetect option and enable it. If your drive has a problem, it may not be recognized by the system. If the operating system does not recognize the drive, you need to load your host adapter drivers.
  3. Why does my computer hang on startup?
    Verify that your system is Serial ATA compatible. You need either a Serial ATA 1.0-compatible motherboard connector or Serial ATA host adapter to use this drive.
Read More

How to install, format, and partition internal PATA/SATA drive in Vista?

How to install Internal hard drive installation instructions for Windows Vista using Vista installation process or Disk Management.

It is recommended you use Windows Vista to format and partition your hard disk drive when installing Vista on a boot drive or adding a drive as additional storage.

DiscWizard is your best choice if you want your new drive to become the new boot drive.  To do that, the operating system and the files on the old boot drive need to be copied to the new drive.

The following are step-by-step installation instructions on how to format and partition a drive in Windows Vista.

Fresh Vista Install:

  1. Physically install the hard drive in your computer. If this is a PATA / IDE drive, set the BIOS to Auto-Detect the hard disk. If this is a SATA drive, on some systems you may need to enable the SATA port in the BIOS before the computer recognizes the drive. For further information on navigating your system’s BIOS, please consult with your computer manufacturer’s documentation.
  2. Insert the Windows Vista CD-ROM and restart the computer.
  3. Follow on-screen prompts for setup. When installing Vista fresh on this hard drive, at the screen titled, “Which type of installation do you want?”, click Custom (advanced).
  4. At the “Where do you want to install Windows?” screen, select Disk 0 Unallocated Space and click Next.
  5. If this is a SATA drive and it is not recognized in the above step, you may need to install drivers provided by the motherboard manufacturer if the drive is connected directly to the motherboard, or install drivers provided by the controller card manufacturer if the drive is connected directly to a SATA PCI controller card. To install the driver for the SATA controller on the motherboard or PCI controller card, you will need to click Load Driver.
    Note: there are no Vista drivers provided by Seagate for any Seagate or Maxtor branded PATA or SATA drive, as the drives themselves are all Plug-and-Play within Windows Vista when connected internally on your computer.
  6. From here, proceed with the rest of the Vista installation.

Installing an Additional Data Drive in Windows Vista:
Note:If the second drive is pre-formatted or used in another Windows system, it is not necessary to re-format the drive. Follow the instructions below up to Step 2 and Vista should recognize the drive.

  1. Physically install the hard drive in your computer. If this is a PATA / IDE drive, set the BIOS to Auto-Detect the hard disk. If this is a SATA drive, on some systems you may need to enable the SATA port in the BIOS before the computer recognizes the drive. For further information on navigating your system’s BIOS, please consult with your computer manufacturer’s documentation.
  2. Restart the computer and boot into Windows Vista.
  3. Click on the Start button and select Control Panel. In the Control Panel, click on System and Maintenance. Scroll down and click on Administrative Tools. Double-click on Computer Management. On the left-hand side of the Computer Management window, click on Disk Management, located in the Storage section.
  4. In Disk Management you will see the active hard disks. Be patient, as it may take a minute or two for it to load the disk information. On the bottom half, you will see Disk 0, which is the Primary (or C:) drive. Disk 1 and greater are generally considered secondary storage drives.
  5. If the description of Disk 1 is “Not Initialized” then you must right-click on the Disk 1 icon and select Initialize.
  6. In the window that appears, click on the disk to be initialized and click on OK.
  7. Next, right-click on the Unallocated region of the basic disk, and select New Simple Volume.
  8. In the New Partition Wizard, click Next. Select the type of partition you want and follow all on-screen instructions.  After finishing, the section of the disk that said “Unallocated” should say “Formatting” for a few seconds.  Once it is finished formatting, it will say, “Healthy”.
Read More

How to Install A (PATA) Hard Disk Drive?

Step 1. Opening The Computer Case

Important: Each computer has a different way of opening the case and location of the hard disk drive. Refer to the user’s manual of your computer for detailed instructions.

Warning: The following procedure listed below will have you working within the chassis of the system. Following a few simple rules will keep you and your hardware safe.

1. Always power OFF your computer and disconnect the power cable before opening the case.

2. Always use an anti-static wrist strap before connecting or disconnecting anything within your computer.

Step 2. Installing The Hard Disk Drive

3. When the hard disk drive is level with the hard drive rack, gently push it in place without exerting too much force. Tighten the hard disk drive in place using the screws supplied with the product.

Note: If screws other than those supplied are used, the PCB board of the hard disk drive may get damaged and cause the hard disk drive to malfunctio.

Step 3. Making Your Connections

4. Line the key on the UDMA cable with the opening on the hard disk drive.

Note: Make sure the cable is not inserted in reverse since this can damage the connector and hard disk drive. Do not force or rock the connection into it’s socket on the hard disk drive. Push it in straight until it is seated.

Pata UDMA and Power Cable Connections

5. Line the Molex power cable connector with the opening on the hard disk drive.

Note: Make sure the cable is not inserted in reverse since this can damage the connector and hard disk drive. Do not force or rock the connection into it’s sockets on the hard disk drive. Push it in straight until it is seated.

Read More

How To Set The Jumper Setting On Samsung (PATA) Hard Disk Drive?

Setting The Jumper On Your Hard Disk Drive

Use the common jumper settings for Samsung hard disk drives that are listed below. Please verify the jumper setting by checking the label on your hard disk drive.

Important: If you partitioned and formatted your hard disk drive, with the General or 32 GB pin setting, and now need to use the opposite pin setting; remember to partition and format the drive again after changing the pin settings.

Configuring your Hard Disk Drive (Master, Slave, or Cable Select) – Setting the Jumper

  • If this is the only HDD in your computer, set the pin setting to Master.
  • If this is the second HDD in your computer, set the pin setting to Slave.
  • If this is the second HDD in your computer, and the first drive is set to Cable Select, set the pin setting to Cable Select.
  • If you are replacing the HDD in your computer, set the jumper setting to match that of the drive you are replacing.

Cable Select:

    • This setting is the default setting for PATA/IDE hard disk drives. With the Cable Select jumper setting, the BIOS determines whether a hard disk drive is Set as Master or Set as Slave by it’s position on the UDMA cable.
    • If the hard disk drive jumper is set to Cable Select and is connected to the black connector on the end of the UDMA cable, it is recognized as Set as Master for that PATA controller.
    • If the hard disk drive jumper is set to Cable Select and is connected to the grey connector on the middle of the UDMA cable, it is recognized as Set as Slave for that PATA controller.Note:When using Cable Select, your system must meet the following conditions:
      • Your systems host controller must support Cable Select.
      • Your hard drives must support Cable Select.
      • Your cable must support Cable Select.

Set as Master:

  • Use this setting if you are installing an additional hard disk drive to a single UDMA cable with a hard disk drive Set as Slave, jumper one hard disk drive to Set as Master, and the other to Set as Slave.
  • Use this setting if you are installing an additional hard disk drive to a single UDMA cable and the Cable Select setting is not recognized.


Set as Slave:

  • Use this setting if you are installing an additional hard disk drive to a single UDMA cable with a hard disk drive Set as Master, jumper one hard disk drive to Set as Master, and the other to Set as Slave.
  • Use this setting if you are installing an additional hard disk drive to a single UDMA cable and the Cable Select setting is not recognized.

32 GB Clip Setting:

Use this on computers manufactured before November 1998 when either you start up your computer and see the message, “Hard disk drive controller failure“, or your system stops responding during the boot process after installing a new drive. This occurs when the hard disk drive is too large for the BIOS to support.

Read More

How to install, partition, format, or reformat a WD external hard drive in Windows XP?

To partition and format the external hard drive with Disk Management, follow these steps:

  1. To begin, access Disk Management by right-clicking on My Computer and left-click on Manage. If you don’t have My Computer on your desktop, it should be located in your Start Menu.
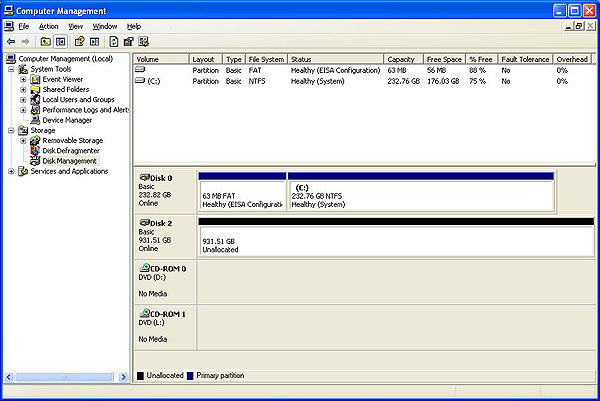
  2. The Computer Management window will open. It will have two panes. On the left pane, there will be a list of items. Under Storage, click on Disk Management. This will load a right pane with 2 windows on the right side. You may need to maximize the Computer Management window to see all your drives.
  3. In the lower right pane, you should see a graphical list of all available drives or devices. Find the drive listing that corresponds to the drive that you want to partition and format. It typically has a black barindicating unallocated space.If there is a blue bar, then the drive has already been partitioned and formatted. Make sure, that if you have data on the drive, you back it up before proceeding. Once you are ready to proceed, right-click on the blue bar and choose Delete Partition… You will get a pop-up window asking you if you really want to delete the partition. Click Yes. The bar should now be black.

    Image

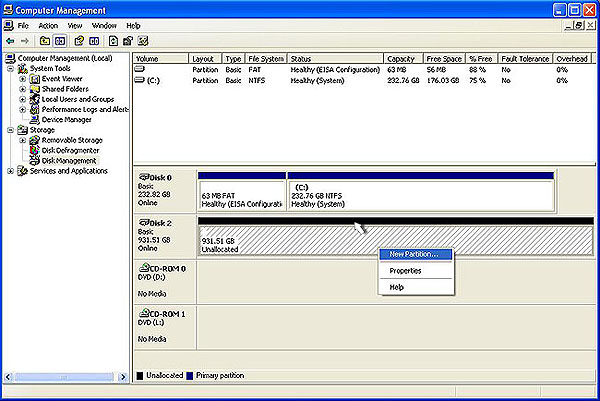
  4. Right-click on the black bar to see a menu of available options. Select New Partition…Image
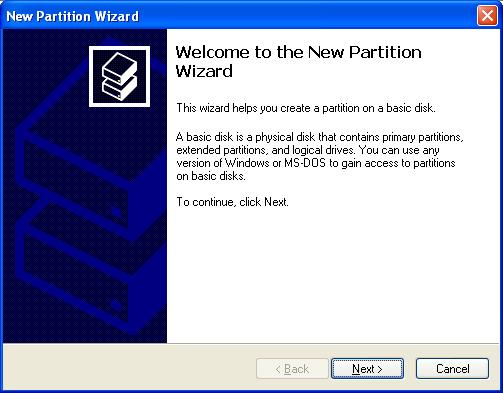
  5. The Welcome to New Partition Wizard will come up. Click on Nextto proceed to the next screen.Image
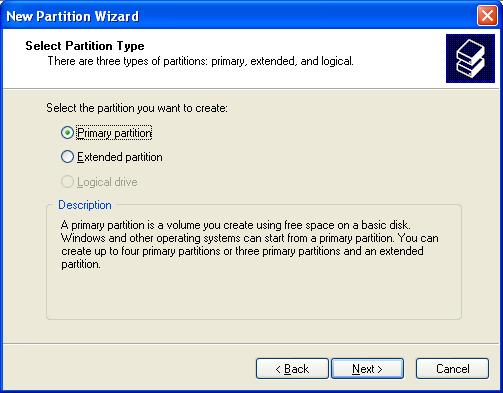
  6. Choose Primary Partition and press Next.Image
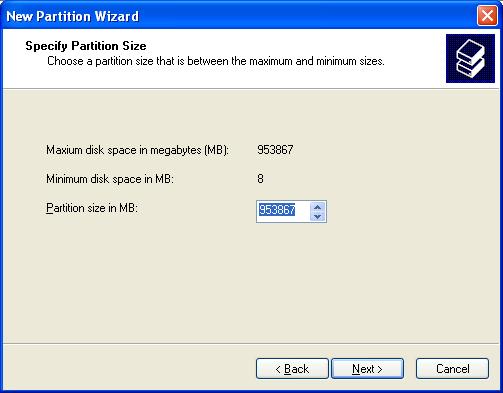
  7. This is where you can set a partition on the drive. By default Windows chooses the whole drive so click on Next.Note: You can also chose to create more than one partition by choosing a smaller size for this partition. Later, you can come back to this window, and create another partition on this drive, by repeating this process.

    Image

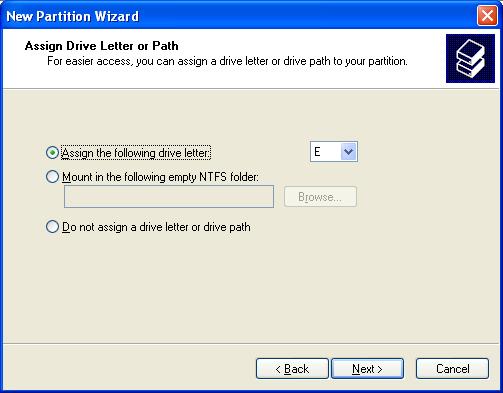
  8. Choose the drive letter that you want the drive to have. By default Windows will choose the next available drive letter. Then click on Next.Image
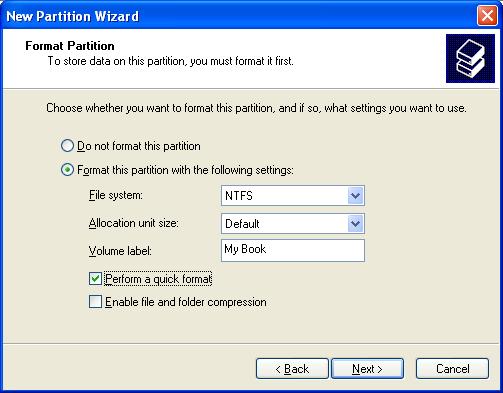
  9. This is the format screen. Make sure that the File System is set to NTFS. In the Volume Label field you can give the drive a name if you want. Check the box that says Perform a Quick Format so that the drive will be formatted quickly. Make sure to leave the Allocation unit size to Default, and then click Next.Image
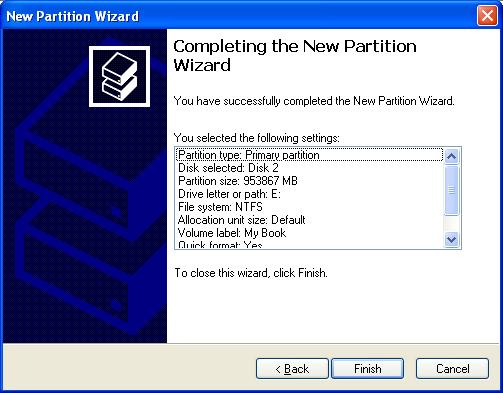
  10. This screen gives you a confirmation of all the steps that you just went through. Click on Next.Image
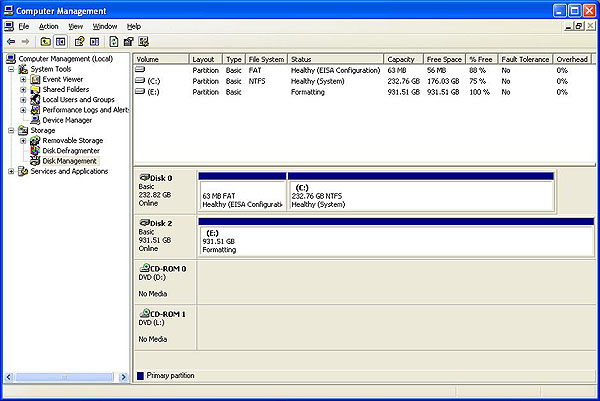
  11. The listing for the drive (Disk 2 in the picture below) will say Formattingas it formats the drive.Image
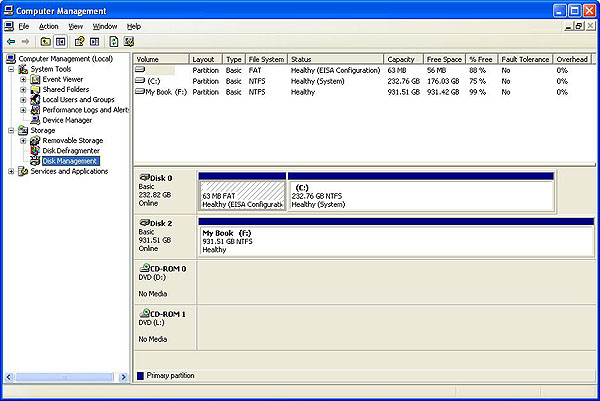
  12. When the drive is done (Disk 2 in the picture below) the bar will be blue and the drive will say Healthy.Image

Note: Once the drivers are installed, you can follow the directions to partition and format the hard drive, if necessary.

Read More

How to partition, format, or reformat an internal or external drive on Mac OS X 10.4?

Please follow the steps below to format hard drive:

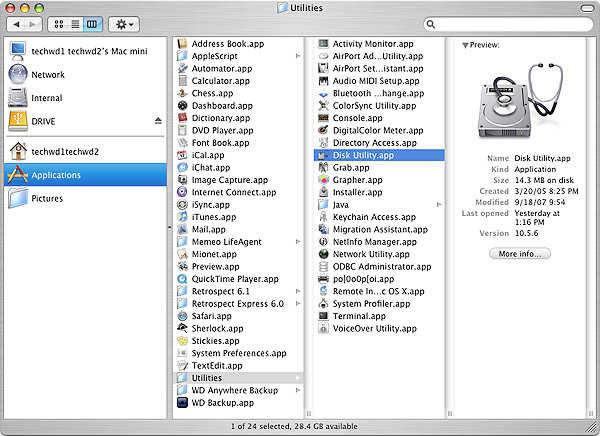
1. Double left-click on your Internal Mac drive and choose Applications -> Utilities and double-click on Disk Utilities.

format hard drive

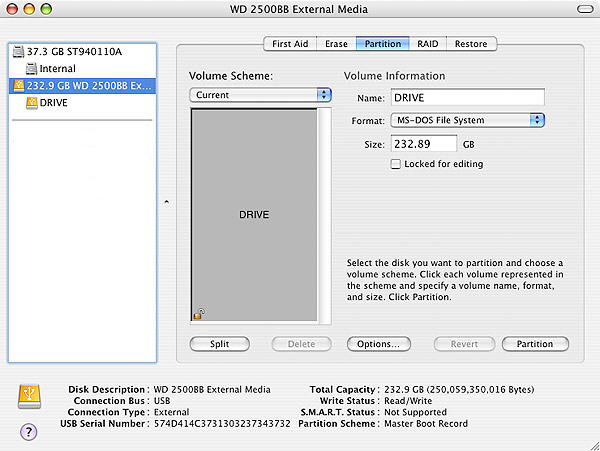
2. In the far left pane, choose the drive that you want to partition and format. Typically there are two listings for each drive unless you have more than one partition on a particular drive. Choose the drive listing that is farthest to the left for the drive that you want to format. It is usually directly above the name of the drive.

format hard drive

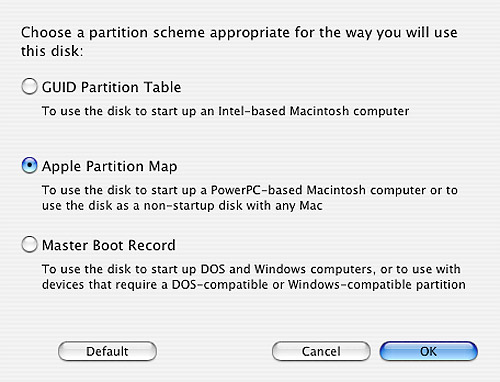
3. Click the Options button and choose Apple Partition Map. Then click on Ok.

format hard drive

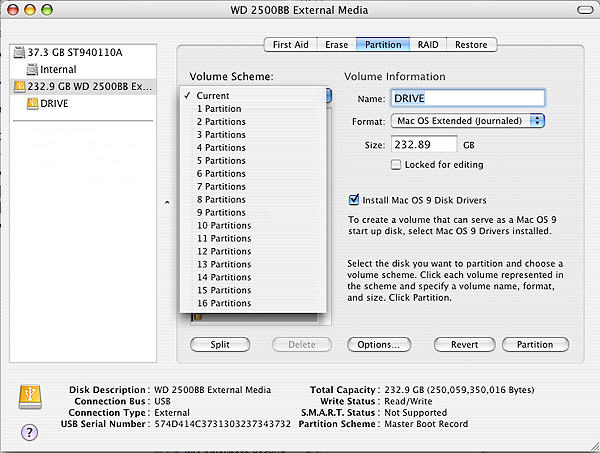
Note: If you cannot choose Options because it is grayed out, click on the Current dropdown menu and click on 1 partition. This should make the Options button useable again. Also, if you receive an error that the drive cannot be unmounted, shut down the Mac, unplug the drive from the Mac, turn you Mac back on and when it is fully loaded to the desktop, connect the drive and try again from Step 1.

format hard drive

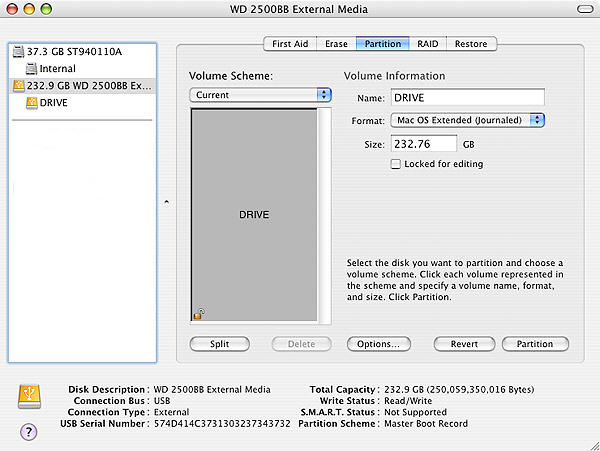
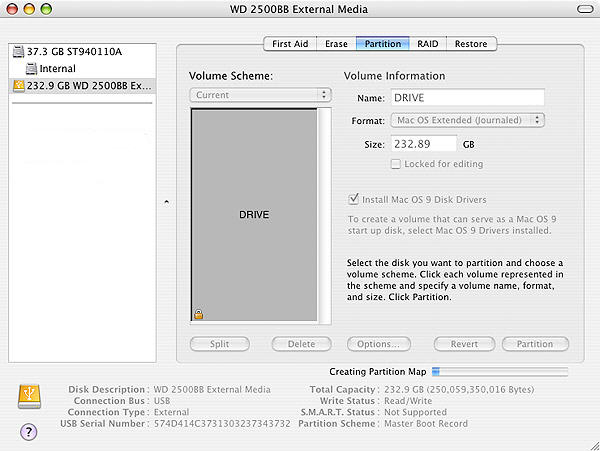
4. Change the Format to Mac OS Extended (Journaled). You can also give the drive a name by typing it into the Name box. When you are done, click on Partition.

Partition hard drive

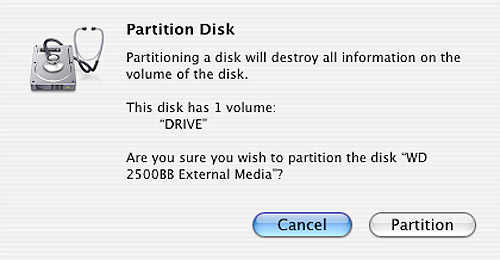
5. A box will come up letting you know that formatting and partitioning the drive will erase all of the information that is on the drive. If you don’t need any of the information on the drive, then click on Partition.

Partition hard drive

6. The drive is now formatting and you will see a status bar at the bottom that says Creating Partition Map. When it is done, this bar will go away and the drive should now show up on your desktop.

Partition hard drive

Read More