How to use FDISK to partition a Hard Drive?

FDISK Using FDISK to create a Primary Partition

1. Go to an MS-DOS prompt or use a Boot Floppy.
2. Enter -> fdisk
3. Answer the question for large disk support (Y=FAT32 N=FAT)
4. If option 5 exist then you have more than 1 drive attached to your system.
• You need to determine, which drive you are going to partition.
• Enter option 5 and look at your options. It will show you the Drive number and the drive letter associated with it.
• Enter the drive number you wish to select.
• Just a note if you have a Primary Master and a Primary Slave, then the Primary Master will be Drive 1 and the Primary Slave will be Drive 2.
5. Enter Option 4 to “Display Partition Information” to confirm the drive your working with and that there are currently no partitions. If you already have a Primary Master, then you will need to delete it first. (Make sure you save your data first with a proper backup.)
6. Enter option 1 to “Create DOS partition or Logical DOS Drive”.
7. Enter option 1 to “Create Primary DOS Partition”.
8. you will be asked to “Enter Partition size in MBytes or percent of disk space

At this point the drive is ready to be formatted.
If you set this drive up as an additional drive to your existing OS, then you can boot into that OS and begin using the drive.
If this will become a Windows boot disk, you can now start your Windows installation.

Considerations

      •Most functions in

FDISK

      are catastrophic. Make sure to backup your data first.
      •There are two types of Partitions.
      1. Primary.
      2. Extended.

Primary Partition.

      1. Is a boot partition where the Operating System will reside or can also be used for user data.
      2. Each Primary Partition is given a unique Drive Letter assignment. (C:)

Extended Partition.

      1. Each Extended Partition can have one or more Logical Drive(s) within the Extended Partition.
      2. Each Logical Drive is is given a unique Drive Letter assignment. (D:)
      • Hard Drive number.
      1. Windows classifies Hard Drives as Disk Drive 1 through Disk drive n.
      •IDE Drives are scanned in the following order and given a number of 1 through n.
      1. Primary Master.
      2. Primary Slave.
      3. Secondary Master.
      4. Secondary Slave.
      5. Tertiary Master.
      6. Tertiary Slave.
      7. Quantanary Master.
      8. Quantanary Slave.
      • SCSI Drives are scanned from SCSI ID 0 through 16 and given a number of 1 through nn.
      • After entering the FDISK command, you will get a prompt, asking if you want large disk support.
      1. If you reply Y (YES), then you will setup FAT32 partitions.
      2. If you reply N (NO), then you will setup FAT (FAT16) partitions, that have a maximum of 2g.
    3. If you did not receive this prompt then your fdisk command may be from Windows 95 (950A) and you should obtain a newer copy.
Read More

Can’t partition a SCSI hard drive with FDISK or Disk Utility?

SCSI Hard Drive If you are experiencing difficulty creating a partition on a SCSI disk drive, try these basic troubleshooting steps.

  1. Check all cable connections. Test data cable by trying a different cable or try the cable on a known working drive.
  2. Check the jumper settings.
  3. Check termination.
  4. Check the SCSI controller. Test it by trying a known good controller or a known working drive.
  5. Check SCSI controller default settings. Set the controller to asynchronous negotiation and the transfer rate to 10Mbs (or the slowest setting).
  6. Make this offending drive the only SCSI device in the system and re-test.
  7. Run a SCSI ‘low level’ format routine in the SCSI BIOS Setup Utility.
    Note: This will erase all the data on the drive.
  8. Try the drive in a different system.
Read More

How to install, format, and partition internal PATA/SATA drive in Vista?

How to install Internal hard drive installation instructions for Windows Vista using Vista installation process or Disk Management.

It is recommended you use Windows Vista to format and partition your hard disk drive when installing Vista on a boot drive or adding a drive as additional storage.

DiscWizard is your best choice if you want your new drive to become the new boot drive.  To do that, the operating system and the files on the old boot drive need to be copied to the new drive.

The following are step-by-step installation instructions on how to format and partition a drive in Windows Vista.

Fresh Vista Install:

  1. Physically install the hard drive in your computer. If this is a PATA / IDE drive, set the BIOS to Auto-Detect the hard disk. If this is a SATA drive, on some systems you may need to enable the SATA port in the BIOS before the computer recognizes the drive. For further information on navigating your system’s BIOS, please consult with your computer manufacturer’s documentation.
  2. Insert the Windows Vista CD-ROM and restart the computer.
  3. Follow on-screen prompts for setup. When installing Vista fresh on this hard drive, at the screen titled, “Which type of installation do you want?”, click Custom (advanced).
  4. At the “Where do you want to install Windows?” screen, select Disk 0 Unallocated Space and click Next.
  5. If this is a SATA drive and it is not recognized in the above step, you may need to install drivers provided by the motherboard manufacturer if the drive is connected directly to the motherboard, or install drivers provided by the controller card manufacturer if the drive is connected directly to a SATA PCI controller card. To install the driver for the SATA controller on the motherboard or PCI controller card, you will need to click Load Driver.
    Note: there are no Vista drivers provided by Seagate for any Seagate or Maxtor branded PATA or SATA drive, as the drives themselves are all Plug-and-Play within Windows Vista when connected internally on your computer.
  6. From here, proceed with the rest of the Vista installation.

Installing an Additional Data Drive in Windows Vista:
Note:If the second drive is pre-formatted or used in another Windows system, it is not necessary to re-format the drive. Follow the instructions below up to Step 2 and Vista should recognize the drive.

  1. Physically install the hard drive in your computer. If this is a PATA / IDE drive, set the BIOS to Auto-Detect the hard disk. If this is a SATA drive, on some systems you may need to enable the SATA port in the BIOS before the computer recognizes the drive. For further information on navigating your system’s BIOS, please consult with your computer manufacturer’s documentation.
  2. Restart the computer and boot into Windows Vista.
  3. Click on the Start button and select Control Panel. In the Control Panel, click on System and Maintenance. Scroll down and click on Administrative Tools. Double-click on Computer Management. On the left-hand side of the Computer Management window, click on Disk Management, located in the Storage section.
  4. In Disk Management you will see the active hard disks. Be patient, as it may take a minute or two for it to load the disk information. On the bottom half, you will see Disk 0, which is the Primary (or C:) drive. Disk 1 and greater are generally considered secondary storage drives.
  5. If the description of Disk 1 is “Not Initialized” then you must right-click on the Disk 1 icon and select Initialize.
  6. In the window that appears, click on the disk to be initialized and click on OK.
  7. Next, right-click on the Unallocated region of the basic disk, and select New Simple Volume.
  8. In the New Partition Wizard, click Next. Select the type of partition you want and follow all on-screen instructions.  After finishing, the section of the disk that said “Unallocated” should say “Formatting” for a few seconds.  Once it is finished formatting, it will say, “Healthy”.
Read More

How to partition, format, or reformat an internal or external drive on Mac OS X 10.4?

Please follow the steps below to format hard drive:

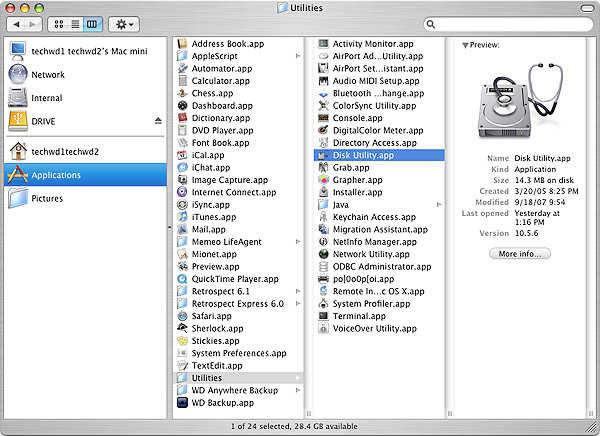
1. Double left-click on your Internal Mac drive and choose Applications -> Utilities and double-click on Disk Utilities.

format hard drive

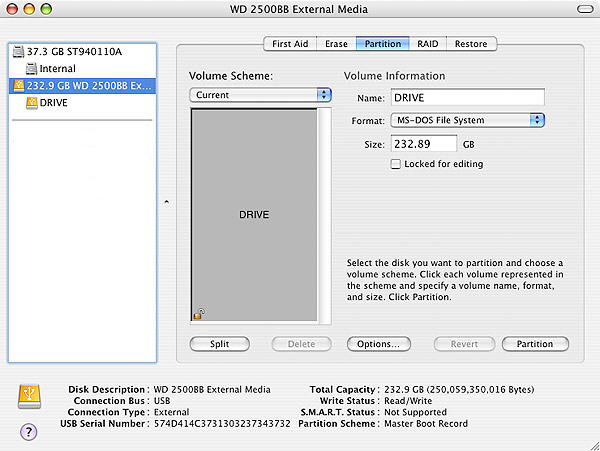
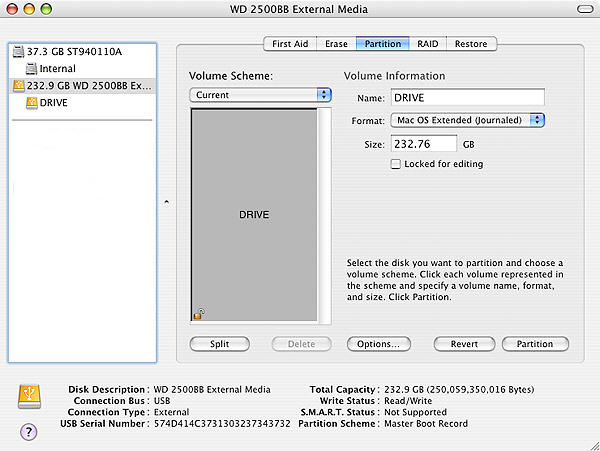
2. In the far left pane, choose the drive that you want to partition and format. Typically there are two listings for each drive unless you have more than one partition on a particular drive. Choose the drive listing that is farthest to the left for the drive that you want to format. It is usually directly above the name of the drive.

format hard drive

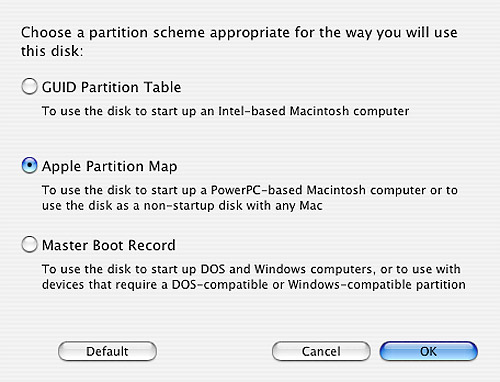
3. Click the Options button and choose Apple Partition Map. Then click on Ok.

format hard drive

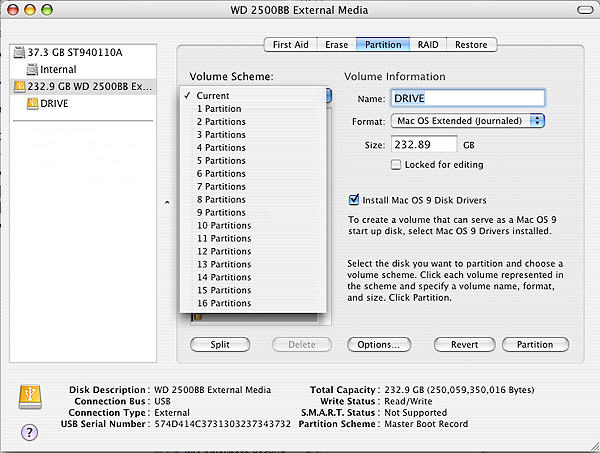
Note: If you cannot choose Options because it is grayed out, click on the Current dropdown menu and click on 1 partition. This should make the Options button useable again. Also, if you receive an error that the drive cannot be unmounted, shut down the Mac, unplug the drive from the Mac, turn you Mac back on and when it is fully loaded to the desktop, connect the drive and try again from Step 1.

format hard drive

4. Change the Format to Mac OS Extended (Journaled). You can also give the drive a name by typing it into the Name box. When you are done, click on Partition.

Partition hard drive

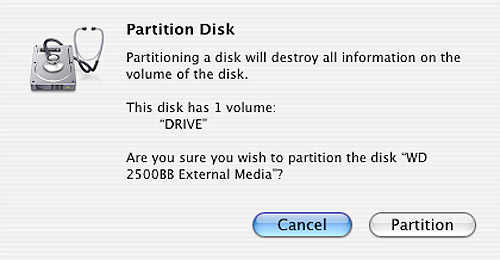
5. A box will come up letting you know that formatting and partitioning the drive will erase all of the information that is on the drive. If you don’t need any of the information on the drive, then click on Partition.

Partition hard drive

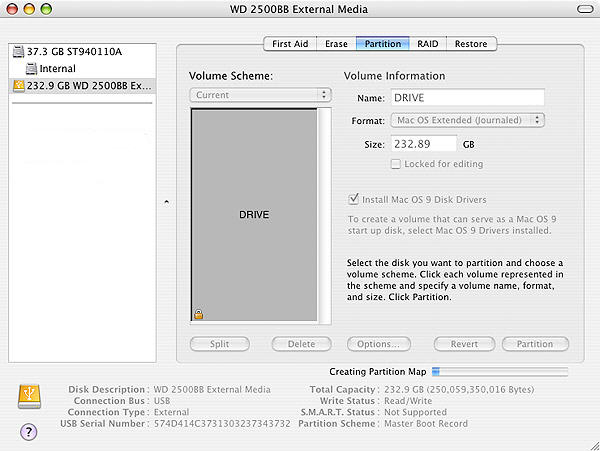
6. The drive is now formatting and you will see a status bar at the bottom that says Creating Partition Map. When it is done, this bar will go away and the drive should now show up on your desktop.

Partition hard drive

Read More