Change From RAID 0 to RAID 1

I am puchacing a new computer that is configured for raid 0. I would like to reconfigure it for raid 1. I prefer to reinstall win 7 to get rid of the junk new machines are shipped with so OS reinstallation is not a problem. Will I need new drivers or hardware (it is a Dell XPS system).

RAID0_RAID1

Change From RAID 0 to RAID 1

It should be fine. Just download all necessary drivers from dell. You may want to create media disks before doing this so that you can restore to factory settings if need be.you need not new hard drives, as we know the raid 0 is congifure with two hard drive, and raid 1 also need 2 hard drives, you just recongigure the raid array, and reinstall the windwos 7, that’s OK, you’d better do a fresh format before reconfigure.

Read More

To RAID-0 or Not To RAID-0

I was thinking about going down the RAID road with my rig and was wondering what people think is best RAID-0 or RAID 0+1(This is what i was thinking) or is there a better option advice would be well recived befor i go spend £150 on 3 more new drives to make the 4 needed for 0+1 and could you tell me how RAID 0+1 and RAID 1+0/10 differ please.

As was said up, it’s necessary to know the application before accurate advice can be given. RAID 0 will benefit you in database access, huge spreadsheets, video editing, CAD rendering and a few other specialized apps. For everybody else, all its going to do for you is getting you bragging rights for good benchmark scores.

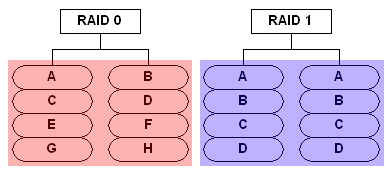
RAID 0

If you need data redundancy, and in reality who doesn’t, RAID 1 is a viable solution. For most data control situations an NAS presents a very convenient alternative and it easily performs the same job for multiple boxes. All data can be kept on the NAS with images of a standard “programs drive” as well as individual boot drives for each machine on the network, making cold metal restores a cinch. Many proprietary RAID formats will even allow ya to do rebuilds and expansions on the fly via “Hot Swap”. It’s also rather “portable” and the joke in my SOHO is that in case of fire, I can grab the NAS handle and run …. and after the data is safe come back in for the any employees, wife, kids, etc.

If your concern is only “one box”, RAID 1 provides data redundancy…..but so do other alternatives …. i.e. tape / optical, cloud backups …… RAID 0 , again unless you have specialized applications, will serve no observable benefit other than nice benchmark scores.

Read More

How to sepup a RAID 0/1 Array with WD SATA RAID Controller?

sepup a RAID 0/1 Array with WD SATA RAID ControllerSteps to setup A RAID 0 and RAID 1 Array with WD SATA RAID Controller & Two SATA Hard Drives

1. Steps to create a RAID 0 Array:

  1. With the computer powered off, follow the instructions for installing the RAID controller correctly and connect both Serial ATA hard drives to the controller.
  2. Boot your computer with the controller and drives already installed.
  3. Watch your boot screens for a prompt that will ask you to press the Control and F keys at the same time to enter the Fastbuild utility and press those keys to enter.
  4. Press the 1 key to enter Auto Setup.
  5. Verify that the top of the screen says Optimize Array for: Performance.
  6. If the top of the screen says Security instead of performance, highlight the word Security and press the right arrow button to change the word to Performance.
  7. You should see that two hard drives are being used in the array and you will also see the total size of the array in MB.
  8. Press the Control and Y keys at the same time to save the array configuration.
  9. Press the Y key to create and quick initialize the array.
  10. You will be warned that all data on the drives will be erased, press the Y key to proceed.
  11. The array is now created, press any key to reboot.

Note: A RAID 0 array is not fault tolerant. It is recommended that you backup any important data that you decide to store on the array.

2. Steps to create a RAID 1 Array:

  1. With the computer powered off, follow the instructions for installing the RAID controller correctly and connect both Serial ATA hard drives to the controller.
  2. Boot your computer with the controller and drives already installed.
  3. Watch your boot screens for a prompt that will ask you to press the Control and F keys at the same time to enter the Fastbuild utility and press those keys to enter.
  4. Press the 1 key to enter Auto Setup.
  5. Verify that the top of the screen says Optimize Array for: Security.
  6. If the top of the screen says Performance instead of Security, highlight the word Performance and press the right arrow button to change the word to Security.
  7. Press the Control and Y keys at the same time to save the array configuration.
  8. Press the Y key to create and quick initialize the array.
  9. You will be warned that all data on the drives will be erased, press the Y key to proceed.
  10. The array is now created, press any key to reboot.

Note: A RAID 1 array is designed for fault tolerance. You will not notice any performance increase in your computer after creating a RAID 1 array. A RAID 1 array uses the second hard drive to copy the data of the first drive. Should one of the hard drives fail, you will still be able to boot your computer using the second hard drive.

Important: After creating a RAID 1 array, the total capacity of both hard drives will not appear as usable space in Windows. Because the second hard drive is being used to store the exact same data of the first drive, the usable capacity in Windows will be the capacity of only the first hard drive.

* To use the array for extra data storage only:

  • Install the latest service pack for your operating system to enable large drive support and use Disk Management to partition and format the array.

* To use the array as your bootable system drive:

  • Set your BIOS to boot to CD first and boot from your Windows 2000/XP CD to load your operating system onto the array.
  • Windows will treat the array as one large drive and will install on the array just as it would on a single drive.
  • When you are prompted by Windows setup to press the F6 key to install SCSI or RAID drivers, you will need to press F6 and insert the driver disk that came with your RAID controller.
  • Once the drivers for the controller are installed you will be able to finish the installation of Windows 2000/XP onto the array. After the installation of Windows, please install the latest service pack for Windows to enable large drive support and avoid data corruption.

Note: Your system BIOS may require you to change the order of your boot sequence before you can boot your computer from a controller. For more information about adjusting options in your system BIOS, please contact the manufacturer of your computer or motherboard.

Read More

Case Study: How to create a RAID 0 (stripped) Array

Raid 0 Array (Stripped) Create a RAID 0 (stripped) array using the Western Digital serial ATA RAID controller and two serial ATA drives.

Note: A RAID 0 array is not fault tolerant. It is recommended that you backup any important data that you decide to store on the array.

To create a RAID 0 array please follow the steps below:

  1. With the computer powered off, follow the instructions for installing the RAID controller correctly and connect both Serial ATA hard drives to the controller.
  2. Boot your computer with the controller and drives already installed.
  3. Watch your boot screens for a prompt that will ask you to press the Control and F keys at the same time to enter the Fastbuild utility and press those keys to enter.
  4. Press the 1 key to enter Auto Setup.
  5. Verify that the top of the screen says Optimize Array for: Performance.
  6. If the top of the screen says Security instead of performance, highlight the word Security and press the right arrow button to change the word to Performance.
  7. You should see that two hard drives are being used in the array and you will also see the total size of the array in MB.
  8. Press the Control and Y keys at the same time to save the array configuration.
  9. Press the Y key to create and quick initialize the array.
  10. You will be warned that all data on the drives will be erased, press the Y key to proceed.
  11. The array is now created, press any key to reboot.

To use the array for extra data storage only:

  • Install the latest service pack for your operating system to enable large drive support and use Disk Management to partition and format the array.

To use the array as your bootable system drive:

  • Set your BIOS to boot to CD first and boot from your Windows 2000/XP CD to load your operating system onto the array.
  • Windows will treat the array as one large drive and will install on the array just as it would on a single drive.
  • When you are prompted by Windows setup to press the F6 key to install SCSI or RAID drivers, you will need to press F6 and insert the driver disk that came with your RAID controller card.
  • Once the drivers for the card are installed you will be able to finish the installation of Windows 2000/XP onto the array. After the installation of Windows, please install the latest service pack for Windows to enable large drive support and avoid data corruption.

Note: Your system BIOS may require you to change the order of your boot sequence before you can boot your computer from a controller. For more information about adjusting options in your system BIOS, please contact the manufacturer of your computer or motherboard.

Read More

Which RAID Mode Should You Choose?

1. Speed (RAID 0)

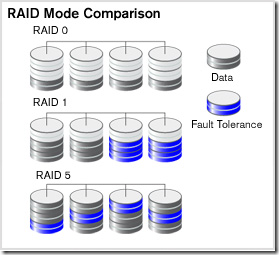
Set in high-performance mode (also called striped mode or RAID 0) the storage system gives you the power you need when you’re:raid 0

  • Designing huge graphics and need a lightning-fast Photoshop scratch space.
  • Recording large DV files while maintaining clean audio performance.
  • Editing DV or HD video and want a smooth work flow with no dropped frames.
  • Rendering complex 3D objects or special effects.
  • Performing disk-intensive database operations.
  • Driven to be the first geek on your block with a computer so fast it blows your
    socks off.
      Why is RAID 0 so fast? It’s a bit complicated, but suffice it to say that two or more heads, or in this case, drives, are better than one. Picture multiple hoses filling a bucket at the same time or several men bailing a boat and you can understand why two drives striped are

faster

      than one. Data is saved (striped) across both drives and accessed in parallel by all the drives so you get

higher data transfer rates

      on large data accesses and

higher input/output rates

      on small data accesses.

Raid Mode

2. Data protection (RAID 1)

Set the system to data protection mode (also known as mirrored mode or RAID 1) and the capacity is divided in half. Half of the capacity is used to store your data and half is used for a duplicate copy.

Why do I want that kind of redundancy? It’s your data, your family pictures, your movie of baby’s first steps, your first novel. Is it important? You decide. If it is, then RAID mirroring is for you.

3. Data protection and speed (RAID 5)

In systems with three or more drives. we recommend that you set the system to RAID 5. This gives you the best of both worlds: fast performance by striping data across all drives; data protection by dedicating a quarter of each drive to fault tolerance leaving three quarters of the system capacity available for data storage.

Read More

RAID 0 Data Recovery

Raid1. RAID 0 Data Recovery FAQ:

Q: What is a “RAID 0” configuration?
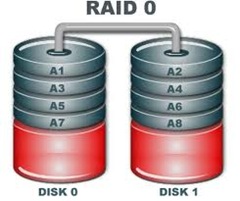
A: A RAID 0 (zero) volume set is a group of hard disk drives that are combined and accessed together based on a pre-defined configuration to allow for “data striping” across multiple drives. The term “RAID” refers to a “Redundant Array of Inexpensive (or Independent) Disks”. RAID 0 drive sets are also described as “striped without parity” and “non-redundant” volumes.

Q: What is meant by the term “disk striping”?
A: Within a disk striping (RAID 0) volume, information will be written evenly , or “striped”, over at least 2 (if not more) disk drives.

Q: How many drives are needed for a RAID 0 volume?
A: To establish a RAID 0 volume, a minimum of at least 2 hard disk drives ar required. Unlike RAID 1, the number of drives used in the array can be an odd or even number.

Q: What is the difference between “hardware” and “software” RAID 0 configurations?
A: Hardware-based RAID 0 uses a physical controller (either as a separate plug-in board or as part of the motherboard) that provides for the striping of data across the drives in the volume. With a software-based RAID 0 volume, the drives are attached to a normal drive contoller and software controls the order and writing to drives in the volume set.

Q: What are the benefits of using drives set up as a RAID 0?
A: A RAID 0 (disk striping) set will use the maximum amount of available storage capacity of each drive in the array, and allows for faster access and retrieval of data.

Q: What are the negatives associated with RAID 0?
A: RAID 0 (disk striping) does not provide any protection against drive failures. If one or more drives fail, all of the information contained on the volume becomes totally inaccessable. On the other hand, with a mirrored disk volume (RAID 1), information is written to the first drive and then to a second (or “mirror”) drive at the same time. If one of the hard drives in the mirror volume fails, the remaining hard drive can be placed in service as a single drive with no loss of information. Similar to a RAID 0 volume, RAID 1 volumes require a minimum of two (2) drives.

Q: Can RAID 0 be combined with another type of RAID, like RAID 1?
A: The combination of striping and then mirroring is referred to as RAID 0+1. In this scenario, the configuration will provide disk striping (RAID 0) across 2 or more drives and will “mirror” the data in real-time to a duplicate drive set (RAID 1). This unique combination will provide fault tolerance, but it does so at the expense of usable storage space. A volume established as a RAID 0+1 volume will need four (4) hard drives at a minimum to be configured.

Q: Can data be recovered from a re-formatted RAID 0 volume?
A: Many times information is still recoverable, depending on how the drives were re-formatted. Re-formatting a volume using Windows, for example, will create what will appear to be a new “clean” volume – but the original data will still be on the disk in the “free and available” space. A low-level format to “wipe” or overwrite every single block takes a considerable amount of time and destroys the original data.

Q: Could data recovery software utilities be used to recover my RAID 0?
A: Perhaps, but it wouldn’t be the safest approach. Most data recovery software will require the read / write heads to constantly travel over areas of the original disk that, if there is any physical damage, could render the surfaces useless and beyond recovery. The safest method of recovering data from a failed or corrupted RAID 0 volume (or with any storage device) is to create a block-level copy of every sector on each hard drive. The copied image is then used to reconstruct the original volume and rescue the required files and directories. This approach, while more time consuming, maintains and preserves the data integrity of the drive media and limits the number of times that the original drive needs to be accessed. It also protects against any writing to the original media, which could result in an inadvertent overwrite of the data that needs to be recovered.

Q: With RAID 0, if one or more drives become corrupted or fail, is data recoverable?
A: In most situations, data will be recoverable. The quality and integrity of the data recovered will depend on the extent of the damage incurred to each failed storage device. The drives will need to be addressed and recovered individually before attempting to address the set as a volume.

2. How Raid 0 Data Recovery?

Use at your own risk, and always make backups of your disks before performing any data recovery procedure.

RAID 0 is simply blocks of data striped between two disks. Block size can be anything, but is typically 64kB (128 sectors) Disk 0 will contain the first sector 0 through 127, disk 1 will contain sectors 128 through 255, and this will continue to alternate throughout the entire virtual disk. One complication can be expected in some cases, and that is the presence of an offset. An offset is a number of sectors before the first striped block. The presence of an offset is common in Adaptec cards. The offset can easily be found by searching for the partition table. When found, simply take the sector number where the partition table is located, and clone the disk to a file starting with this sector.

The next step is to find the stripe size. This is a very critical step and you must be absolutely sure. Typically the stripe size will be the same as the default setting for the card that was used. For instance, a Dell PERC 2 adaptec RAID card has a stripe size of 32K (64 sectors) and an offset of 64K (128 sectors). Use this as your starting point if possible. If you do not know the card type used, it is wise to use 64K (128 sectors) as your starting point as this is most common among all cards.

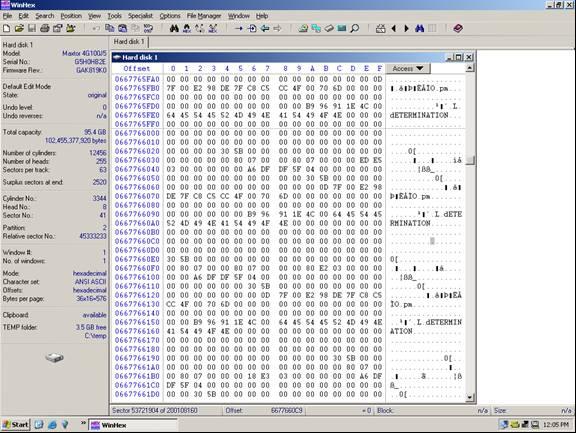
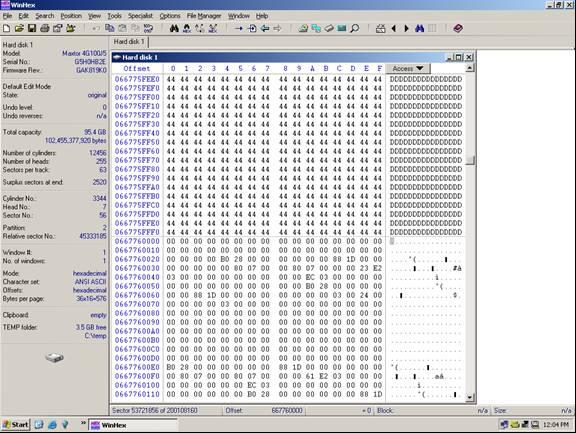
Now use Winhex to find a location on the disk that is easy to see a pattern. See the example below.

Raid 0 data recovery

Notice above how we have text, apparently from a database of some sort. This text can be used to identify a data pattern. Now look at the current sector (53,721,904). Divide this number by the suspected stripe size in sectors. In this case the stripe size we are attempting to validate is 128 sectors. The resulting number will probably not be a whole number. In this case it is 419702.375. Take the whole number of 419702 and multiply this by the suspected stripe size (128). The resulting number is what we will refer to as the stripe break point. It is necessary to know this simple calculation for all types of RAID except RAID 1 (mirroring).

Find the break point:
53721904/128=419702.375
419702*128 = 53721856

Answer: A break point is located at sector 53, 721, 856 (see illustration below)

raid level 0 data recovery

Notice how at the exact break point of 53, 721, 856 we have a definite difference of data. This is because the stripe is from a separate area of the volume. Not all break points will be this easy. In some cases you will have to look at the actual data and determine if consistency exists. Train your eyes to catch a break point while you are scrolling the sectors using the page down function, and you will become very proficient. You will often have to repeat the steps above on different areas of the disk if the data is too inconsistent to determine the break point.

Once the break point is discovered, you will then be able to start the de-striping process. Using a software utility, such as the hex editor Winhex, place the disk images in the proper order, adjust the stripe size, and clone to a hard disk. Once complete, the disk should be mountable. Refer to the partition and boot sector repair section of this manual if the disk is not mountable, or review the stripe break points.

Read More

RAID Array & Server Glossary of Computer Terms (Letter R)

RAID
Redundant Array of Independent Disks, a collection of two or more disks working together in an array. Mylex RAID controllers implement this technology to connect up to 15 SCSI devices per channel. The different forms of RAID implementation are known as “RAID levels.” See also Berkeley RAID Levels, Disk Array, and RAID Levels.

The system manager or integrator selects the appropriate RAID level for a system. This decision will be based on which of the following are to be emphasized:

  • Disk Capacity
  • Data Availability (redundancy or fault tolerance)
  • Disk Performance

RAID Adapters
See RAID Controller

RAID Advisory Board (RAB)
An association of companies whose primary intention is to standardize RAID storage systems. Mylex is a member of RAB.

RAID Controller
Low cost RAID controllers that use SCSI channels on the motherboard.

RAID Levels
Mylex disk array controllers support four RAID Advisory Board approved (RAID 0, RAID 1, RAID 3, and RAID 5), two special (RAID 0+1, and JBOD), and three spanned (RAID 10, 30, and 50) RAID levels. All DAC960, AcceleRAID, and eXtremeRAID series controllers support these RAID levels. See also Berkeley RAID Levels.

– Level 0:
Provides block “striping” across multiple drives, yielding higher performance than is possible with individual drives. This level does not provide any redundancy.

– Level 1:
Drives are paired and mirrored. All data is 100 percent duplicated on a drive of equivalent size.

– Level 3:
Data is “striped” across several physical drives. Maintains parity information, which can be used for data recovery.

– Level 5:
Data is “striped” across several physical drives. For data redundancy, drives are encoded with rotated XOR redundancy.

– Level 0+1:
Combines RAID 0 striping and RAID 1 mirroring. This level provides redundancy through mirroring.

– JBOD:
Sometimes referred to as “Just a Bunch of Drives.” Each drive is operated independently like a normal disk controller, or drives may be spanned and seen as a single drive. This level does not provide data redundancy.

– Level 10:
Combines RAID 0 striping and RAID 1 mirroring spanned across multiple drive groups (super drive group). This level provides redundancy through mirroring and better performance than Level 1 alone.

– Level 30:
Data is “striped” across multiple drive groups (super drive group). Maintains parity information, which can be used for data recovery.

– Level 50:
Data is “striped” across multiple drive groups (super drive group). For data redundancy, drives are encoded with rotated XOR redundancy.

Note: The host operating system drivers and software utilities remain unchanged regardless of the level of RAID installed. The controller makes the physical configuration and RAID level implementation.

RAID Migration
A feature in RAID subsystems that allows for changing a RAID level to another level without powering down the system.

Read-Ahead Cache
A caching strategy whereby the computer anticipates data and holds it in cache until requested.

Recovery
The process of reconstructing data from a failed disk using data from other drives.

Redundancy
The inclusion of extra components of a given type in a system (beyond those the system requires to carry out its functions).

Rotated XOR Redundancy
XOR refers to the Boolean “Exclusive-OR” operator. Also known as Parity, a method of providing complete data redundancy while requiring only a fraction of the storage capacity of mirroring. In a system configured under RAID 3 or RAID 5 (which require at least three SCSI drives), all data and parity blocks are divided amongst the drives in such a way that if any single drive is removed (or fails), the data on it can be reconstructed using the data on the remaining drives. In any RAID 3 or RAID 5 array, the capacity allocated to redundancy is the equivalent of one drive.

Read More